Saturday, July 7, 2012

Bacon Guacamole Grilled Cheese Sandwich


It should come as no surprise to those of you who read my blog that, given my family's obscene love for cheese, we also love grilled cheese sandwiches. Because of this, I am always on the lookout for fancy, delicious-sounding grilled cheese. Our love of cheese is probably only rivaled by our love of bacon. Seriously, this family of mine can go through some bacon! So, a grilled cheese with bacon?! Awesome! Add in some creamy guacamole, and it sounds freakin' amazing! I used to not like guacamole or avocados. My parents LOVED them, and I never saw the appeal of the weird, squishy food. I was never a vegetable hater (or is an avocado a fruit?), but avocados just never did it for me. When I was pregnant with Boy #1 I had a veggie sandwich for lunch one day and almost threw up when I tasted the avocado and it's squishyness in my sandwich. Yuck. But then somehow after he was born, I embraced the avocado and LOVED it. Go figure...pregnancy does weird things to you. So, anyway, when I saw this sandwich on Pinterest I had to try it!!

Bacon Guacamole Grilled Cheese Sandwich
Source: closetcooking.com via Pinterest
Ingredients listed are for one sandwich

2 slices bacon
2 slices sour dough bread
1 tablespoon butter, room temperature
1/2 cup jack and cheddar cheese, shredded
2 tablespoons guacamole, room temperature
1 tablespoon tortilla chips, crumbled (optional)

Cook the bacon until crispy and set aside on paper towels to drain.

Butter one side of each slice of bread, sprinkle half of the cheese onto the unbuttered side of one slice of bread followed by the guacamole, bacon, tortilla chips, the remaining cheese and finally top with the remaining slice of bread with the buttered side up.

Grill over medium heat until golden brown and the cheese has melted, about 2-3 minutes per side.

*****

This sandwich definitely delivered!! I loved the addition of the tortilla chips in the sandwich for a little bit of crunch. I'm not normally a chip-in-sandwich-eater (except when I'm pregnant...which I'm not, I'm just saying I did it when I was pregnant), but this was pretty tasty. I love making my own guacamole, and if you've never tried it, you really should. It's so easy--mash up an avocado or two or ten (you know, depending on how much you need), add in a little salsa (homemade or from a jar, whatever floats your boat), salt, and maybe a squeeze of lime juice, and you're good to go. My only complaint was that I think I had too much guac and not quite enough cheese for the amount of guac I had used. But, like I said, this was super tasty, and we will definitely have it again!


Sunday, June 24, 2012

Italian Beer Bread with Sun Dried Tomato Butter


This was my final contribution to my grandma's happy hour birthday party. Back when Boy #1 turned six in February, he requested Little Ceasar's pizza for his family birthday dinner. Since no one other than my two kids are big fans of that, I made an executive decision to have a happy hour type party for him, so he could still have his pizza, but the rest of us wouldn't be forced to eat it. My brother and his girlfriend came down from Seattle for the party, but she ended up getting really sick while they were visiting, which meant no one wanted to touch our house with a 10 foot pole, meaning my family didn't end up coming over for his birthday dinner. Instead we had our best friends over to celebrate with us. I had this bread recipe slated to make for it, so I went ahead and made it. We all liked it so much I decided to make it again so my family could actually try it!

Italian beer bread and sun dried tomato butter
Source: SnappyGourmet.com via Pinterest

Bread:
3 1/2 cups (15oz.) all-purpose flour
1/2 cup granulated sugar
1/2 cup grated parmesan cheese
1 tablespoon baking powder
1 tablespoon Italian seasoning
1 teaspoon salt
1/2 teaspoon garlic powder
1/4 teaspoon onion powder
1/4 teaspoon black pepper
12 oz. beer
2-3 tablespoons unsalted butter, melted (optional)

Butter:
1/2 cup unsalted butter, softened
1/4 cup sundried tomatoes in oil, chopped
1/4 teaspoon salt
1/8 teaspoon pepper

Preheat oven to 350 degrees F. Spray a 9×5 inch bread pan with nonstick cooking spray.
In a large bowl, whisk together flour, sugar, cheese, baking powder, Italian seasoning, 1 teaspoon salt, garlic powder, onion powder, 1/4 teaspoon pepper until well combined. Pour in beer and stir until just combined.

Place dough in prepared bread pan. Spoon 2-3 tablespoons of butter on top of bread if desired.

Bake bread for about 50-70 minutes or brown and crispy around edges. Cool slightly then remove from pan.

Meanwhile, place 1/2 cup butter, sundried tomatoes, 1/4 teaspoon salt, and 1/8 teaspoon pepper in food processor and process until smooth. Serve with bread.

Notes
SNAPPY TIPS: Be sure to cook the bread until is browned and crispy around edges so that it’s cooked through the middle. If you don’t add butter to the top of the bread, you can cover the bread halfway through the cooking time to help prevent overbrowning before the bread is cooked through.

*****

Like I said above, I had already made this before, so I knew it was a winner. I love a good quick bread recipe, and this comes together really easily. The sun dried tomato butter is tasty, too, although it is really hard to spread if you keep it in the fridge. This is a relatively easy appetizer to make, and I know it's one that I'll make a lot in the future.


Greek Yogurt Queso Dip


When I was working up what I'd make for my grandma's birthday party, Boy #1 requested cheese dip. I had pinned this queso dip on Pinterest and thought I'd give it a try. If you remember, I love Greek yogurt, so I was excited to give this a try.

Greek Yogurt queso
Source: littlebittybakes.com via Pinterest

2 tablespoons unsalted butter
2 tablespoon all-purpose flour
12 ounces plain Greek yogurt
8 ounces mild cheddar cheese, shredded or cubed
2 tablespoons grated parmesan cheese
1/4 teaspoon chili powder
Dash of cayenne
Salt & pepper, to taste

In a medium saucepan, melt the butter over low heat.  Stir in the flour, using a wire whisk to stir until smooth.  Add the yogurt; stir until smooth.  Add the remaining ingredients; stir constantly until cheese is completely melted and smooth.
Serve warm with tortilla chips and/or fresh vegetables.  (you can keep it on the stove on very low heat, or put it in a crock pot on warm, until serving).

Nutrition stats per 2 tablespoons: 90 calories, 6g fat (4g sat), 130 mg sodium, 1g sugar, 6g protein

*****

Since we had an event to attend before the party, I mixed this up at home before we left and then reheated it once it was time for the party. I really love party food that can be made ahead of time so I'm not having to run around like a crazy woman getting everything ready right before a party. Ha! Who am I kidding?! I'm generally doing that anyway! This was really easy to put together, and I loved the extra zip/tang the Greek yogurt provided. Boy #1 ended up not really being a fan of it, but I loved it and thought it was great. I'd definitely make it again! Actually I bet if it was thinned out a bit with some milk, it would be a great sauce for mac and cheese!


Baked Brie in Bread Bowl


This was another recipe I made for my grandma's 94th birthday party. If you're on Pinterest, it's entirely possible you saw this recipe because it definitely made the rounds. I normally do some kind of baked brie for the party, and this looked awesome. I'm a sucker for a bread bowl--be it clam chowder, spinach dip or whatever--so this appealed to me on many levels!! Plus warm, melty cheese INSIDE bread?! Yes please!

Baked brie in bread bowl
Source: McCormick website via Pinterest

1 1/2 teaspoons McCormick® Chili Powder
1/2 teaspoon McCormick® Garlic Powder
1/2 teaspoon McCormick® Mustard, Ground
1/2 teaspoon sugar
1 loaf round sourdough bread (about 1 pound)
1 tablespoon butter, softened
1 round (8 ounces) Brie cheese

1. Preheat oven to 350°F. Mix spices and sugar in small bowl. Set aside. Place bread on baking sheet. Cut circle in top of bread and remove bread center to make room for the Brie. 

2. Spread butter on bread. Sprinkle with 2 teaspoons of the spice mixture. With knife, make 2-inch cuts at 1-inch intervals around edge of bread. Remove rind from Brie and place in bread. Sprinkle Brie with remaining spice mixture. Replace top of bread. 

3. Bake 20 to 30 minutes. To serve, remove bread top and break into bite size pieces. Dip bread pieces in hot Brie.

per serving
Calories: 263
Fat: 11 g
Carbohydrates: 30 g
Cholesterol: 32 mg
Sodium: 545 mg
Fiber: 2 g
Protein: 11 g

*****

I gotta say, I was most excited for the bottom layer of this, the bottom of the bread bowl that would be coated with melty brie. Kind of like the best part of a clam chowder bread bowl is the bottom of the bowl that's soaked with chowdery goodness. It was pretty awesome having cubes of bread along the side of the brie to just tear off and smear with cheese. Oh, cheese, how I love thee! This was dedfinitely a cool take on baked brie. Not sure if I like this or the typical brie-wrapped-in-puff-pastry baked brie better. The puff pastry version is faster/easier, but this one is awesome having bread right there to dip in it.


Giada's Stuffed Baby Peppers


We are on vacation once again, however I don't have an internet connection (what kind of rental house in this day and age doesn't offer wifi?!), so I'm just typing this up and saving it and will upload once we're home at the end of the week. We're on the opposite coast this time, spending a week on the Central Coast area of CA with my husband's family. Once again, it's cloudy. At least in CA the clouds usually burn off, although the past two days they sadly have not. THe husband and I are spending the day wine tasting in Paso Robles while his lovely sister watches our kids for us, so that's probably a sure sign the sun will be shining on the beach all day. Oh well, I'll be tasting wine with the love of my life, so I can't complain too much.

You may remember that every year for my grandma's birthday, she likes to have a happy hour birthday party where we feast on all sorts of appetizers and wine. I always spend weeks trying to figure out what my contributions will be. I had seen these in a Giada cookbook when I was searching for dinner ideas and thought they'd be a great contribution. I don't think I've ever gone wrong with a Giada recipe.

Giada's Stuffed Baby Peppers
Source: FoodNetwork.com

Vegetable oil cooking spray
2 tablespoons olive oil
3 ounces thinly sliced pancetta, chopped into 1/4-inch pieces
1/2 medium onion, finely chopped
3/4 cup ricotta cheese
1/3 cup grated Parmesan
1/2 cup frozen petite peas, thawed
Kosher salt and freshly ground black pepper
24 (2 to 3-inch long) sweet baby peppers

Place an oven rack in the center of the oven and preheat to 350 degrees F. Spray a baking sheet with vegetable oil cooking sprayand set aside.

In a medium skillet, heat the oil over medium-high heat. Add thepancetta and cook, stirring frequently, until brown and crispy, about 5 to 7 minutes. Using a slotted spoon, remove the pancetta anddrain on paper towels. Add the onion to the pan and cook until translucent and soft, about 5 minutes. Set aside to cool for 10 minutes.
In a medium bowl, combine the onion, pancetta, cheeses, and peas. Season with salt and pepper, to taste.

Using a paring knife, cut 1/2-inch from the stem-end of the peppers. Remove the seeds and veins. Using a small dessert spoon, fill each pepper with the ricotta mixture. Place the filled peppers on the prepared baking sheet and bake for 15 to 18 minutes until the peppers begin to soften. Remove from the oven and cool for 10 minutes.
Arrange the peppers on a platter and serve.

*****

We had an event for the husband's work before we went to my mom's for the party, so I assembled the peppers ahead of time and just kept them in a cooler while we were at the event. When it was party time, I put them on a cookie sheet and popped them in the oven. Super easy to get them prepped ahead of time!

These were really tasty, and they're low carb which I need to keep in mind for when we're having low carb weeks, or just to take to things where I know it will be a carb-fest. Let me tell you something about petite peas though--they're a scam!! I stood at the freezer case of my grocery store looking for petite peas. There was one brand that sold them--at three times the cost of a bag of regular peas. But, it was for my grandma's 94th birthday so I figured I'd splurge. You know what? They were the same freakin' size as regular peas. Well played, Birds Eye Vegetables, well played. So save yourself some money and use regular peas.

I will definitely be making these again. There were quite a few leftover (there's always a ton of food at this party), and the husband and I liked eating them cold even. He took them as a side in his lunch for a couple days after the party. Thanks, Giada, for another great recipe!!


Wednesday, June 6, 2012

Penne Rosa


Well, it's another rainy day at the beach. Bummer as far as my vacation fun goes, but at least I'm getting lots of blog posts done, right? We just got rid of cable at our house, so my kids are fascinated at having Cartoon Network again, so at least they're happy being cooped up inside. The sun came out briefly this morning but then quickly got rainy and then windy. I just washed, dried, and flat ironed my hair (a whole lot of good that did with this humidity, let me tell you...note snarky tone in that) in the hopes that it would help bring out the sun because then I'd want to swim but would have to sacrifice my hair to do so. Does that make sense? Basically I'm hoping that my hairstyling will have control over the weather somehow.

With that note, on to my post.

I love me a creamy pasta dish, but since I'm pretty conscious of my calorie intake and eating healthy, creamy pasta sauces are something I tend to avoid unless I'm being really indulgent. So I was pretty excited when I saw this recipe on Pinterest for a creamy pasta sauce that used Greek yogurt for the creamy aspect of it. If you haven't discovered Greek yogurt yet, you need to try it! It's super tasty and very high in protein, which I love. The husband and I go through it like there's no tomorrow. Thankfully Costco sells it for super cheap! We both like it for a fast, high-protien breakfast or snack, plain with a little honey drizzled on the top, or it's delicious with fruit mixed in as well. And you can use it in place of all sorts of things. It's fantastic!! I even used it to make boxed mac and cheese recently when I was out of milk, and the result was amazing.

Now, I'll step down off my Greek yogurt soapbox and get on with my blog post.

Penne Rosa
Source: Back to Her Roots blog via Pinterest.com

12 ounces whole wheat penne
1 tablespoon olive oil
4 cloves garlic, minced
1 pinch crushed red pepper flakes
8 ounces button mushrooms, sliced
2 medium tomatoes (about 1/2 lb.) chopped
Salt and pepper, to taste
4 cups fresh spinach
1/2 cup marinara sauce
1/3 cup 0% plain Greek yogurt
1/4 cup grated parmesan cheese


Cook penne according to package directions, omitting salt and fat. Drain and set aside.

In a large skillet with a lid, heat olive oil over medium-low heat. Add in garlic and red pepper flakes, cook for 2 minutes or until garlic begins to soften.

Add in mushrooms, tomatoes, salt and pepper. Cook for 5 minutes, or until mushrooms begin to release their water. Remove from heat, add in spinach and cover skillet. Let spinach wilt for 2 minutes.

Remove lid and place skillet back over low heat. Add the penne, Greek yogurt and pasta sauce. Stir until sauce is mixed well and all pasta and veggies are coated. Heat until just warmed through. Divide into pasta bowls and serve topped with parmesan cheese.

*****

The original recipe called for shrimp, but I left that out because I didn't have any, and my kids don't really like it anyway, plus I thought we needed a vegetarian meal because we hadn't had one in awhile. Wow that was a long sentence. That was the only modification I made. This was a pretty big hit all around with my family. I think it would be delicious with the shrimp the original post used,k but it was good on its own with just the vegetables. It's definitely something I'd make again, especially when I want a creamy pasta fix!


Mmmm...sauce.


Tuesday, June 5, 2012

Creamy Poblano Chicken Over Cornbread Waffles


Well, we've been forced inside for awhile due to a torrential downpour, so while we're stuck inside I thought I'd do another blog update. It does not look pretty outside, so I may do a couple posts...who knows!

I felt recently in my meal planning that I needed to break away from using Pinterest for my meal planning, so I pulled out a cookbook my mother-in-law gave me for Christmas a few years ago. She was a teacher at a Christian school in San Antonio, and one of the high school classes put together a cookbook for a fund raiser. I pulled the cookbook out for something else recently and decided to flip through it for some meal planning ideas. This jumped out at me, and I had some random peppers in my fridge already, so I thought it was worth a go. Then lo and behold, when I did a search for cornbread waffles, it turns out the recipe is from an old issue of Southern Living because the first search result took me to this exact recipe!

Creamy Poblano Chicken Over Cornbread Waffles
Source: San Antonio Christian School cookbook and Southern Living

3 tablespoons butter or margarine
1 large sweet onion, chopped
2 poblano chile peppers, seeded and diced
3 garlic cloves, minced
8 skinned and boned chicken breast halves, cut into bite-size pieces
1 teaspoon salt
1/2 teaspoon pepper
1 (10 3/4-ounce) can cream of chicken and mushroom soup, undiluted
1 (8-ounce) container sour cream
1 (8-ounce) package shredded sharp Cheddar cheese
Cornbread Waffles (recipe below)

Melt butter in a Dutch oven. Add onion, chile pepper, and garlic; sauté 5 minutes. Add chicken, salt, and pepper; cook, stirring often, 8 to 10 minutes or until chicken is done. Stir in soup and sour cream until smooth. Add cheese, and cook 7 to 8 minutes or until cheese is melted.

Serve over Cornbread Waffles.

Cornbread Waffles
1 1/2 cups cornmeal
1/2 cup all-purpose flour
2 1/2 teaspoons baking powder
2 tablespoons sugar
3/4 teaspoon salt
1 large egg
1 1/2 cups milk
1/4 cup butter or margarine, melted
1 1/2 cups frozen white shoepeg corn, thawed

Stir together first 5 ingredients in a large bowl. Stir together egg and next 3 ingredients; add to cornmeal mixture, stirring just until dry ingredients are moistened.

Bake in a preheated, oiled waffle iron just until crisp.

*****

There were mixed reviews on this meal at my house (and from my BFF who was over briefly after dinner. I loved this. The husband was confused by the cornbread waffles because he expected them to taste like regular waffles would. Once he told himself to expect cornbread instead of waffles, he liked it a little better. Boy #1 wasn't home, Boy #2 ate it okay. I really liked it, but only if the bites were really saucy. Jen thought it was okay when she stopped by. We decided it might be better as a pot pie filling instead of served over the waffles. Or over biscuits. The husband thought it could be spicier, and I agreed. I wasn't sure what kind of peppers I was using or how hot they'd be. Someone at the husband's work had brought in peppers from their garden that he brought home, but we had no idea what they were. They were too small to be Anaheims, they were too big to be jalapenos. I still have no idea what they were. But I could have used another one or two for a bit more oomph.

I don't know if I'd make it again...I really liked the flavor, but since everyone else in my house that ate it was pretty indifferent about it, I don't know if it will come into rotation in our house again. Maybe in a different form, but probably not like this. But, I thought it was tasty!!


Sunday, June 3, 2012

Buffalo Turkey Burgers with Blue Cheese Coleslaw


I'm on vacation in Florida right now with my two kiddos, my mom, and some extended family. We're spending a week pool and beachside with three of her cousins and their families. It's a blast so far!! My boys were in the pool for over six hours today before we pulled them out to go to the dollar store to get some beach toys. Boy #2 fell asleep in the car on the way there and is still snoozing (so I volunteered to stay back here with him), and Boy #1 is back at it, either swimming or going to play on the beach, I'm not sure.

We had a four hour plane ride yesterday, and I was alone with my kids. In my mind, they'd spend the entire flight enthralled with various new movies I'd purchased for the trip and basically leave me alone except for the occasional DVD switch or another snack (you have no idea how much food I take along on an airplane ride...it stems from a mantra of "when in doubt, feed them" from when we traveled with our boys when they were babies). While they were busy being fixated with movies I was going to spend the flight updating my blog, be one of those people typing away on my laptop on the plane. Now, if you have kids you're probably shaking your head at me right now, and I don't blame you. I should have known better. No one wanted to watch a movie for more than 10 minutes, and I was constantly picking up a backpack so they could find something else to do or trying to come up with something to entertain them. My laptop stayed packed away in my backpack in the overhead compartment the whole trip.

Sigh.

But, I'm at least hoping to get caught up on some entries while on vacation. I mean, I can't spend an entire week laying by the pool or on the beach eating tasty food and having delicious adult beverages, right? Ha! Who am I kidding? That sounds awesome, so this may very well be the only post I do. We'll see. I can't let Boy #2 sleep too long or he'll never go to bed tonight.

So...

I recently found ground turkey on sale for BOGO, which I love. And then a day or two later I happened to see this recipe on skinnytaste.com and thought it would be a perfect addition to my meal plan for the week. I wasn't sure about the coleslaw on the burger but figured it was worth a shot. Plus I don't think I've ever been disappointed with a recipe I've made from her website! And one more thing, we really love anything deemed "buffalo" so it was worth a shot!

Buffalo Turkey Burgers with Blue Cheese Coleslaw
Source: skinnytaste.com
1 1/2 cups broccoli slaw
1/4 cup skinny blue cheese dressing (recipe below)
1.25 lbs 93% lean ground turkey
2/3 cup grated carrots (grate in food processor) 
1/4 cup seasoned whole wheat breadcrumbs 
1 clove garlic, grated 
1 tbsp red onion, grated
1/4 cup Franks Hot Sauce
salt and fresh pepper
oil spray
5 slices reduced fat cheddar
5 whole wheat burger buns (I used Martin's 100 calorie Potato Whole Wheat Buns)

Directions: In a medium bowl combine broccoli slaw and skinny blue cheese dressing. Set aside. In a large bowl, combine ground turkey, carrots, breadcrumbs, garlic, onion, hot sauce, salt and pepper.

Makes 5 equal patties, 5.5 oz each. Servings: 5 • Size: 1 Burger  
Calories: 358 • Fat: 15 g • Protein: 38.3 g • Carb: 22.7 g • Fiber: 5.6 g • Sugar: 5.9

Low Fat Creamy Blue Cheese Dressing
1/2 cup crumbled blue cheese
6 oz fat free Greek yogurt
1 tbsp light mayonnaise
1 tbsp lemon juice
1 tbsp white wine vinegar
1/8 teaspoon garlic powder
salt and freshly ground black pepper

In a small bowl, mash blue cheese and yogurt together with a fork. Stir in mayonnaise, lemon juice, vinegar, and garlic powder until well blended. Season to taste with salt and pepper. Makes 1 cup.

Servings: 8  • Serving Size: 2 tablespoons •  Calories: 46.8 • Fat: 3.0 g • Protein: 2.8 g • Carb: 2.2 g • Fiber: 0.3 g 

*****

As I've mentioned before, my children are very anti-spicy food, so before adding in the Frank's I pulled out enough of the mixture for a burger patty each for them and set it aside. I was pretty liberal with the Frank's, but I really could have put more in it. Oh, and I skipped the garlic and onion and instead went for a bit each of garlic powder and onion powder. I'm lazy, and neither was enough of an amount to deal with using the real thing. We loved these burgers!! I will warn you, with the slaw on top they were very messy, but they were oh-so tasty. I would have eaten another if we'd had it, I loved it so much. The slaw on top was a great addition, too. Mellowed out the tang and heat of the Frank's and added an interesting texture. I think if you weren't a fan of blue cheese (which I just don't understand) you could easily substitute ranch dressing for the blue cheese dressing when mixing up the slaw. My kids were happy with their normal burgers, the husband and I were happy with our tasty buffalo burgers, so it was a win-win all over!!

Tuesday, May 8, 2012

I'll be returning shortly!

I was scrolling through my blog archives recently searching for a recipe and realized just how few posts I've been doing recently. I make awesome new recipes all the time, I just haven't taken the time to sit down and post them. I'm not sure why--I really do love updating my blog. I think for one thing training for the triathlon I have this coming weekend has really taken a lot of my time (along with driving back and forth to the gym). Since this week is a taper week, I've decided it's time to organize my office. My office tends to be the dumping ground for our house, and I never fully unpacked and/or organized it when we moved in to this house two years ago. It is time. So, please hang with me a bit longer and I promise I'll be back soon to regularly scheduled (okay, probably not scheduled) blog postings!!

Tuesday, April 17, 2012

Maple Chicken and Waffles


Recently I was looking all around my office for a cookbook I wanted to use for meal planning. I couldn't find it anywhere. Then I realized I don't actually own it, I've just always borrowed it from the library and kept it a long time when I've borrowed it. I promptly ordered it right then and there. And since I needed a little more to qualify for free shipping, I figured I'd get Pioneer Woman's new cookbook while I was at it. Let me tell you the bliss of getting two brand new cookbooks in the same package. Heaven!!!

It's a little random how I came to find out about this cookbook. I have an online friend named Kristy. We met on Facebook, which I'll admit is kind of weird for two grown women. I've known her husband since elementary school, and she was also FB friends with someone I grew up going to Sunday school with and a friend from college. Small world, huh? So we became Facebook friends. She has lost over 100 pounds and is completely dedicated to exercise and a healthy lifestyle. She mentioned this cookbook awhile back, so I checked it out. And I loved it! So, thank you, Kristy, for the great recommendation!

My birthday was last month, and one of my gifts was a waffle maker. It's pretty awesome. I'd been dying for an occasion to make waffles and bust out my new toy, but making breakfast like that on a school morning stresses me out, and our Saturdays have been crazy recently with the husband and I both training for a triathlon next month, and Sunday mornings are a bit chaotic, too, because of church. So I was super excited to see this recipe for chicken and waffles and get to use my new toy at dinner time.

Maple Chicken and Waffles
Source: Pretty Delicious by Candice Kumai, Copyright 2011

Chicken:
1/2 cup low-fat buttermilk
1/4 cup maple syrup, plus more for serving
2 pounds boneless, skinless chicken breasts
1/2 cup panko bread crumbs
1/4 tsp ground cinnamon
1/4 tsp freshly grated nutmeg
1/4 tsp sea salt

Waffles:
1 1/2 cups whole wheat flour
2 Tbsp brown sugar
1 1/2 tsp baking soda
1/2 tsp sea salt
3/4 tsp ground cinnamon
1/4 tsp freshly ground nutmeg
1 cup low-fat buttermilk
2 large eggs

To make the chicken: Whisk the buttermilk and 1/4 cup of the maple syrup together in a medium bowl. Add the chicken and turn to coat. Cover the bowl with plastic wrap and refrigerate for 1 hour or overnight.

Preheat the oven to 400. Line a rimmed baking sheet with foil and lightly coat the foil with cooking spray.

Stir together the panko, cinnamon, nutmeg, and salt in a medium bowl. Remove the chicken from the marinade, letting the excess drip back into the bowl. Place the chicken breasts in the bread crumbs and turn to coat so each side is evenly covered with seasoned panko. Set the chicken on the baking sheet and bake until the coating is golden and crispy and the chicken is cooked through, about 30 minutes. Leave the oven on, but reduce the temperature to 250. When the chicken is cool enough to handle, slice crosswise into thin strips.

To make the waffles: Whisk the flour, brown sugar, baking soda, salt, cinnamon, and nutmeg together in a large bowl. Whisk the buttermilk and eggs together in a medium bowl. Add the buttermilk mixture to the flour mixture, and stir together until just combined.

Heat a waffle iron according to the manufacturer's instructions. Coat the iron with cooking spray and then add enough batter to fill tghe holes without overflowing once the iron is closed. Cook until gorgeous and browned. As the waffles are made, place them on a baking sheet and place in thed 250 oven to stay warm while you cook the rest.

To serve, stack 1 or 2 waffles on a plate. Criss-cross the chicken strips over the waffles, drizzle with a little of the maple syrup and serve extra on the side.

*****

I had never made chicken and waffles before, and this was pretty easy. I had to rearrange my meal plan because the night I originally planned on making it, I didn't have enough time to thaw the chicken, let it marinate in the buttermilk, and get it cooked. Boy #1 was really disappointed because he was so excited to have this. I'll admit I was disappointed too. When we finally had it, it received rave reviews from my whole family. I'll definitely make this again, and this may end up being my go-to waffle recipe. The only thing I'd change would be to spray the chicken with some nonstick spray before putting it in the oven so it would end up a little browned, but that's purely cosmetic.


Mmmm...waffley goodness!

Monday, April 9, 2012

Honey Sesame Chicken


Lately my afternoons have been starting out with me camped out on the floor outside Boy #2's room waiting for him to fall asleep for his nap. Otherwise he constantly gets out of bed and I'm constantly coming upstairs to put him back in bed. I think he's heading towards dropping his nap, but so far he still takes one most days, thankfully. Some days I sit here for a very long time. Other days he falls asleep pretty quickly. Normally I have my phone with me and do something like catch up on Scrabble or Words With Friends or Draw Something, but today I brought my laptop up and decided to do a blog post. I just uploaded our Easter pictures and that included some dinner pics from recently. It was a tough choice which one to do because we've had some tasty things, but I figured I'd start with this one. I tend to be somewhat against cooking chicken in the crockpot because it ALWAYS seems to turn out dry. Dry chicken is not delicious, and personally I like to eat delicious food. This one sounded tasty and since there was a sauce with it, I thought that maybe it would be okay...because sometimes dry chicken can at least be masked with enough sauce.

Honey Sesame Chicken
Source: Adapted from Table For Two blog via Pinterest

1 to 1.5 lb. boneless, skinless chicken breasts
Salt and pepper
3/4 cup of honey
1/2 cup of low sodium soy sauce
1/2 cup ketchup
2 tbsp. vegetable oil
1/2 tsp garlic powder
1 tsp onion powder
1/4 tsp. red pepper flakes
Cornstarch
Sesame seeds

Place the chicken breasts in the crockpot insert and sprinkle salt and pepper on both sides.
In a medium sized bowl, combine honey, soy sauce, ketchup, oil, garlic powder, onion powder, and red pepper flakes. Stir to combine well. Pour over the chicken in the crockpot.

Cook on low for 3-4 hours or high for 1 1/2-2 1/2 hours.

When done, remove chicken and cut into chunks. Prior to putting the chicken back in the stockpot, combine some cornstarch in water and whisk it into the crockpot to thicken up the sauce a bit. Throw the chicken back in and stir around to recoat the chicken in the sauce.
Serve hot over a bed of white rice or quinoa (optional) and sprinkle some sesame seeds on top.

*****

The original recipe called for chicken thighs, but I only had chicken breasts. And the original recipe had more honey and less ketchup and real garlic and real onion, but I didn't have enough honey, I accidentally used too much ketchup, and I was too lazy to chop up garlic and onion. Hey, at least I'm honest. Also, since I'm being honest, I forgot to get this started when I had planned, so I had to throw my chicken into the crockpot frozen and say a prayer and cross my fingers it was done in time for dinner. Thankfully it was. And you know what? It wasn't dried out!!! Perhaps using frozen chicken and checking the chicken when you think it might not be cooked yet are the keys? Maybe I've just been leaving it in the crockpot for too long all these years. I don't know. But, I do know that this was DELICIOUS and my whole family really liked it. I opted to serve it with quinoa instead of rice because I only had brown rice and not enough time for it to cook, plus I love the nutritional content of quinoa over rice.

This is definitely something we'll have again, especially since most of the ingredients are things I always have on hand.


Thursday, April 5, 2012

Twice-Baked Cauliflower


We're going to my mom's house for Easter dinner this year. Well, we generally always go to her house for dinner. I asked what I could bring, and she said we're having ham and turkey, so I said I could either make funeral potatoes or this twice baked cauliflower dish I made when we were doing low carb awhile back. She said either would be fine, so I decided I'd go with the cauliflower because it's healthier and something different. Then I realized I had never posted it on my blog! So, if you're looking for a side dish for Easter dinner, consider this! It's super tasty. We originally had it with Pimento Cheese Stuffed Chicken Breasts and the flavors complimented each other really well! And they shared a lot of the same ingredient which made preparing them at the same time a total breeze.

Twice Baked Cauliflower
Source: Kalyn's Kitchen blog
Serves 6-8

1 large head cauliflower
4 oz. low fat cream cheese (do not use fat free)
1/2 cup low fat sour cream (do not use fat free)
1/4 cup minced green onions
1/4 cup freshly grated Parmesan cheese (If you only have finely grated Parmesan, use a bit less)
6 slices bacon, cooked until very crisp, fat blotted with paper towel and then crumbled
1 cup reduced fat sharp cheddar cheese


Preheat oven to 350F/180C. Cut out stem and core from cauliflower, and cut into small pieces. Cook in large pot of boiling salted water until cauliflower is tender, but not overly soft. Drain well and mash with potato masher, leaving some chunks. Mix in light cream cheese, light sour cream, green onion, Parmesan, and 3/4 of the crumbled bacon.

Spread evenly in a medium-sized glass casserole dish. Sprinkle with low-fat cheddar cheese and reserved bacon. Bake 30-35 minutes, or until hot and bubbly.

*****

I mostly followed the recipe except I steamed the cauliflower instead of boiling it because I've always read that it's a better way to cook vegetables (so they keep more of their nutrients)--especially with cauliflower. I think we'll have 11 people at Easter dinner, so I think I'm going to double this. Plus it's so tasty I really don't mind having leftovers. My mom loves cauliflower, so I hope she likes this.

This is a great substitute for potatoes if you're doing no or low carb. Don't get me wrong, I love potatoes, but the bite of the cauliflower really adds a lot to this, and cauliflower is lower in calories (significantly!) and carbs (even more significantly!) than potatoes Plus Boy #1 doesn't like potatoes (I know, it's weird!), and he loved this.

Mashed cauliflower!

Please excuse the half eaten chicken breast, I forgot to take a picture before we started eating!

Monday, April 2, 2012

Pizza Rolls


Slowly but surely (okay, more slowly than surely) I'm getting caught up on my blog posts. I have a note in Outlook that I update with the posts I'm going to do, and I'm hoping soon it starts getting shorter instead of longer. I feel like my time management skills have really been lacking lately. It's not just my blog, it's with everything!

This goes all the way back to the Super Bowl. I'm at least getting it in just under two months, so it could be worse I guess. My BFF Jen and her husband had a Super Bowl party for all of our friends. It was super fun but a little nuts with 16 kids running around and 12 adults hanging out watching the game. The food we had was amazing. AMAZING. Everyone brought a ton of stuff, and I gorged the whole time. I had a food baby for days afterwards. But it was worth it. On the Evite she had sent it seemed like most people were bringing some kind of dip or spread, so I wanted to do something different. I had seen these on Pinterest and thought they looked good and would be kid friendly.

Pizza Rolls
Source: Adapted from TidyMom.net via Pinterest

2 cans crescent rolls
garlic salt
Italian Seasoning
1 cup sliced pepperoni
2 cups shredded mozzarella
1/2 cup Parmesan Cheese

Preheat oven to 425

Dust a large cutting board or piece of wax paper with flour and roll out each pizza crust. Season each crust with garlic salt and Italian seasoning. Top with cheese and meat.

Starting with the long side, roll crust into a tight log. Slice into 1" sections.

Place on lightly greased pan and bake for 10-12 mins.

*****

The original recipe called for using the tubes of pizza crust dough, but I opted for crescent rolls. I don't remember why now, but it probably involved cost and coupons. It also said to roll it starting with the short side, but I rolled the long side so I'd get more out of it instead of thicker ones, if that makes sense. The crescent roll dough was a little thin once it was rolled out some, but I made it work. My five year old (well, now he's six but he was five at the time) loved helping me make these.

These were fantastic and were gobbled up at the party. There were a few left, so I left some with Jen for her son to take in his lunch and I brought the rest home and did the same for Boy #1. These are actually a great lunchbox item, too! I'll definitely be making them again, either for another party or event or to have on hand to send in lunches.

Thursday, March 22, 2012

Pesto Pasta with Chicken Sausage and Roasted Brussels Sprouts


You know what I love about Thursdays? My house is clean from having bible study here last night which means I can pretty much do whatever I want on Thursday! Woo hoo!! Granted I should unload the dishwasher and move the dirty breakfast and lunch dishes into it, but that doesn't sound fun and updating my blog does.

This, of course, came to me via Pinterest. Actually I had pinned it multiple times which I took to be a sign that I needed to make it. I happened to be at a natural grocery store a few weeks ago, and they happened to have chicken sausage AND fresh brussels sprouts on sale. Another sign, right?! I bought both of them and made this shortly thereafter.

Pesto Pasta with Chicken Sausage and Roasted Brussels Sprouts
Source: Adapted from Gimme Some Oven blog via Pinterest.com

1 lb fresh brussels sprouts, ends trimmed and any yellowed/browned outer leaves removed, then sliced in half
3 Tbsp. olive oil, divided
1/2 tsp. Kosher salt
1/2 tsp. freshly-ground black pepper
1 lb orecchiette pasta
4 chicken sausage links
5 cloves garlic, peeled and thinly sliced
1/3 cup pesto
Parmesan cheese, for serving

Preheat oven to 400 degrees. Spread brussels sprouts on a rimmed baking sheet. Drizzle with 2 Tbsp olive oil, salt, and pepper. Stir around until well combined. Roast for about 20-30 minutes, stirring once partway through, or until they are crispy on the outside and cooked on the inside. Remove from oven and set aside.

Meanwhile, heat the remaining olive oil in a skillet over medium-high heat. Add the sausage and cook, turning occasionally, until nearly-browned, about 6-8 minutes. Remove from pan, slice, and add back into skillet to brown sliced sides. Add the garlic, and continue cooking for another 1-2 minutes until the garlic is fragrant and the sausage is browned.

Cook the pasta according to the package directions. Once the pasta is cooked, drain the water (reserving 1/4 cup pasta water), and then toss together the pasta, pesto, cooked sausage and garlic, and brussels sprouts. Add in some of the reserved pasta water if needed for extra moisture.

Serve warm, and sprinkle with freshly-grated Parmesan cheese.

*****

I always, always, always forget to reserve pasta water. Even the times (like this one) when I tell myself constantly while cooking that I need to remember to reserve some of it, I never think of it. Well, I think of it but only once all the water has been poured down the drain. Ugh. I added in some chicken broth to make up for it, but I think the pasta water would have been better.

My family was mixed on this. The kids liked it well enough (brussels sprouts are one of their favorite veggies), the husband and I really liked it. Even the leftovers were good the next few days for lunches. I'd definitely make this again, and it would be fun to play around with different sausage flavors, too. I used a chicken apple sausage, which was tasty, but I bet you'd get good results with an Italian or even a spicy Italian sausage. Yum!


These brussels sprouts were ridiculously big. I think they were the size of Boy #1's fist!

Tuesday, March 20, 2012

Turkle Burgles


We were on a spring break trip in CA last week, and the husband pointed out that I hadn't updated my blog in awhile. I knew he was right, so today I decided to make blog updating a priority. and then I got distracted by Pinterest and going through my picture folders to see what exactly I wanted to blog about, so now I only have time to do one post instead of the two or three I had planned. Oh well! I was amazingly efficient today, so let's hope that carries over to tomorrow. Of course, it helps that Boy #2 is being entertained by an alphabet/phonics video.

This isn't anything we've had recently, but it's super yummy, and Boy #1 keeps talking about them, so I figured I should write a post about them. I have no idea where the name of this came from, but it's something my family has always eaten, especially with leftover Thanksgiving turkey. The sandwiches are so easy to put together, and really tasty! Hey, if my six year old asks for them repeatedly, you know it has to be something good! he even took them for his lunch, cold!

Turkle Burgles
Serves 4

4 hamburger buns or sandwich rolls (I use Oroweat Sandwich Thins)
8 slices cooked bacon
8 slices turkey (or enough for four sandwiches)
4 slices cheese
Thousand Island salad dressing (or homemade with mayo, ketchup, and relish)

Heat broiler. Toast hamburger buns. Place bottom half of buns on a cookie sheet. Top with 2 slices of turkey, 2 strips of bacon (I tore mine in half to get more bacon coverage), and slice of cheese. Place under broiler until cheese begins to melt. Spread dressing on top half of bun and top sandwich.

*****

Seriously, the hardest part of these was mixing up my own Thousand Island dressing. We had these a couple nights in a row when we had leftover turkey after the holidays because 1) they're so easy to put together, and 2) we all loved them. I'm sure they could be made using turkey lunchmeat, too, if you didn't have any leftover turkey meat, I've just always had them with leftover turkey.

Typing this out and looking at the pictures almost makes me want to find a turkey to cook...almost!


Tuesday, February 28, 2012

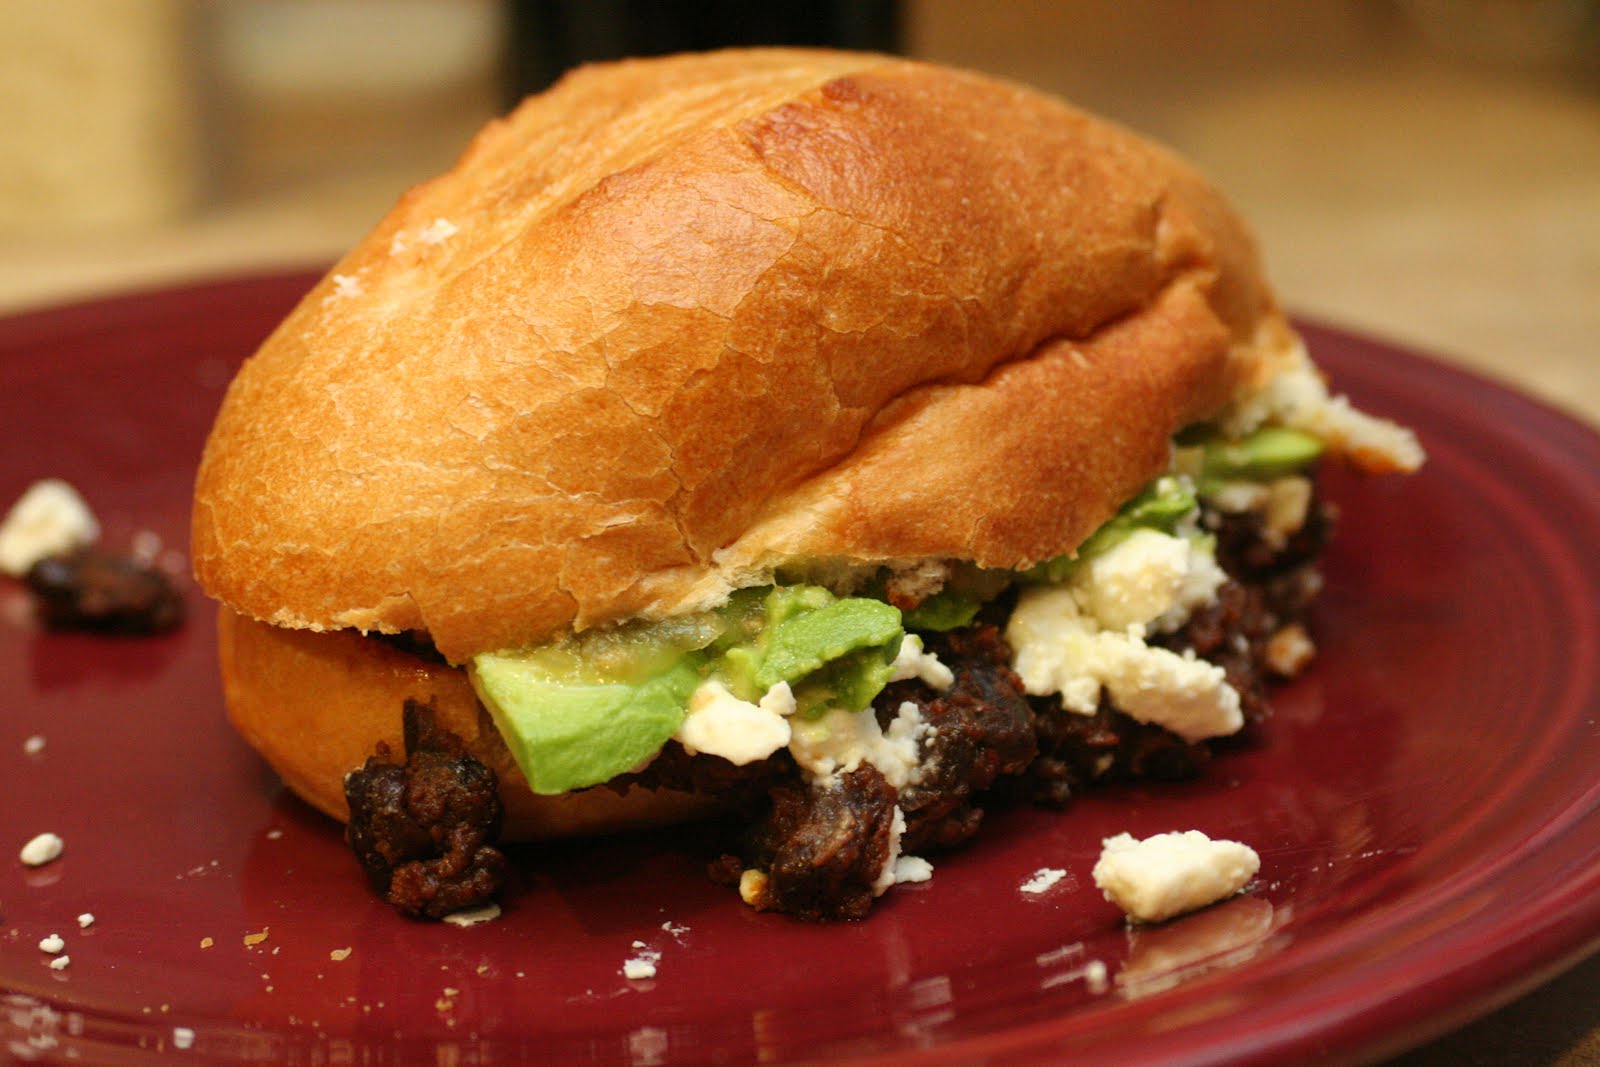
Rick Bayless Crusty Chorizo and Black Bean Subs


This isn't a new recipe, but my original post just had pictures taken with my cell phone. the husband and I had this for our date night dinner last week, so I seized the opportunity to get some new, better pictures of it. This is hands down one of my favorite sandwiches ever. The husband might not like me sharing this, but after we finished our sandwiches, he went into the kitchen and made a bite sized sandwich with some of the bread I tore out of the middle of the rolls. Yeah, it's that good. I normally make my own tomatillo salsa to go with these, but I knew I had some salsa verde in the fridge, so I just used that this time.

I know this is already on my blog, but I feel like it needs a new entry with the better pictures. So, here's the recipe again!

Crusty Black Bean Chorizo Subs
aka Tortas de Chorizo y Frijoles Negros
Copyright 2005, Rick Bayless' Mexican Everyday

8 ounces fresh Mexican chorizo sausage, casing removed (about 1 cup)
3-4 Tbsp vegetable or olive oil (divided use)
Two 15-ounce cans black (or other) beans
Salt
4 bolillo rolls, crusty French rolls or submarine sandwich rolls (6-7 inches long, 3 inches wide)
6 ounces queso fresco or other fresh cheese such as feta or goat cheese, sliced 1/4 inch thick
1 ripe avocado, pitted, flesh scooped from the skin and cut into 1/4-inch slices
3/4 cup Roasted Tomatillo Salsa (recipe to follow)

Set a large 12-inch skillet over medium heat and add the chorizo. Cook, breaking up the clumps, until browned and thoroughly cooked, about 8-9 minutes. Add 1-2 Tbsp of the oil (depending on how much fat the chorizo has rendered) and the beans. As the beans come to a simmer, mash them to a smooth paste with a Mexican bean masher, old-fashioned potato masher or the back of a large cooking spoon. Cook, stirring nearly constantly, until the consitency of very soft mashed potatoes--expect about 10 minutes after adding the beans. Taste and season with the salt if you think necessary. Keep warm over the lowest heat, covered to keep the beans soft and moist.

Heat a large griddle or skillet over medium. Slice the rolls open. use fingers or a spoon to scrape out some of the soft bread in the center of each half, making a small hollow. Brush the insides with the remainig 2 Tbsp oil, then lay them cut side down on the griddle or skillet to crisp to a rich golden brown, about 3 minutes.

Smear about 1/2 cup of the chorizo-bean mixture over the bottom half of each roll. Top with slices of the cheese and the avocado. Spoon on the salsa or dash on the hot sauce. Set the top of each roll i place, and you're ready to serve.

Roasted Tomatillo Salsa
Copyright 2005, Rick Bayless' Mexican Everyday

4 medium (8 ounces total) tomatillos, husked, rinsed, and halved
2 large garlic cloves, peeled
Hot green chiles to taste (2 serrano or 1 jalapeno), stemmed and roughly chopped
About 1/3 cup (loosely packed) roughly chopped cilantro
1/2 small white onion, finely chopped
Salt

Set a large nonstick skillet over medium-high heat. Lay in the garlic and tomatillos, cut side down. When the tomatillos are well browned, 3-4 minutes, turn everything over and brown the other side. The tomatillos should be completely soft.

Scrape the tomatillos and garlic into a blender or food processor and let cool to room temperature, about 3 minutes. Add the chiles, cilantro, and 1/4 cup water. Blend to a coarse puree. Pour into a salsa dish and thin with a little additional water if necessary to give the salsa an easily spoonable consistency.

Scoop the chopped onion into a strainer and rinse under cold water. Stir into the salsa. Taste and season with salt, usually about 1/2 tsp.

*****

I don't really need to say anything about these because I already have. So delicious!!!


Muffin Mix

I've been on a huge muffin kick lately. I found a recipe from an online friend for zucchini, carrot, raisin muffins (recipe coming at some point). I sent her a note saying I was making them, and she told me that she makes muffins every week for her kids to have for breakfast. I thought it was genius! Especially the next day when all I had to do was throw a muffin, some fruit, and some yogurt on a plate for each of my kids. Voila! breakfast was ready. I don't handle breakfast well. I'm not always caffeinated when my kiddos want to eat, and a lot of times there are fights about what they're going to have. But no one fought the muffins! I mentioned this at one of my bible study groups, and my friend Sarah said she had a recipe for an all-purpose muffin mix, that you just mix up a huge batch and keep it in the pantry or freezer and pull from it as needed and mix in all sorts of things to make different kinds of muffins. Genius!! I copied it down immediately and mixed it up the next day. I just used the last of my mix this morning (well, almost...there's maybe 1/2 a cup left in the container I was storing it in) and figured it was high time to type out the recipe so I didn't always have to look for my scrap of paper on which the recipe is written when I want to make these up. I'll have to mix up some more tomorrow--I don't want to be without my mix!

Sarah's Muffin Mix
Source: My friend Sarah (who runs full marathons!)
Yield: 4 batches of muffins

8 cups flour
3 cups sugar
3 T. baking powder
2 t. salt
2 t. cinnamon
2 t. nutmeg

Combine above ingredients. Store in pantry or freezer up to six months.

For each batch of muffins:

2-3/4 cups muffin mix
1 egg
1 cup milk
1/2 cup butter, melted

Place muffin mix in bowl. Whisk egg, milk, and butter together and stir into dry ingredients. Include whichever mix-ins below (mix any dry ingredients in with mix, wet ingredients or fruit into wet ingredients or at the end). Fill muffin cups 3/4 full. Bake at 400 degrees for 18-21 minutes.

Add-Ins:
Banana: 1 cup mashed bananas
Cranberry Pecan: 1 cup chopped cranberries, 1/2 cup chopped pecans, 3 T. sugar
Cappuccino: 1 cup mini chocolate chips, 2 t. instant coffee granules
Apple Cheese: 1/2 cup shredded apple, 1/2 cup colby jack cheese
Blueberry: 1 cup blueberries
Carrot Raisin: 3/4 cup shredded carrots, 1/3 cup golden raisins

*****

Sorry if the directions for when to mix in what are vague. I didn't copy that part down because it all seemed self-explanatory to me. For most of the varieties I think I'd mix everything in at the end, except the banana I'd mix in with the wet ingredients, the coffee granules I'd mix in with the dry ingredients. I think that's it.

So far I've made blueberry muffins, chocolate chip muffins, and this morning I made banana chocolate chip. I know, I'm fancy. I think the banana chocolate chip have been our favorite so far. I'm dying to try the apple cheese, but my kids ate all the apples I bought last time at the store. I'm also looking forward to the carrot raisin--I LOVE carrot raisin muffins!

I did make a few substitutions to the mix recipe. I used half whole wheat flour and half all-purpose flour. I also cut the sugar down to 2.5 cups. Three cups seemed like a lot (I think I figured it out to be about a tablespoon per muffin if your batch made 12 muffins...mine usually made 18-24 though), and plus the day I went to mix it up I only had 2.5 cups of sugar on hand. I figured I'd try it and see how it turned out. Now I think I'll keep it that way. I had meant to add in some ground flax seed to the mix but forgot when I mixed it up and then kept forgetting each time I make a batch.

This was super, super easy and it's so nice to have on hand! I've even made muffins first thing in the morning when I get up to have for breakfast if we were out, and it wasn't time consuming at all. My kids don't even mind waiting a little longer for breakfast knowing they're going to get a tasty warm muffin out of the deal!

If you make these and try any other variations that you love, leave me a comment and let me know what they were!

Hmnmm...apparently in all the batches of muffins I've made, I haven't taken a picture of any of them. Next time!

Baked Sweet and Sour Chicken


It's 7:30 in the morning right now which is by no means an optimal time at my house for me being on the computer, but this dinner last night was so good that I couldn't wait! Plus my kids are upstairs (supposedly getting dressed, but I think in actuality they're watching Pink Panther cartoons) and I'm waiting for my coffee to cool off a bit, so I figured I might as well jump on the computer. I'm sure I'll regret it when I'm scrambling an hour from now to get us out the door. Oh well.

This, of course, came from Pinterest. Boy #1 LOVES sweet and sour chicken when we get Chinese take-out, so I thought he'd be all over this. I was going to make it one night last week until I saw it had to bake for an hour and knew that just wasn't going to fit into the time frame I had to prepare dinner that night. Boy #1 was disappointed, but he was super excited to come home from school yesterday and find out we were having it last night.

Baked Sweet and Sour Chicken
Source: Life As A Lofthouse blog via Pinterest.com

The chicken coating:
3-4 boneless chicken breasts
salt + pepper
1 cup cornstarch
2 eggs, beaten
1/4 cup canola oil

The sweet and sour sauce:
3/4 cup sugar
4 tbs ketchup
1/2 cup vinegar
1 tbs soy sauce
1 tsp garlic salt

Start by preheating your oven to 325 degrees. Rinse your chicken breasts in water and then cut into cubes. Season with salt and pepper to taste. Dip chicken into the cornstarch to coat then dip into the eggs. Heat your 1/4 cup oil in a large skillet and cook your chicken until browned but not cooked through. Place the chicken in a 9x13 greased baking dish. Mix all of your sweet and sour sauce ingredients in a bowl with a whisk and then pour evenly over the chicken. Bake for one hour and during the baking process you will need to turn the chicken every 15 minutes.

*****

I have to say that this was pretty time consuming to make. It took me awhile to find a groove with the breading/egg wash/frying. Eventually I figured out to move a batch to the egg wash once I had put a batch in the skillet and start a new batch then in the cornstarch. When I flipped the chicken in the skillet, I flipped the chicken pieces in the egg wash, then they were ready to go once I took the skillet batch out. Did you follow that? I also had to adjust the cooking time and temperature. My chicken took longer to thaw than I anticipated, and we had to eat at a certain time last night. I ended up baking it for 30 minutes at 375, and it turned out great. I stirred it around once during baking and then again once it came out of the oven.

We all really liked this. REALLY liked it. Boy #1 is taking the leftovers in his lunch today. The husband and I were both standing over the baking dish taking bites last night once we were done eating. My only real concern with it was the 3/4 cup of sugar in the sauce. It seems like a lot. Next time I may try to scale that back a bit and see what happens. This is definitely something I'll make again, I'll just be sure to allow enough time for all the steps!

Wednesday, February 22, 2012

Pimento Cheese Stuffed Chicken Breasts


I was going back through the pictures for my blog to see what I hadn't posted about yet and couldn't believe I hadn't done this one! This came from our no carb week a few weeks ago. I found it on Pinterest.com and thought it looked awesome--and low carb! I'm pretty much a sucker for anything pimento cheese, so I knew we had to have it. Oh yeah, and it had bacon in it. Sign me up!

Pimento Cheese Stuffed Chicken Breasts
Source: Weight-Watchers-Recipes.net via Pinterest.com

1 slice applewood-smoked bacon
3/4 cup shredded cheddar cheese
2 tablespoons minced green onions
1 1/2 tablespoons diced pimientos
1 tablespoon canola mayonnaise
2 teaspoons fresh lemon juice
1/2 teaspoon hot sauce
1/2 teaspoon salt, divided
4 (6-ounce) skinless, boneless chicken breast halves
1/2 teaspoon black pepper
1 tablespoon canola oil

Directions:

1. Preheat oven to 350°.

2. Cook bacon in a large ovenproof skillet until crisp. Remove bacon, reserving drippings in pan; crumble bacon. Combine bacon, next 6 ingredients, and 1/4 teaspoon salt. Cut a 1-inch-wide slit into the thick end of each breast half; carefully cut down to the center of chicken to form a deep pocket. Divide cheese mixture evenly among pockets. Secure with wooden picks. Sprinkle chicken with 1/4 teaspoon salt and pepper.

3. Heat pan over medium-high heat. Add oil to drippings. Add chicken to pan; saute 4 minutes. Turn chicken over. Bake at 350° for 12 minutes; let stand for 5 minutes.

Makes 4 Servings

Nutritional Info Per Serving: Calories 204, Carbs 20 g, Fat 11 g, Fiber 3 g, Protein 7 g

*****

I changed this up just slightly, like by adding more bacon. Actually I was making another dish that used bacon, so I cooked up quite a bit to be included in both dishes. I love cooking things in bacon grease. I'm sure it's a fast track to a heart attack, but it's so delicious. This recipe worked out great with the dish I had planned to go with it because there were a lot of similar components. Don't you love when that happens?!

This was something we all really loved, and I will definitely make it again. Ooey, gooey cheese and bacon and bacon drippings?! Hells yeah!

Thursday, February 2, 2012

Chinese Five Spice Turkey Lettuce Wraps


I'm super multi-tasking this afternoon...sitting here with hair color in my hair (my roots were in a sorry state of affairs), updating my blog, and watching the most recent Glee episode. Oh, how I love me some old school Michael Jackson!! I also love Aggie's Kitchen (how's that for a transition?!) and was excited when she recently posted this recipe. When we did our low carb week last week, this was the first dinner I planned. I love lettuce wraps but hadn't ever made them myself. They fit the low/no carb diet perfectly, though.

Chinese Five Spice Turkey Lettuce Wraps
Source: Aggie's Kitchen website

1 lb ground lean turkey breast
1 medium red onion, chopped small
3 garlic cloves, minced
1 inch piece of ginger, peeled and minced
1 carrot, chopped small
2 tablespoons chopped water chestnuts
1 1/2 teaspoon 5 Spice Powder
2 teaspoons low sodium tamari (or soy sauce)
3 teaspoons rice vinegar
2 teaspoons black bean sauce
1 teaspoon agave or honey
chile garlic or chile sauce (like sriracha), for serving
Boston or iceberg lettuce leaves, washed and dried
shredded slaw mix (optional)
chopped green onions (optional)

Heat a nonstick skillet over medium heat. Coat pan with cooking spray and add onion and carrot. Cook for about 3-4 minutes, add ground turkey. Using a wooden spoon, break up ground turkey and sprinkle 5 spice powder over meat. Continue to cook until cooked through completely, about 7 minutes.

While turkey is cooking, combine tamari, rice vinegar, black bean sauce, agave, ginger and garlic in a small bowl. Add to ground turkey during the last few minutes of cooking and stir until all combined.

To serve scoop ground meat mixture into lettuce leaves, top with slaw mix, green onions and chili sauce.

*****

I couldn't find black bean sauce, so I substituted hoisin sauce. These were super tasty!! My kids got a little frustrated trying to keep the lettuce wrapped around the filling, so they resorted to just eating the filling and lettuce separately. I'm glad I finally made these...they are definitely something we'll eat on a regular basis!