Tuesday, June 25, 2013

Grilled Pork Ribs


I just love to grill in the summer.  It does have its downsides being in Phoenix and standing outside in the roasting heat over a hot grill, but it creates significantly less dirty dishes and doesn't heat up my kitchen by using the oven.  Plus we have a pool, so a lot of times whomever is grilling will take pool breaks or just hang out in the pool while dinner cooks.  It's a pretty sweet system.

I've always been a fan of boneless ribs.  Gnawing on ribs with the bones in them has always seemed gross and honestly a little barbaric to me.  although for a lot of years I wouldn't even eat meat with bones in it because it reminded me that it once was walking around.  Can you tell I lived with vegetarians in college?  I don't think I had my first buffalo wing until I was in my mid-20s.  I've gotten over it now, but I still won't eat bone-in ribs.  Recently boneless ribs were on sale for a super good price, so I bought a package of them planning on grilling them.  I wasn't really sure how to grill them, if I just threw them on there or what, so a little Googling directed me to a brine recipe, and I ran with it.  My uncle makes really fantastic grilled ribs, but I knew I'd need ingredients I didn't have, and I try to limit grocery store trips in the summer since I have to drag both kids with me.  This was also my first attempt at a brine, so I was pretty excited to try it out.

Grilled Boneless Pork Ribs

1 cup water
1/4 salt
1 T. sugar
3 pounds boneless country style pork ribs

In a gallon Ziploc bag, combine water, salt, and sugar.  Add in ribs, squeeze out excess air, and let sit for at least 30 minutes and up to overnight.

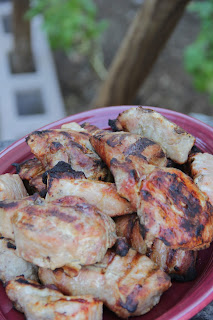
Preheat your grill for indirect heat grilling (is that the right phrase?).  My grill has four burners, I turned on all four to heat it up, then reduced the middle two super low.  Lay ribs in the middle of the grill and cook for 10 minutes.  Flip them over and grill another 10.  Their internal temperature should be 145 degrees.  Remove from grill and serve with your favorite barbecue sauce (or make your own if you're an overachiever like me).

*****

I really had no idea how this was going to turn out.  I'll be honest--I had visions of dried out, tough, inedible ribs, and I was working on a back up dinner plan in the back of my head the whole time.  My original plan had been to only cook about half the package of ribs, but Boy #2 was helping me make dinner, and he said we should do all of them so there'd be leftovers.  Thankfully he's a lot more optimistic than his mama because I didn't know if we should plan on leftovers in case they were awful.

These turned out AMAZING.  I don't know why I doubted myself.  Normally my go-to method of cooking boneless ribs is throwing them in the crockpot with a sweet and sour barbecue sauce that's my great aunt's recipe, but this may very well be my new go to.  It was a huge hit with my family.  There were leftovers but not many.  They were good on their own, they were good with the barbecue sauce (although my kids preferred them without the sauce, the husband and I were torn on which was better).  This was an all around winner!!


 My grill could maybe use a cleaning.

 I tried to make this one a little scenic.  See my failing garden in the background?  Those green things are my sad basil plants that are the only remnant of what I had hoped to be a successful summer garden.

Thursday, June 20, 2013

Rosemary Crackers


I have a love/hate relationship with crackers.  I love to eat them, but I hate the ingredients in most of them.  Ak-Mak crackers are the exception, but I don't buy them very often because no one else in my family likes them.  Actually I don't buy crackers very often anyway because this family is a bunch of cracker monsters.  Crackers just do not last at my house.  I don't know what it is.  I recently found a recipe to make my own crackers and figured it was worth a shot...especially since it was easy and I had all the ingredients on hand.  Plus making my own crackers sounds kind of kitchen bad ass, which I really like.  Okay, maybe not bad ass but definitely impressive, right?

Rosemary Crackers
Source: Budget Bytes blog

 2 cups all-purpose flour
1 tsp baking powder
½ tsp salt (plus more for sprinkling)
1 Tbsp rosemary
to taste freshly cracked pepper
4 Tbsp cold butter
½ to ¾ cup cold water

Chop the rosemary well so that there are no large, sharp pieces. Add the rosemary, flour, baking powder, salt, and some freshly cracked pepper to a food processor and pulse until the mixture is evenly mixed (or just stir them together in a bowl).

Cut the butter into pieces and add it to the food processor. Pulse the mixture until the butter is completely incorporated and no chunks remain. Or, cut the butter into the flour mixture with pastry cutter, two knives, or just with your hands until the butter is completely worked into the flour mixture.

Slowly add cold water to the food processor while pulsing, just until it forms a dough (or stir it in by hand until a dough forms). Depending on the humidity and moisture level in your flour, it will take between ½ and ¾ cup water. (I used closer to 3/4 cup).

Preheat the oven to 400 degrees. Turn the dough out onto a lightly floured surface and roll it out until it is approximately 1/16th inch thick. Use a pizza cutter or knife to cut the dough into small rectangles, squares, or triangles. Prick each “cracker” with a fork. Carefully transfer the cut crackers to a baking sheet lined with parchment paper.

Sprinkle the crackers lightly with salt, if desired. Bake the crackers for 20-25 minutes, or until they are golden brown. The total amount of baking time needed will depend greatly on the thickness and size of the crackers, so watch them closely. Allow the crackers to cool and then store in an air-tight container at room temperature.

*****

See what I mean?!  Super easy!  You can be a kitchen bad ass, too, and impress your friends and colleagues or whomever by making your own crackers.  Plus I love stuff that's all done in the food processor.  These were super, super tasty.  But she's right about watching them while they bake--the thinner ones came out a little too dark for my liking.  Personally I loved dipping these into homemade hummus, and they were good with some slices of cheese on top.  I've made these several times and the cracker monsters have always gobbled them up.

(Why, yes, the picture up top is from Instagram...I had to brag on my kitchen bad ass-ness when I made them the first time!)


Wednesday, June 19, 2013

Ham and Artichoke Sandwich


So I was just looking up my dinner recipe for tonight on my blog (Crockpot Beer Chicken Fajitas, if you're curious) and saw I've only done nine blog posts for the whole year.  Nine!  And it's June!  Yowza.  I need to get back to blogging.  I promptly opened my "cooking blog" photos folder and scoured for something to post.  I'll be honest, when I saw these pictures I couldn't remember exactly what it was, until I saw the artichoke hearts and then remembered.

Every January (well, this year and last year anyway) we go up north to Flagstaff, AZ with my mama the last weekend of winter break.  I love Flagstaff.  It reminds me a lot of where I went to college, and in the summer it's a great escape from the Phoenix heat, and in the winter it's a great place to go get a bit of winter. When the husband and I were there one time years and years ago we stumbled upon a brewery that we fell in love with, now we always make it a point to go there when we're visiting.  Beaver Street Brewery.  Awesome beer (they have a scotch ale which also reminds me of my favorite brewery where I went to college), great food, good place to take kids.  We actually went twice this past trip...once on a date night dinner while my mom kept the boys and then with my mom for lunch one day.  The husband and I always get pizza when we go for dinner (actually he might have gotten pizza again for lunch this trip), but for lunch I wanted to try something new.  This sandwich sounded fantastic (and it was), so I tried to recreate it once we were home.

Ham and Artichoke Sandwich
Source: adapted from Beaver Street Brewery's Wood Fired Ham and Artichoke Sandwich

1 French roll
Few slices of ham
2 slices provolone cheese
Marinated artichoke hearts

Split roll in half lengthwise and toast.  Place ham slices on bottom half of roll.  Top with marinated artichoke hearts and place cheese on top of artichoke hearts.  Place sandwiches (but not the top half of roll) on a cookie sheet and heat under the broiler until cheese melts.  Top sandwich with top half of roll and serve.

*****

Obviously the ingredients above are for one sandwich, so adapt as necessary to fit your needs.  This was a tasty sandwich but not nearly as good as the one at Beaver Street.  I used real ham for mine, not just deli ham, because it's what I had but either would work.  Next time I would brush some of the marinade from the artichoke hearts onto the rolls to give it a little extra boost of flavor.  For those of you that have an aversion to ham, I bet it would be tasty with chicken as well.