Showing posts with label sandwiches. Show all posts

Monday, September 5, 2022

Binging with Babish's Deluxe Grilled Cheese

 Wow, it has been a MINUTE since I've done this!  Thank you, Blogger, for simply having a "new post" link when I go to my blog to make it easy on me.

I recently created an Instagram account for our little dog because he is constantly hovering by anyone preparing food in our kitchen, so I decided to combine cooking and recipes with dog pics.  I'm still working on how to best provide links for the recipes I show, so while I get that figured out I thought the easiest way to start would be directing anyone interested here, and I can provide a link (or the recipe) to whatever the post is.

Interested in following along with this new endeavor?  Give us a follow on Insta at Sous Chef Jeff!

Here's Jefferson aka Sous Chef Jeff in all his cuteness...


So, with all of that being said and introduced, here we go!  My 16 year old son recently introduced me to a YouTube channel, Binging With Babish, and I've kind of been watching it incessantly, sometimes with my son and sometimes on my own.  He had seen this grilled cheese video and thought we should try it sometime.  He was going to make it with me, but high school life got in the way, so I was on my own.

Instead of copying and pasting, I'm just giving you the links.


Binging with Babish: Grilled Cheese Deluxe inspired by Regular Show on the Babish website

This was definitely a tasty grilled cheese and one I would make again for sure.  I did make a few mistakes I would change next time...
  • On the video he puts the cheese into a ramekin to solidify and cool.  The recipe calls for spreading it on a cookie sheet to make slices.  I was having a struggle with plastic wrap for the cookie sheet, so I opted for a container.  I recommend using a cookie sheet if you want the cheese to set faster...basic science stuff here, but it took awhile for the big chunk o' cheese in the container to cool because it was so dense...which meant we actually had these the next night for dinner because the cheese wasn't set in time.  I would have prepped it earlier in the day to avoid this, but at the time I thought my son was going to help me with it, so I was waiting for him to get home from school and sports practice.
  • Once the cheese was cool, and I took it out to slice it, I ended up slicing it way too thick.  Thinner is better if you want an epic cheese pull when you cut the sandwich.
  • I used brioche bread because I thought that would be delicious, but I think next time I'd stick with a regular white sandwich bread, like Pepperidge Farm's.  That's my go-to white bread for sandwiches that require white bread (really white bread is the only option for things like pimento cheese and meatloaf sandwiches, don't you think?).  The brioche was still good, just not what I was looking for with this.  The end result actually reminded me a lot of a Sonic grilled cheese, which by no means was a bad thing.
Here's my cheese blob after I took it out of the container for slicing.  I cut it in half widthwise and then cut slices from the smaller pieces.


And the finished sandwich!


Thursday, August 15, 2013

Baked Hawaiian Ham Sandwiches


So chances are good that if you're on Pinterest, you've seen this recipe and/or pinned it.  We had these last night, and I couldn't believe they weren't on my blog because I've made them several times, and they're completely easy and delicious.

I've always loved the http://www.kingshawaiian.com/products/">King's Hawaiian breads
, and it seems that now they're a whole lot easier to find than they were many years ago.  It used to be a big treat to find them, now pretty much every grocery store has them.  And I love them.  That was selling point number one for these sandwiches.  Although it just occurred to me that I've never looked at the ingredient list.  Sigh.  I probably should, but I'm fairly certain that means I won't want to buy them anymore.  Do you ever run into this conundrum if you try and mainly eat real food?  I suppose I could find a recipe to make my own...surely there's one out there.  But I digress...
I also love sandwiches.  I'd say who doesn't love them, but I do know of someone that doesn't.  She doesn't like mixing her food together, which I understand I guess, but man alive is she missing out!  I can see not wanting your mashed potatoes and peas to mingle together on your plate, but a sandwich is something completely different.  These sounded super easy when I first saw the recipe, and I'm always up for an easy to prepare dinner!  Especially if it's a delicious sandwich.

Baked Hawaiian Ham Sandwiches

One 12-count package http://www.kingshawaiian.com/products/rolls-12-pack/">King's Hawaiian sweet dinner rolls
3 sticks butter
3 Tbsp dijon mustard
1-1/2 tsp worcestershire sauce
1 Tbsp poppy seeds
1 onion, somewhere between finely chopped and diced
1 pound thin sliced ham
6 slices Swiss cheese

Preheat oven to 350.

In a medium saucepan, melt butter and add in mustard, worcestershire, poppy seeds, and onion.  Let simmer 5-7 minutes.

Slice entire package of rolls in half horizontally, so you have 12 bottoms and 12 tops.  Keep them connected--don't break them apart into separate rolls.

Place bottom halves of rolls into a foil-lined 9x13 baking dish.  Brush 1/3 to 1/2 butter mixture on rolls.  Place ham on top, layering evenly across rolls.  Lay cheese slices in single layer on top of ham.  Place top halves of rolls over the cheese and brush remaining butter mixture on the top of the rolls.

Cover with foil.  Bake approximately 15 minutes.  Remove foil cover and bake another 5-7.  Slice into individual rolls and serve.

*****

Obviously you can probably tell from my initial comments that these are a huge hit at my house.  My kids don't like the pieces of onion on theirs that inevitably end up on the top of the roll, so they just push them off and have a little onion pile on their plate, which is okay by me.  I'm not sure how many times I've made them, but last night I actually doubled the recipe so there'd be leftovers because we'll eat a whole batch in one meal.  But then of course today, Boy #1 wanted to buy lunch at school, and the husband had an all day meeting with lunch being served, so there's a whole pan of them just sitting in my fridge now.  Good thing it's leftover clean-up for dinner tonight!

By the way, does anyone know of a ham that is free of nitrates and nitrites?  Try as I might, I cannot find one.  I'm starting to think unless I get a fresh ham and cook it myself, it's not going to happen.  And if that's the case, I'll either stick with the nitrites or do away with ham altogether.

Who am I kidding...I would never do away with ham.

Speaking of ham...check out Boy #2 posing with the sandwiches!


Wednesday, June 19, 2013

Ham and Artichoke Sandwich


So I was just looking up my dinner recipe for tonight on my blog (Crockpot Beer Chicken Fajitas, if you're curious) and saw I've only done nine blog posts for the whole year.  Nine!  And it's June!  Yowza.  I need to get back to blogging.  I promptly opened my "cooking blog" photos folder and scoured for something to post.  I'll be honest, when I saw these pictures I couldn't remember exactly what it was, until I saw the artichoke hearts and then remembered.

Every January (well, this year and last year anyway) we go up north to Flagstaff, AZ with my mama the last weekend of winter break.  I love Flagstaff.  It reminds me a lot of where I went to college, and in the summer it's a great escape from the Phoenix heat, and in the winter it's a great place to go get a bit of winter. When the husband and I were there one time years and years ago we stumbled upon a brewery that we fell in love with, now we always make it a point to go there when we're visiting.  Beaver Street Brewery.  Awesome beer (they have a scotch ale which also reminds me of my favorite brewery where I went to college), great food, good place to take kids.  We actually went twice this past trip...once on a date night dinner while my mom kept the boys and then with my mom for lunch one day.  The husband and I always get pizza when we go for dinner (actually he might have gotten pizza again for lunch this trip), but for lunch I wanted to try something new.  This sandwich sounded fantastic (and it was), so I tried to recreate it once we were home.

Ham and Artichoke Sandwich
Source: adapted from Beaver Street Brewery's Wood Fired Ham and Artichoke Sandwich

1 French roll
Few slices of ham
2 slices provolone cheese
Marinated artichoke hearts

Split roll in half lengthwise and toast.  Place ham slices on bottom half of roll.  Top with marinated artichoke hearts and place cheese on top of artichoke hearts.  Place sandwiches (but not the top half of roll) on a cookie sheet and heat under the broiler until cheese melts.  Top sandwich with top half of roll and serve.

*****

Obviously the ingredients above are for one sandwich, so adapt as necessary to fit your needs.  This was a tasty sandwich but not nearly as good as the one at Beaver Street.  I used real ham for mine, not just deli ham, because it's what I had but either would work.  Next time I would brush some of the marinade from the artichoke hearts onto the rolls to give it a little extra boost of flavor.  For those of you that have an aversion to ham, I bet it would be tasty with chicken as well.


Saturday, August 11, 2012

Shrimp Salad Rolls


My mom is retired and has the luxury of spending a month out of each summer traveling around to cooler climates. She's so lucky! This summer she spent a week at her time share at a lake in eastern Washington, then some time in Seattle visiting my brother, then a week on the Oregon coast and finally finishing up her trip with a few days in Portland before she drove home. Sounds nice, doesn't it? Especially when it means she's escaping the 100+ degree temperatures we have in Phoenix. Oh, I can't wait until I can do the same!! Anyway, while she was in Oregon she got a smokin' deal on fresh Oregon bay shrimp and she was nice enough to bring some home to me. Woo hoo!! I had so many ideas what I could do with it that I got overwhelmed and stuck it all in the freezer. Then I was looking through the most recent issue of Cooking Light and saw a recipe for shrimp salad rolls. I knew that would be a use for one of my pounds of shrimp!

Shrimp Salad Rolls
Source: Adapted from Cooking Light, August 2012

1 pound Oregon bay shrimp, cooked
1/4 cup canola mayonnaise
1 teaspoon grated lemon rind
1 tablespoon fresh lemon juice
2 teaspoons chopped fresh parsley
1-2 teaspoons Old Bay seasoning
1/2 teaspoon freshly ground black pepper
1/4 teaspoon kosher salt
2 hot dog buns
4 romaine lettuce leaves

Combine chopped shrimp, mayonnaise, and next 6 ingredients (through salt) in a large bowl.

Open buns without completely splitting; arrange, cut sides up, on a baking sheet. Broil 1 minute or until toasted. Place 2 lettuce leaves in each bun; top each serving with 1/2 cup shrimp mixture.

*****

If you look at the original recipe you'll see I made a few modifications. It called for larger, raw shrimp and then to chop it. Since the shrimp I had were little already, I skipped that. It also called for fresh tarragon, which I didn't have, so I used some Old Bay instead. I might have thrown a little Tony Chachere's in there, too, for good measure. Rarely can you go wrong with adding a little Tony's to something. And the original said this made four sandwiches, but I love me some shrimp, so I only made two. My kids aren't big seafood fans, and I wasn't about to waste these yummy shrimps on them, so the husband and I had them for a date night dinner one night after the kiddos were in bed.

These were fantastic. I've only ever had lobster rolls once, when we were back east for my cousin's wedding a few years ago, but these sandwiches really reminded me of those. These were a great, light, easy summer dinner. I'll definitely make them again, even without the delicious Oregon shrimp!


Saturday, July 7, 2012

Bacon Guacamole Grilled Cheese Sandwich


It should come as no surprise to those of you who read my blog that, given my family's obscene love for cheese, we also love grilled cheese sandwiches. Because of this, I am always on the lookout for fancy, delicious-sounding grilled cheese. Our love of cheese is probably only rivaled by our love of bacon. Seriously, this family of mine can go through some bacon! So, a grilled cheese with bacon?! Awesome! Add in some creamy guacamole, and it sounds freakin' amazing! I used to not like guacamole or avocados. My parents LOVED them, and I never saw the appeal of the weird, squishy food. I was never a vegetable hater (or is an avocado a fruit?), but avocados just never did it for me. When I was pregnant with Boy #1 I had a veggie sandwich for lunch one day and almost threw up when I tasted the avocado and it's squishyness in my sandwich. Yuck. But then somehow after he was born, I embraced the avocado and LOVED it. Go figure...pregnancy does weird things to you. So, anyway, when I saw this sandwich on Pinterest I had to try it!!

Bacon Guacamole Grilled Cheese Sandwich
Source: closetcooking.com via Pinterest
Ingredients listed are for one sandwich

2 slices bacon
2 slices sour dough bread
1 tablespoon butter, room temperature
1/2 cup jack and cheddar cheese, shredded
2 tablespoons guacamole, room temperature
1 tablespoon tortilla chips, crumbled (optional)

Cook the bacon until crispy and set aside on paper towels to drain.

Butter one side of each slice of bread, sprinkle half of the cheese onto the unbuttered side of one slice of bread followed by the guacamole, bacon, tortilla chips, the remaining cheese and finally top with the remaining slice of bread with the buttered side up.

Grill over medium heat until golden brown and the cheese has melted, about 2-3 minutes per side.

*****

This sandwich definitely delivered!! I loved the addition of the tortilla chips in the sandwich for a little bit of crunch. I'm not normally a chip-in-sandwich-eater (except when I'm pregnant...which I'm not, I'm just saying I did it when I was pregnant), but this was pretty tasty. I love making my own guacamole, and if you've never tried it, you really should. It's so easy--mash up an avocado or two or ten (you know, depending on how much you need), add in a little salsa (homemade or from a jar, whatever floats your boat), salt, and maybe a squeeze of lime juice, and you're good to go. My only complaint was that I think I had too much guac and not quite enough cheese for the amount of guac I had used. But, like I said, this was super tasty, and we will definitely have it again!


Tuesday, March 20, 2012

Turkle Burgles


We were on a spring break trip in CA last week, and the husband pointed out that I hadn't updated my blog in awhile. I knew he was right, so today I decided to make blog updating a priority. and then I got distracted by Pinterest and going through my picture folders to see what exactly I wanted to blog about, so now I only have time to do one post instead of the two or three I had planned. Oh well! I was amazingly efficient today, so let's hope that carries over to tomorrow. Of course, it helps that Boy #2 is being entertained by an alphabet/phonics video.

This isn't anything we've had recently, but it's super yummy, and Boy #1 keeps talking about them, so I figured I should write a post about them. I have no idea where the name of this came from, but it's something my family has always eaten, especially with leftover Thanksgiving turkey. The sandwiches are so easy to put together, and really tasty! Hey, if my six year old asks for them repeatedly, you know it has to be something good! he even took them for his lunch, cold!

Turkle Burgles
Serves 4

4 hamburger buns or sandwich rolls (I use Oroweat Sandwich Thins)
8 slices cooked bacon
8 slices turkey (or enough for four sandwiches)
4 slices cheese
Thousand Island salad dressing (or homemade with mayo, ketchup, and relish)

Heat broiler. Toast hamburger buns. Place bottom half of buns on a cookie sheet. Top with 2 slices of turkey, 2 strips of bacon (I tore mine in half to get more bacon coverage), and slice of cheese. Place under broiler until cheese begins to melt. Spread dressing on top half of bun and top sandwich.

*****

Seriously, the hardest part of these was mixing up my own Thousand Island dressing. We had these a couple nights in a row when we had leftover turkey after the holidays because 1) they're so easy to put together, and 2) we all loved them. I'm sure they could be made using turkey lunchmeat, too, if you didn't have any leftover turkey meat, I've just always had them with leftover turkey.

Typing this out and looking at the pictures almost makes me want to find a turkey to cook...almost!


Tuesday, February 28, 2012

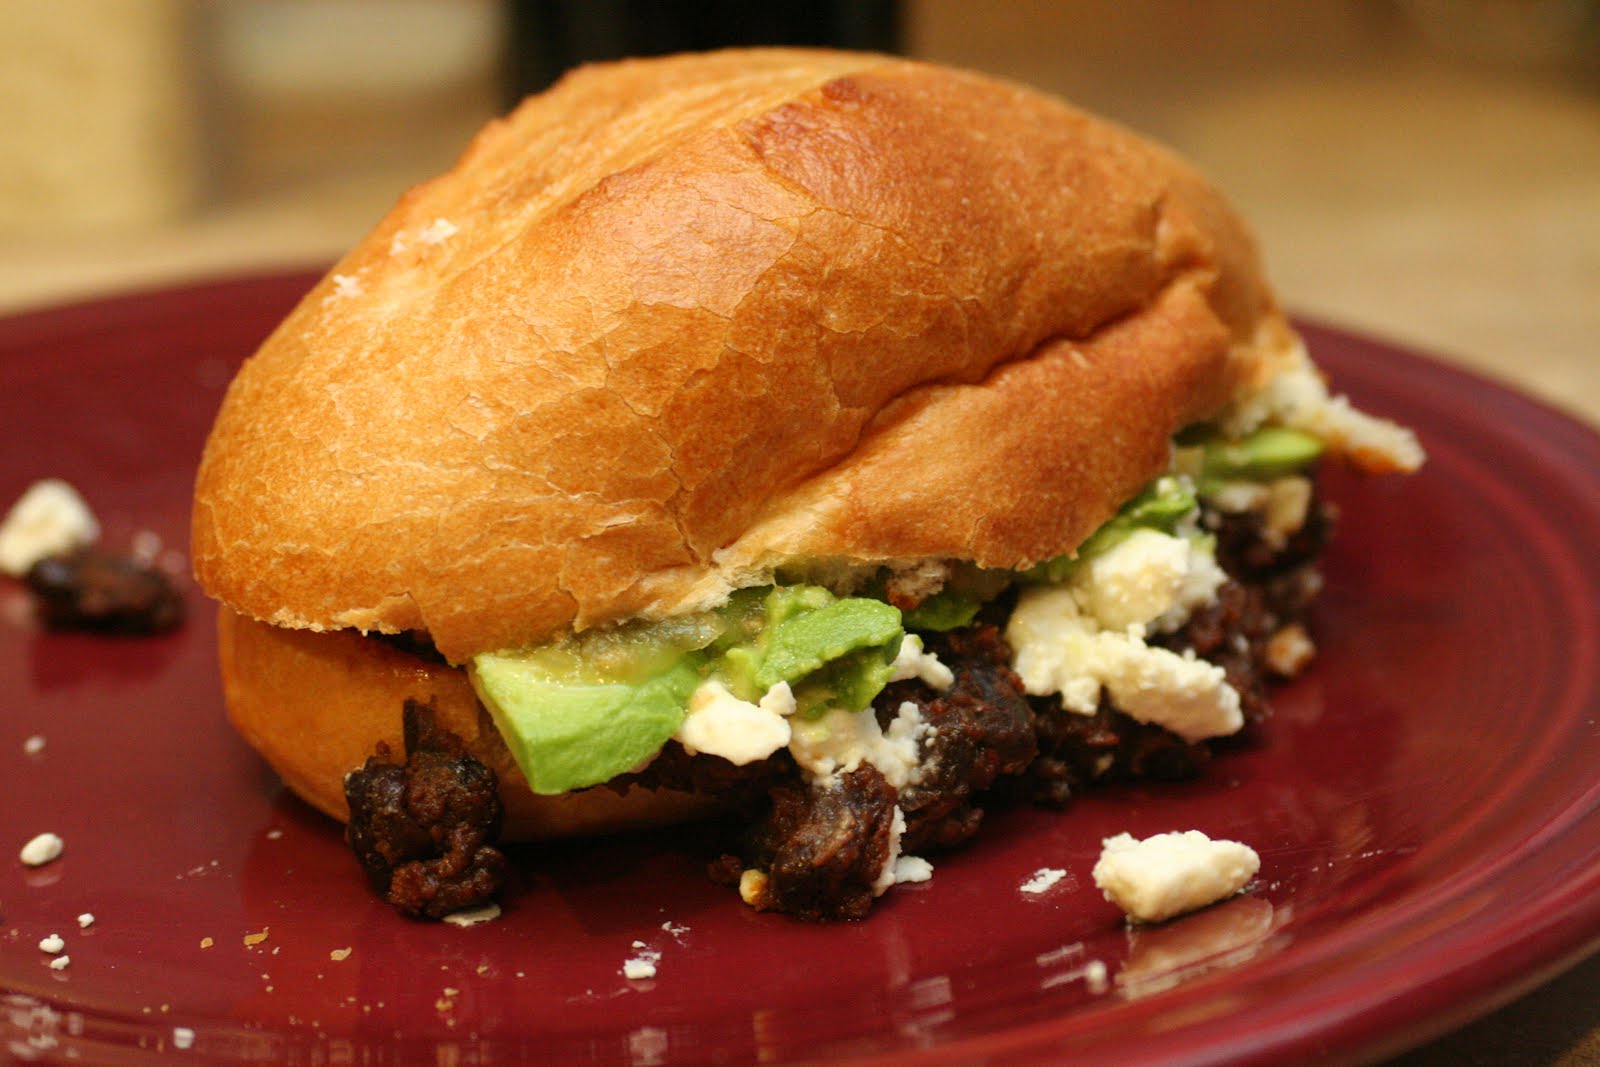
Rick Bayless Crusty Chorizo and Black Bean Subs


This isn't a new recipe, but my original post just had pictures taken with my cell phone. the husband and I had this for our date night dinner last week, so I seized the opportunity to get some new, better pictures of it. This is hands down one of my favorite sandwiches ever. The husband might not like me sharing this, but after we finished our sandwiches, he went into the kitchen and made a bite sized sandwich with some of the bread I tore out of the middle of the rolls. Yeah, it's that good. I normally make my own tomatillo salsa to go with these, but I knew I had some salsa verde in the fridge, so I just used that this time.

I know this is already on my blog, but I feel like it needs a new entry with the better pictures. So, here's the recipe again!

Crusty Black Bean Chorizo Subs
aka Tortas de Chorizo y Frijoles Negros
Copyright 2005, Rick Bayless' Mexican Everyday

8 ounces fresh Mexican chorizo sausage, casing removed (about 1 cup)
3-4 Tbsp vegetable or olive oil (divided use)
Two 15-ounce cans black (or other) beans
Salt
4 bolillo rolls, crusty French rolls or submarine sandwich rolls (6-7 inches long, 3 inches wide)
6 ounces queso fresco or other fresh cheese such as feta or goat cheese, sliced 1/4 inch thick
1 ripe avocado, pitted, flesh scooped from the skin and cut into 1/4-inch slices
3/4 cup Roasted Tomatillo Salsa (recipe to follow)

Set a large 12-inch skillet over medium heat and add the chorizo. Cook, breaking up the clumps, until browned and thoroughly cooked, about 8-9 minutes. Add 1-2 Tbsp of the oil (depending on how much fat the chorizo has rendered) and the beans. As the beans come to a simmer, mash them to a smooth paste with a Mexican bean masher, old-fashioned potato masher or the back of a large cooking spoon. Cook, stirring nearly constantly, until the consitency of very soft mashed potatoes--expect about 10 minutes after adding the beans. Taste and season with the salt if you think necessary. Keep warm over the lowest heat, covered to keep the beans soft and moist.

Heat a large griddle or skillet over medium. Slice the rolls open. use fingers or a spoon to scrape out some of the soft bread in the center of each half, making a small hollow. Brush the insides with the remainig 2 Tbsp oil, then lay them cut side down on the griddle or skillet to crisp to a rich golden brown, about 3 minutes.

Smear about 1/2 cup of the chorizo-bean mixture over the bottom half of each roll. Top with slices of the cheese and the avocado. Spoon on the salsa or dash on the hot sauce. Set the top of each roll i place, and you're ready to serve.

Roasted Tomatillo Salsa
Copyright 2005, Rick Bayless' Mexican Everyday

4 medium (8 ounces total) tomatillos, husked, rinsed, and halved
2 large garlic cloves, peeled
Hot green chiles to taste (2 serrano or 1 jalapeno), stemmed and roughly chopped
About 1/3 cup (loosely packed) roughly chopped cilantro
1/2 small white onion, finely chopped
Salt

Set a large nonstick skillet over medium-high heat. Lay in the garlic and tomatillos, cut side down. When the tomatillos are well browned, 3-4 minutes, turn everything over and brown the other side. The tomatillos should be completely soft.

Scrape the tomatillos and garlic into a blender or food processor and let cool to room temperature, about 3 minutes. Add the chiles, cilantro, and 1/4 cup water. Blend to a coarse puree. Pour into a salsa dish and thin with a little additional water if necessary to give the salsa an easily spoonable consistency.

Scoop the chopped onion into a strainer and rinse under cold water. Stir into the salsa. Taste and season with salt, usually about 1/2 tsp.

*****

I don't really need to say anything about these because I already have. So delicious!!!


Saturday, September 17, 2011

Smoked Salmon and Pesto Sandwich

This was another sandwich creation that stemmed from mine and Clementine's recent visit to Postino Winecafe. They had a bruschetta with smoked salmon and pesto that was incredible. I couldn't stop thinking about it. I love the combination of pesto and salmon. My mom makes a really tasty pesto salmon, but since the husband doesn't like salmon I don't get it very often. Clementine came up with the idea of making a sandwich version of the bruschetta. When she told me about it when she had the idea, I was tempted to run out and buy the ingredients to have it too. Last weekend I was able to go to Trader Joe's, so I figured I'd pick up some smoked salmon there to make these sandwiches for the husband and me.

Smoked Salmon and Pesto Sandwich
Source: My BFF Clementine

olive oil
1 par-baked ciabiatta loaf
1 4-ounce package smoked salmon
1/2 package of softened cream cheese
3-4 tablespoons of pesto (store-bought or homemade)
1/4 red onion, minced finely
1/2 small jar of capers

Preheat the oven to 400 degrees. Place the whole ciabiatta loaf directly on the oven rack for 10 minutes, so the crust may get crisp and the inside may get warm. Remove from oven with tongs and let cool slightly on a cutting board. (Note: if your ciabatta loaf is fully baked, use a 350 degree oven for more like 5 minutes.)

Once bread is cool enough to handle, slice the entire loaf lengthwise and brush some olive oil on both the top and bottom halves. Spread 1/4 cup of softened cream cheese on each half. On the bottom half, sprinkle capers and red onions over the cream cheese. Layer the smoked salmon on next. On the top half of the bread, slather pesto sauce over the cream cheese layer. Place top and bottom halves of the loaf together to assemble one large sandwich. Cut into individual sandwich servings and serve immediately.

*****

Wow. Wow. Wow. This may have been the best sandwich I have ever had. It's at least one of the top five. It was so good, I was tempted to run to the store to get more smoked salmon and ciabatta bread. I may have gone if I hadn't already consumed a few glasses of wine at that point. Jen Clementine put tomatoes on hers when she made them, but I wasn't sure I'd like it with tomatoes, so I left them off. I have to say, this was the perfect combination of ingredients. My bread was perfect--crunchy on the outside but soft inside, creamy from the cream cheese, salty with the smoked salmon and capers, the rich pesto. Wow. This is something we will definitely have on a regular basis.

Best. Sandwich. Ever.


Sunday, August 28, 2011

Brie, Prosciutto, and Fig Jam Panini

I'm pretty sure I've mentioned that I'm training to run a half marathon. The race is now a week from tomorrow, and I'm completely freaking out, but that's not the point. A few weeks ago, Jen Clementine and I went up north to do a long run in cooler temperatures. We were ready to rock out 12 miles, and I figured the change in altitude (I think it's around 5,000 feet) would be balanced out by the cooler temperatures. I was wrong. The altitude kicked our asses, and it really wasn't that much cooler than when we do our early morning runs here. Lame. We left feeling pretty defeated. We had planned on eating lunch up there before heading back, but when we gave up it wasn't really lunch time. We figured we'd eat somewhere in Phoenix before heading home. Clementine suggested Postino Winecafe which was fine with me because I'd wanted to try it for a long time.

We got there and were overwhelmed with tasty options. First overwhelming thing: all wines are $5 a glass from 11 to 5 every day. Once we got our wine choices figured out, we had to tackle the menu. Bruschetta...panini...salads...desserts...oh my. We ended up sharing one of the bruschetta boards and splitting a sandwich. I loved Postino so much that I decided the husband and I needed to eat there the following weekend when we were doing a staycation at a local resort. He and I shared the same combination of food but with different bruschetta flavors (I guess toppings would be a better choice of word) and a different sandwich. The sandwich we went with was the Prosciutto with Brie--Prosciutto with triple cream brie, fig jam and arugula
with balsamic vinegar and olive oil. Holy moly. The husband is a huge fan of figs, so it was an easy sell. I knew after eating it I needed to recreate it. Clementine had recreated it before, so I read what she had done and kind of went from there. I don't have exact measurements of what I used, so you'll have to wing it a bit if you decide to make this.

Brie, Prosciutto, and Fig Jam Panini
Source: adapted from Postino Winecafe

2 cups arugula
Olive oil
Balsamic vinegar
Juice from one half a lemon
1 loaf ciabatta bread
Fig jam/preserves
Prosciutto
Brie

In a medium bowl, toss arugula with drizzles of olive oil and balsamic vinegar and juice from half a lemon. Set aside.

Split ciabatta loaf into two halves then slice each half horizontally (or use ciabatta rolls). Spread fig jam on inside halves of the bread. Top with prosciutto, arugula, and brie. Place top half of bread onto sandwich. Grill on a panini press until cheese is melted.

*****

I think I had a three ounce package of prosciutto and used the whole thing between the two sandwiches. This was super tasty. The salty prosciutto, the sweet figs, the creamy brie...oh my goodness! It's pretty rare that we have fig jam, and it's not cheap when we do have it, so I doubt this is something we'll have very often (unless we go to Postino), but oh man, was it ever tasty!!


Wednesday, April 27, 2011

Green Goddess Grilled Cheese Panini

I heart cheese. That's not news. I heart paninis, too, and that's probably equally newsworthy. There's a panini blog I follow, Panini Happy. She has all sorts of amazing sandwiches on there that I'm dying to try. Ummm...grilled mac and cheese with pulled pork?! Yes, please!! I had seen her post about this Green Goddess Grilled Cheese on St. Patrick's Day and thought it sounded fantastic. I found myself needing to be somewhere near our Saturday's Farmer's Market recently and decided to stop in to get the fresh herbs I'd need to make this.

Panini Happy's Green Goddess Grilled Cheese Panini
Source: PaniniHappy.com

1 clove garlic, finely chopped
1 oil-packed anchovy, finely chopped
1 teaspoon lime zest (about 1 lime)
3 tablespoons chopped fresh Italian parsley
2 tablespoons chopped fresh tarragon
2 tablespoons chopped fresh cilantro
1 tablespoon chopped fresh basil
1 tablespoon finely chopped shallot
1/4 teaspoon Dijon mustard
2 ounces cream cheese, cut into smaller cubes
1 cup shredded mozzarella
1 cup shredded sharp cheddar
8-12 slices sourdough bread
2 tablespoons extra-virgin olive oil

Add garlic and anchovies to a mini-prep food processor and pulse for a few seconds until it’s really finely chopped, almost like a paste (if you don’t have a food processor, you can always just chop the ingredients really well with a knife on a cutting board).

Add in the lime zest, parsley, tarragon, cilantro, basil, shallot, mustard and cream cheese and pulse again until well blended. Transfer to a medium-sized bowl and stir in the mozzarella and cheddar cheeses.

Preheat the panini grill to medium-high heat.

For each sandwich: Spread a generous amount of the cheese mixture onto one slice of bread. Close the sandwich with a second slice of bread. Brush a little olive oil on top. Grill for 5 to 6 minutes until the cheese is melted and oozy and the bread is toasted. Serve immediately and enjoy!

*****

I'm lazy and didn't chop everything on my own...I tossed it all in my food processor to let it work for me. What's the point of having machines in my kitchen and me doing all the work they can do? Oh, but I didn't have any shallots. I don't know why my grocery store is so hit or miss with shallots. they aren't that uncommon an item are they? Oh what I'd give to have a store that carries everything nearby. I shouldn't complain...when we first moved to this area there was only one grocery store. Now I at least have choices. Anyway.

The cheese filling on this was FANTASTIC. Before it cooked it had a really garlicky bite to it, but that mellowed a lot while the cheesy goodness melted while the sandwich was on the panini press. My only complaint was my bread choice. I didn't buy sourdough bread for this because I figured we could just use the regular whole wheat bread we use on a regular basis. I was WRONG. Don't make my same mistake. This sandwich needs a sturdy bread, not lame-o Oroweat Double Fiber Whole Wheat bread. And be generous with the filling on said sturdy bread. It's worth it. Oh, and don't forget to put the leftover spread away and sitting on your kitchen counter all night because you'll be a sad cheese-lover in the morning when you come downstairs and discover your mistake. I'm just saying...learn from my mistake.

I'd totally make this again but only with a better kind of bread.

Sandwich filling:


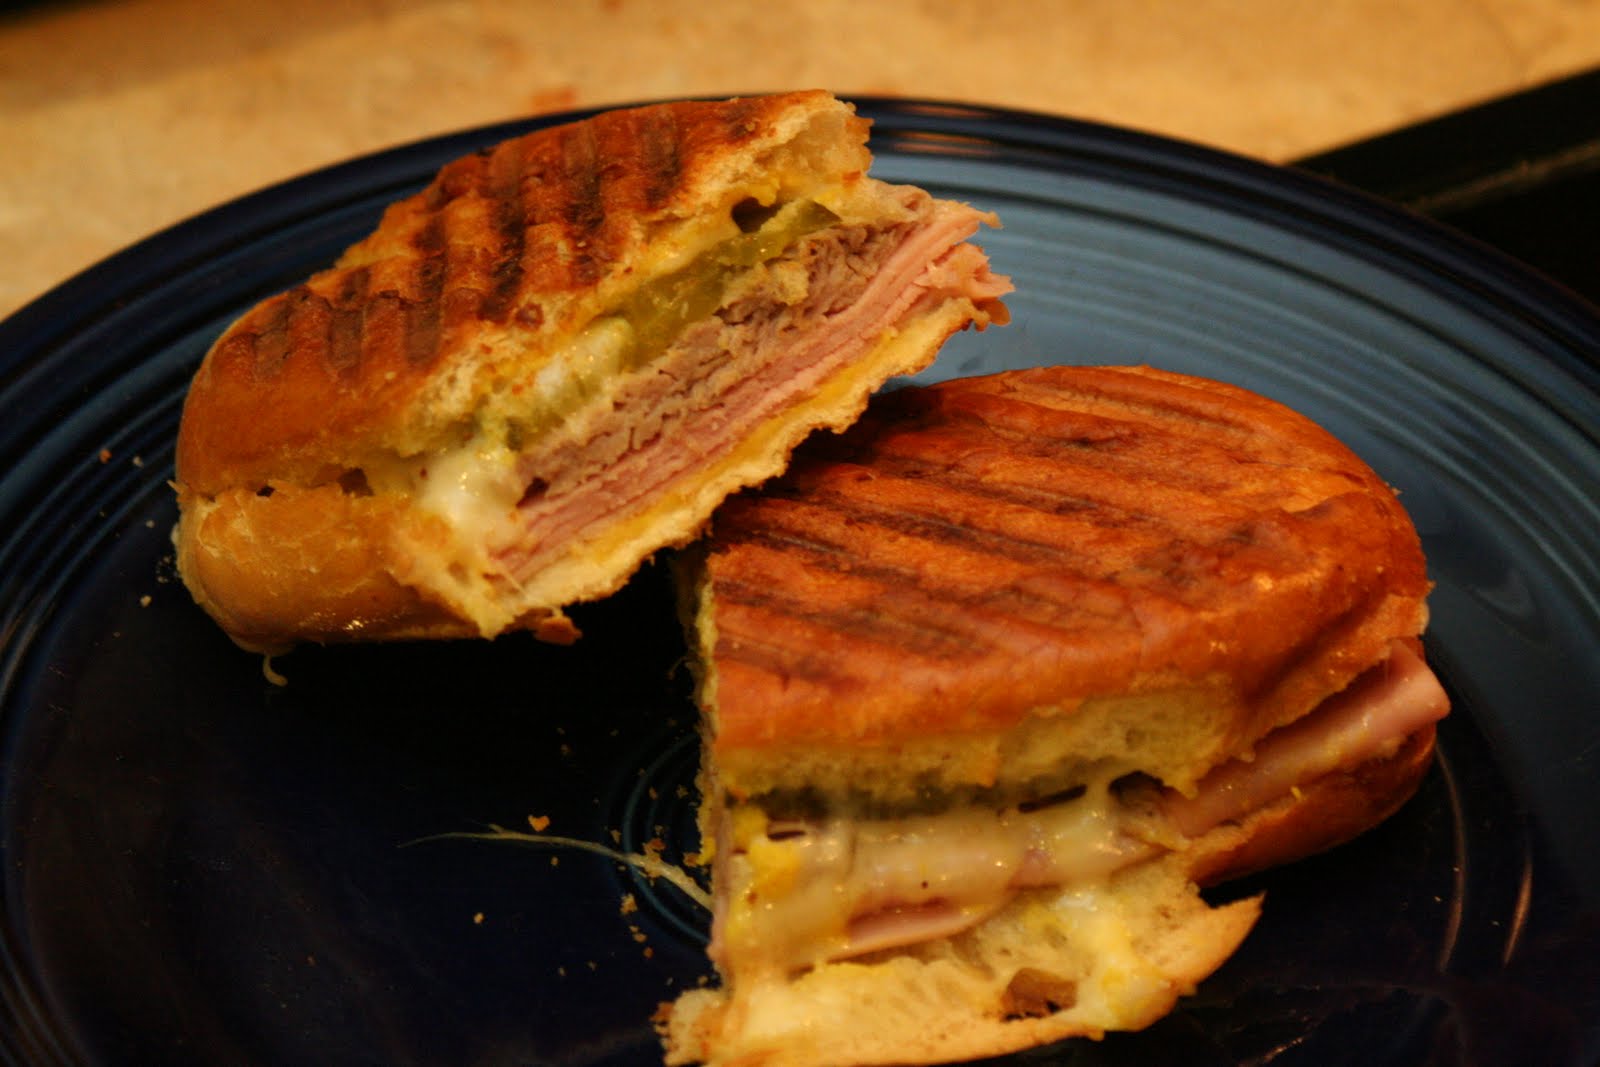
Cuban Sandwiches

Hello, dear blog. I've missed you so. I really have no excuse for why I've stayed away so long. Well, I kind of do but it's not a very good one. I wrote out a list of blog posts I want to do and there are seven on the list and two maybes. Yikes. That's a lot of catching up to do. Conveniently I feel like doing no sort of household chores today, other than what I've already accomplished, so that works out pretty well. Plus someone from church is swinging by at some point, so I don't want to be in the middle of, say, giving the dog a bath when she gets here.

Quite awhile ago the husband and I went on a date night to a local Cuban restaurant. My mom had bought a Groupon for it but wasn't going to be able to use it, so she generously gave it to us. Woo hoo! I love a date night, but a free date night is even better! Actually I think we ended up spending more than the amount of the Groupon because (here's a little known fact about me) I cannot resist a good, fresh mojito...the kind with real mint leaves in the bottom of the glass. Lordy mama, am I ever a sucker for a good mojito. It's actually kind of a sickness because whenever I smell fresh mint all I can think of are mojitos.

Anyway...

We went to this Cuban restaurant for dinner and decided to share two entrees. I seriously could not decide. We knew we wanted a Cuban sandwich and honestly I would have eaten anything else on the menu. We ended up getting some kind of pulled pork that was really good, but the Cuban sandwich was AMAZING. I've always been a fan of Cuban sandwiches...pork, ham, swiss cheese, mustard, pickles. What's not to love?! After having a very tasty sandwich there the husband and I decided we needed to have them again soon. So we had them for a date night dinner one Friday after the kiddos went to bed. I just kind of winged the recipe.

Cuban Sandwiches

4 slices deli ham
4 slices roasted pork
2 slices Swiss cheese
4 slices dill pickles
Mustard
2 crusty rolls or 4 pieces french bread

Split open rolls and spread both sides with mustard. use as much or little mustard as you like. On bottom half of roll, layer 2 slices ham, 2 slices pork, 1 slice Swiss cheese, and 2 pickle slices. Top with top half of roll.

Using a panini press (or whatever you like to use for a pressed sandwich), grill sandwich until cheese is melted and the bread is toasted.

*****

Pretty easy. For the pork component I used a one pound pork loin roast that I had cooked in the crockpot. I used my friend Jen's method for cooking a pork roast...throw the roast, a can of beer, some salt and pepper in the crockpot and let it cook. It was pretty awesome pork and I think my new go to method for cooking pork when I just need the meat for something.

These weren't quite as good as the ones we had at Havana Cafe, but I think that was due to the bread. I didn't have access to special Cuban bread, and I really think that would make a big difference. The husband and I both liked them, and it was a pretty easy dinner to throw together, so I'm sure we'll have them again.

Friday, November 26, 2010

Prosciutto and Gruyere Strombolis

I get a daily email from MyRecipes.com with a featured recipe of the day. Sometimes they look great and then find their way into my Recipes folder in Outlook, other times they meet the sad fate of the Deleted Items folder. When this one showed up one morning I had a sudden flashback because I had made these years and years ago. In fact, when I first made this may have been one of the first times I'd ever used prosciutto. I don't remember when it was exactly, but it was two houses ago, so it was some time between February 2003 and September 2005. It was a Cooking Light recipe, and how I forgot about it, I'm not sure. It's really yummy and really easy, which, as you know, is a combination I love!!

Prosciutto and Gruyere Strombolis

1 (11-ounce) can refrigerated French bread dough
2 ounces thinly sliced prosciutto
1 cup trimmed arugula
1/2 cup (2 ounces) shredded Gruyère cheese
1/4 cup chopped fresh parsley

Preheat oven to 425°.

Unroll dough onto a baking sheet; pat into a 14 x 11-inch rectangle. Cut dough into quarters to form 4 (7 x 5 1/2-inch) rectangles. Top each rectangle with 1/2 ounce prosciutto, 1/4 cup arugula, 2 tablespoons cheese, and 1 tablespoon parsley. Beginning at short side of each rectangle, roll up the dough, jelly-roll fashion; pinch seam to seal (do not seal ends of rolls). Arrange rolls 4 inches apart on baking sheet. Bake at 425° for 10 minutes or until rolls are lightly browned. Serve warm.

CALORIES 275 (28% from fat); FAT 8.5g (sat 4.4g,mono 2.1g,poly 0.5g); IRON 2.3mg; CHOLESTEROL 24mg; CALCIUM 158mg; CARBOHYDRATE 34.4g; SODIUM 754mg; PROTEIN 14g; FIBER 1.5g

*****

So according to the website, this was published in Cooking Light's August 2004 issue. One of the reasons I slated this dinner (whenever it was we had it weeks ago) was because I had arugula in the fridge, but by the time I made them the arugula had seen better days. I skipped that part of it and just had prosciutto and gruyere inside them. This was a huge hit with everyone. The boy was strangely excited for this dinner when I told him what we were having. Now that I've remembered this recipe it's something we'll have again for sure. Yum!

sadly I did not take a picture. :(

Monday, August 30, 2010

Barefoot Bloggers: Ultimate Grilled Cheese

Wow, I had no idea how behind I was on Barefoot Bloggers assignments until I just went to my Barefoot Bloggers tag and saw it's been quite some time since I've done any of them. Oops!! I hope I don't get kicked out of the group. I'll have to look over what ones I've missed and try to incorporate them into my next couple weeks' meal plans. I tell ya, moving a couple months ago really threw a wrench into a lot of things!

I was excited to see a bonus recipe for August from Ina's not-yet-released new cookbook. And it claimed to be the Ultimate Grilled Cheese. Why wouldn't I try something like that?! We're big fans of grilled cheese around here. Plus it had bacon...cheese and bacon together?! Yes please!!

Ultimate Grilled Cheese
From Ina Garten's Barefoot Contessa How Easy Is that?

•12 slices thick-cut bacon, such as Nodine’s applewood smoked
•1 cup good mayonnaise
•1/4 cup Dijon mustard
•1/4 cup freshly grated Parmesan cheese
•1 1/2 teaspoon kosher salt
•1/2 teaspoon freshly ground black pepper
•1 white pullman loaf or sourdough bread, sliced 1/2-inch thick (12 slices)
•6 tablespoons salted butter, at room temperature (for spreading, you probably won’t use it all)
•6 ounces aged Gruyere or Comte cheese
•6 ounces extra-sharp Cheddar, such as Cabot or Shelburne Farms

1. Preheat the oven to 400 degrees F. Arrange the bacon on a baking rack set over a sheet pan in a single layer and roast for 20 to 30 minutes, until nicely browned. Drain on a plate lined with paper towels and cut in 1-inch pieces.

2. Meanwhile, combine the mayonnaise, mustard, Parmesan, salt, and pepper in a small bowl. Lay 12 slices of bread on a board and spread each one lightly with butter. Flip the slices and spread each one generously with the mayonnaise mixture. Don’t neglect the corners!

3. Grate the cheeses in a food processor fitted with the largest grating disk and combine. Distribute the bacon evenly on half the slices of bread. Pile 1/3 cup grated cheese evenly on top of the bacon and top with the remaining bread slices, sauce side down.

4. Heat an electric panini press. When the press is hot, cook the sandwiches for 3 to 5 minutes in batches until the bread is toasted and the cheese is melted. (Or, heat a nonstick skillet on medium-low, place two sandwiches at a time inside, and use a lightweight metal cake pan to weigh them down gently. Cook for 3 to 5 minutes. Flip the sandwiches, press them down with the cake pan, and cook for about 2 minutes, until golden brown. Repeat until all of the sandwiches are done.)

5. Allow the sandwiches to cool for 2 minutes. Cut in half, and serve warm.

*****

We were too excited to try these, so we cooked the bacon in a skillet instead of in the oven. That's the only change I made because I trust Ina and assumed they'd be awesome. Well, I was right. They were freakin' fantastic!!! I probably went overboard on my cheese usage, but for the ULTIMATE grilled cheese, I figured that was acceptable. The husband thought these would be better on a Texas Toast style bread and done in the skillet instead of a panini press, but he ate two sandwiches so he must not have had too much of a problem with them.

This will definitely go into our sandwich/panini rotation for sure!! Way to go, Ina!!

We like cheese in our house!


My husband is the bacon cook in our house. He was a master grill operator at the Waffle House back before I knew him, so all breakfast food cooking duties are his.


Cover your keyboards so you don't get drool on them!!

Sunday, August 22, 2010

Surimi Rolls

Do you know one of the things I love about my meal planning spreadsheet? It's a super easy way for me to go back and see what things I've missed posting on my blog! Plus I love spreadsheets, but since I'm not out in the corporate world anymore I don't have many occassions for them, so really any chance I get to create one, I jump on it. Have I mentioned before that I planned probably 75% of my wedding using spreadsheets? I even had a way cool one for our seating chart at the reception using conditional formatting, SUMIF formuals, etc. It was pretty awesome if I do say so myself.

Anyway...I was figuring out my meal plan for the coming week (which isn't very exciting since I'm challenging myself to use stuff we already have on hand) and went back and looked at previous weeks' meal plans because I do a new tab for each week. I realized there are quite a few things I need to go back and post. The baby is napping, the boy is watching a show, and the husband is napping on the couch, so I'm having some computer time.

As a parent I feel I'm obligated to have a subscription to Parents magazine. Along with that I get weekly emails with meal ideas. Sometimes I take the time to read through them and see if there's anything interesting, other times I just delete it. This recipe was in one I actually read, and I loved how easy it sounded!

Surimi Rolls
From Parents.com

1 pound imitation crab meat (surimi), chopped
3/4 cup light mayonnaise
3/4 cup chopped celery (about 2 large ribs)
4 teaspoons fresh chopped tarragon
1 tablespoon Dijon mustard
1 tablespoon olive oil
8 hot dog buns, top-sliced variety

1. In a large bowl, mix together the imitation crab, mayonnaise, celery, tarragon, mustard and olive oil until well combined. Cover and refrigerate for at least 1 hour.

2. To serve, spoon a generous 1/3 cup of the crab mixture into each roll. Garnish with parsley, if desired.

*****

I didn't have any tarragon, so I sprinkled in some Old Bay seasoning to add a little something to it. This came together ridiculously fast which is always nice. I was honestly surprised at how my kids gobbled this up. The baby could not get enough of it, and the boy ate every bite on his plate. This was a great dish for summer when it's hot out and you don't feel like cooking or heating up the kitchen but want something filling. I'd definitely make it again!

(I forgot to take a picture of it, but the post on Parents.com has a picture on it. I included the link in the recipe title up above.)

Wednesday, April 28, 2010

Barefoot Contessa's Caesar Club Sandwich

One more Barefoot Bloggers recipe that I missed posting in the correct month and finally got around to doing! I think I only have three recipes left (one of which I'm making Friday night) and then I'm fully caught up. woo hoo!! One is a cookie recipe, so I'll have to enlist the boy's help for that one as he loves to help make cookies.

Anyway, this recipe was chosen back in March by Karen of Shortbread. It's from the Barefoot Contessa at Home cookbook, which was the first Ina cookbook in my collection. My sister-in-law got it for me for my birthday many years ago. This sandwich was always one I wanted to try, but I'm not sure why it's taken me this long to make it. Let's see, I got the cookbook in April 2005, so five years?! Good lord. I'm serious when I say I have a major procrastination problem. In seeing what BB recipes I'd been slacking on preparing I saw this one and figured I'd go ahead and add it to the meal plan.

Barefoot Contessa's Caesar Club Sandwich
Copyright 2006, Barefoot Contessa at Home, All Rights Reserved

2 split (1 whole) chicken breasts, bone in, skin on
Good olive oil
Kosher salt
Freshly ground black pepper
4 ounces thinly sliced pancetta
1 large garlic clove, chopped
2 tablespoons chopped fresh flat-leaf parsley
1 1/2 teaspoons anchovy paste
1 teaspoons Dijon mustard
1 1/2 tablespoons freshly squeezed lemon juice
1/2 cup good mayonnaise
1 large ciabatta bread
2 ounces baby arugula, washed and spun dry
12 sun-dried tomatoes, in oil
2 to 3 ounces Parmesan, shaved

Preheat the oven to 350 degrees F.

Place the chicken breasts on a sheet pan skin side up. Rub the chicken with olive oil and sprinkle with salt and pepper. Roast for 35 to 40 minutes, until cooked through. Cool slightly, discard the skin and bones, and slice the meat thickly. Set aside.

Meanwhile, place the pancetta on another sheet pan in a single layer. Roast for 10 to 15 minutes, until crisp. Set aside to drain on paper towels.

Place the garlic and parsley in the bowl of a food processor fitted with a steel blade and process until minced. Add the anchovy paste, mustard, lemon juice, and mayonnaise and process again to make a smooth dressing. (Refrigerate the Caesar dressing if not using it immediately.)

Slice the ciabatta in half horizontally and separate the top from the bottom. Toast the bread in the oven, cut side up, for 5 to 7 minutes; cool slightly. Spread the cut sides of each piece with the Caesar dressing. Place half the arugula on the bottom piece of bread and then layer in order: the sun-dried tomatoes, shaved Parmesan, crispy pancetta, and sliced chicken. Sprinkle with salt and pepper and finish with another layer of arugula. Place the top slice of ciabatta on top and cut in thirds crosswise. Serve at room temperature.

*****

I only changed things up slightly. Well, maybe a little more than slightly. I pounded out two chicken breasts so they'd be thinner and then cooked them on my grill pan instead of Ina's oven method. I also had some homemade Caesar dressing I'd made (shoot...did I ever post that? It's a Rick Bayless recipe...), so I skipped that part of the recipe and just used up what I had. And I used bacon instead of pancetta because I already had some. And I used regular tomatoes instead of sun-dried. Want in on a little secret? I'm not really a fan of sun-dried tomatoes. If they're in something and I don't have to taste them on their own, I don't mind them. But I got quite a few tomatoes from my produce co-op last week, so I went with that instead.

So, after FINALLY trying this, I'm so sad I waited five years!! This was an awesome sandwich!! We had something going on at our house on Sunday when I made this, so dinner was going to be ready really late. We ended up feeding the kids chicken nuggets, then the husband and I had this after they had eaten so as to not postpone their bedtime. Honestly I'm glad we didn't have to share it with them. We each ate a third of the sandwich, then he took the leftover piece to work for lunch the next day. This was really easy to throw together, especially since I already had Caesar dressing made up in the fridge. I foresee us having this on a regular basis over the summer when it's too hot to cook.

Ina, you've done it again!! You never cease to amaze me!!


Monday, March 22, 2010

Grilled Vegetable Paninis

Recently I somehow stumbled on a food blog dedicated solely to paninis, PaniniHappy.com. Actually I think I found out from a link on Aggie's Kitchen. We love paninis, and I'm always looking for new variations. After my cheese making class I had some goat cheese (which at some point will be its own post) I wanted to use, so I checked out the panini blog for some ideas. I found a recipe for a Grilled Vegetable Panini that was pretty similar to what I wanted to do, so I used it as a basis. We needed to go to Trader Joe's, so I planned on picking up a bag of their frozen grilled zucchini and eggplant mix, but wouldn't you know they were out of it. So I bought an eggplant and a package of zucchini (really reasonably priced, by the way) and figured I'd grill my own. I still had some TJ panini rolls left in the freezer, so I used those for the sandwiches.

Grilled Vegetable Paninis

1 eggplant, sliced into 1/4-inch rounds
3 small to medium zucchini sliced lengthwise into 1/4-inch slices
4 Tbsp olive oil
3 Tbsp balsamic vinegar
1 tsp dried basil
1 tsp dried oregano
4 cloves garlic, minced
Goat cheese (chevre)
Slices of mozzarella
Panini rolls

Combine eggplant and zucchini slices in a large bowl. In separate small bowl, combine oil, vinegar, basil, oregano, and garlic. Whisk to combine, then pour over vegetables in large bowl and toss to combine. Let marinate at least one hour.

Prepare grill or grill pan. Grill vegetables in batches, approximately 3-4 minutes per side or until grill marks appear. Remove to plate and finish grilling vegetables.

To assemble sandwiches, spread layer of chevre on bottom half of panini roll (or bread of your choosing). Top with layers of vegetables, then a slice of mozzarella. Place top half of sandwich roll on sandwich and place the whole thing in a panini press for 3-4 minutes or until grill lines appear and mozzarella is melted.

*****

Mmmmmmmmm...this was so good!! We had a bit of a grill mishap, so I ended up having to use my grill pan inside. Some of the crazy storms we had this winter kept knocking over our grill, so we need to do a little maintenance on it to get it ready for grilling before we can use it. It worked out okay on the grill pan, just took a lot longer since I had to do smaller batches.

The chevre I used was what I had made at my cheese class. It was really yummy, although it was slightly more work than the other cheeses because you have to let it sit for longer, and it requires a special packet of something. I'll probably have to post about the cheese class tomorrow because I still have two posts left to do today, and the boy is getting antsy being in his room for quiet time.

Anyway, these were super tasty!!! The husband and I loved them. They were really filling, too. I did two layers each of zucchini and eggplant. I would definitely make this again--filling, healthy, vegetarian--love it!! Although I much prefer the convenience of the frozen veggies from Trader Joe's over having to do it myself.

The panini rolls I like:


My vegetables marinating. I tossed them around every now and then during the course of the hour.


Grilling the veggies on my grill pan. God bless the inventor of the grill pan.


Mmmmm...big pile of grilled veggies!!


Even more mmmmmm...cheesy, yummy grilled vegetable panini!!

Monday, March 1, 2010

Ranch Chicken Panini

Man, it has been a crazy couple weeks here at my house. The boy turned four, so we had his birthday party, my brother came to visit for the weekend for that, and somewhere in the middle of all of that we decided to buy a new house, so we've been busy pouring over real estate listings online and going out to look at houses with our realtor. We put an offer on one, and the seller accepted it, now we're just waiting on the bank to approve it since it's a short sale. What a long, drawn out process!! Blogging hasn't been very high on my to do list lately, and when I've been menu planning I've been sticking with things I've made before and not really branching out at all. This week, though, I have mostly new things planned, and I'm hoping to get back to posting on a regular basis.

I think it was last Monday I was over at my mom's. Yeah, because my brother was still here visiting. She had recently come home from a trip to California, and on her way home bought 25 avocados for $5. She generously shared the wealth with me and sent me home with a huge bag of avocados. Want to know something interesting? I used to hate avocados. When I was pregnant with the boy there was one on a veggie sandwich I got for lunch one day and the texture of it almost made me puke. But after he was born, I loved them!! Who can explain it. Anyway, some of them were already pretty ripe, so I wanted to use them up quick. We had been saying recently that we hadn't had paninis for dinner in awhile, so I swung by the store on the way home from my mom's and picked up some ciabatta rolls. Other than that I had no ideas. I'm pretty pleased with the recipe I came up with--we really liked these sandwiches!!

Claire's Ranch Chicken Paninis

2 chicken breasts, pounded thin and cut in half
2 avocados, peeled and sliced
4 slices cheese of your choice (I used provolone)
2 tomatoes, sliced
Ranch dressing (I made The Pioneer Woman's Ranch Dressing because I cannot find any store bought ranch dressing that does not contain MSG)
4 ciabatta rolls (or panini bread of your choice)

Using grill or grill pan, cook chicken breasts until done. Slice rolls in half. Spread each half with ranch dressing (be pretty liberal with it). Place chicken breasts on bottom half of roll, top with avocado and tomato, finish with cheese (so it holds everything together). Place top half of roll on rest of sandwich. Throw them on your panini grill (or press, whatever) until cheese is melted.

*****

Mmmmmm...these were so good!! I was wishing I had some bacon to fry up and add to them. It all came together pretty fast, too, especially with having pounded the chicken out so it was thinner.

I have to say that PW's ranch dressing was AWESOME. FANTASTIC. MAGICAL. WONDERFUL. The boy likes ranch dressing on his salads, and we were almost out of the bottle we had on hand. I was reading ingredient lists on all the different brands at the grocery store--seriously, ALL the brands--and every single one had MSG as one of the ingredients. I couldn't believe it. I knew the packets of the dry mix had it as an ingredient, but I hadn't ever checked the bottled stuff before, which is weird in itself because I always read ingredients before buying something. Anyway, I remembered reading PW's recipe when she first posted it, so I quickly pulled it up on my phone when we got to the store so I could get the necessary ingredients. Turned out all I needed were chives, so that was easy. And I have to tell you that this was the best ranch dressing I have ever had!! It was super easy to put together, too, and I love knowing what goes into it and not having a bunch of crazy weird things in it that I can't even pronounce. I'm trying to do away with bottled salad dressings in general, and this is a great step in that direction as ranch was really the last dressing hold out.

Sorry the picture is lacking in quality, I had to resort to taking it with my phone.

Monday, February 15, 2010

Rick Bayless' Crusty Chorizo and Black Bean Subs

I had made these sandwiches awhile back, and the husband and I both loved them. I mean really, it's a Rick Bayless recipe, so how can you really go wrong?! When I was doing my menu plan for next week I was trying to think of things I had on hand for he and I to have for our Friday date night dinner. I remembered some chorizo I had bought that needed to be used up soon, and I had bought a bunch of avocados because they were on sale for really cheap. I immediately thought of these sandwiches and knew we had to have them. Here's the link to my original post:

Ricky Bayless' Crusty Chorizo and Black Bean Subs

I took a picture of our sandwiches, but it's on my phone, and I need to email it to myself, then I'll add it. The only variation I made was that I had some leftover guacamole in the fridge from a couple nights prior, so I slathered that on there instead of sliced avocados. I also used feta for the cheese because it's what I had. It's hard to say whether this is my most favorite sandwich or the muffuletta. I can't decide. I guess one can win for warm sandwich and one can win for cold. :)

Sunday, January 24, 2010

Muffuletta

So, I was lying awake in the middle of the night last night wondering how it is I always end up getting so behind on my blog. I really have no idea because it's not like I'm not on the computer during the day (in actuality I should probably step away from the computer more often, but that's a whole other can of worms) and it's not like it really takes a long time to do. So I'm hoping that starting this week I can stay more current on updating. I noticed I'm down one follower--maybe someone got annoyed that I keep forgetting to post. :(

Anyway, I'm going back a week for this recipe. I've made it before, so I'll just post the link, but I took pictures this time so I wanted to add those in. When we were in New Orleans a few weekends ago we had grand plans to swing by Central Grocery on our way to the airport and get a muffuletta sandwich to eat on the plane, only to find out the store is closed on Sunday. D'oh! We were pretty disappointed as that was one of the top places we were most excited about eating at while we were there. Strangely enough no where at the airport sold them, so the husband had a muffuletta hankering. Even though it broke my Pantry Challenge rule for the month, I told him I'd get everything to make it for our date night dinner that Friday. Let me just say that this is not a cheap sandwich to make. But, oh, is it ever so tasty!!!

Muffuletta Sandwich

The husband was kind of worried when he saw the pile of bread on the counter that I had pulled out from the loaf, but when I explained to him that we got more sandwich that way, he was all for it. Here's the olive salad in the bread:


All wrapped up and ready for the fridge!


I used one of my bigger cookbooks to weight it down. Then I didn't think that was enough so I tied twine around it to really press it down, but I didn't take a picture of my extreme measure.


Check out all the layers!!


In actuality, I think the amount of meat could be scaled back a bit, especially since I added ham onto it too. My olive salad only sat for about six hours, and I think I had the sandwich pressed for a little over two hours. It was tasty! The husband had the wedge that was left the next day for lunch, which I'm sure was even more fantastic as that would really give the juices from the olive salad time to soak into the bread. Just typing this out and looking at the pictures makes me want another one!!

Sunday, September 20, 2009

Crusty Black Bean Chorizo Subs

Oh man. I am so, so, so, so, so excited for dinner tonight!! I was watching an episode of Rick Bayless' show Mexico One Plate at a Time recently where he was talking about Lucha Libre (the crazy Mexican wrestling with masks) and made a super torta. It looked FANTASTIC. Then it just so happened that the last time I was looking at cookbooks at the library, his Mexican Everyday cookbook was back, so I checked it out and am once again holding it hostage. I was flipping through it and found that the torta he made on that episode was in the cookbook. It also just so happened that I have some chorizo in the freezer I need to be using up, so this worked out great. I've been looking forward to this dinner for a week now. I was going to make it last night, but my aunt called and invited us over for mixed grill. I'm not one to turn down a dinner made by someone else--especially if my uncle is grilling--so I bumped this back to tonight.

Crusty Black Bean Chorizo Subs
aka Tortas de Chorizo y Frijoles Negros
Copyright 2005, Rick Bayless' Mexican Everyday

8 ounces fresh Mexican chorizo sausage, casing removed (about 1 cup)
3-4 Tbsp vegetable or olive oil (divided use)
Two 15-ounce cans black (or other) beans
Salt
4 bolillo rolls, crusty French rolls or submarine sandwich rolls (6-7 inches long, 3 inches wide)
6 ounces queso fresco or other fresh cheese such as feta or goat cheese, sliced 1/4 inch thick
1 ripe avocado, pitted, flesh scooped from the skin and cut into 1/4-inch slices
3/4 cup Roasted Tomatillo Salsa (recipe to follow)

Set a large 12-inch skillet over medium heat and add the chorizo. Cook, breaking up the clumps, until browned and thoroughly cooked, about 8-9 minutes. Add 1-2 Tbsp of the oil (depending on how much fat the chorizo has rendered) and the beans. As the beans come to a simmer, mash them to a smooth paste with a Mexican bean masher, old-fashioned potato masher or the back of a large cooking spoon. Cook, stirring nearly constantly, until the consitency of very soft mashed potatoes--expect about 10 minutes after adding the beans. Taste and season with the salt if you think necessary. Keep warm over the lowest heat, covered to keep the beans soft and moist.

Heat a large griddle or skillet over medium. Slice the rolls open. use fingers or a spoon to scrape out some of the soft bread in the center of each half, making a small hollow. Brush the insides with the remainig 2 Tbsp oil, then lay them cut side down on the griddle or skillet to crisp to a rich golden brown, about 3 minutes.

Smear about 1/2 cup of the chorizo-bean mixture over the bottom half of each roll. Top with slices of the cheese and the avocado. Spoon on the salsa or dash on the hot sauce. Set the top of each roll i place, and you're ready to serve.

Roasted Tomatillo Salsa
Copyright 2005, Rick Bayless' Mexican Everyday

4 medium (8 ounces total) tomatillos, husked, rinsed, and halved
2 large garlic cloves, peeled
Hot green chiles to taste (2 serrano or 1 jalapeno), stemmed and roughly chopped
About 1/3 cup (loosely packed) roughly chopped cilantro
1/2 small white onion, finely chopped
Salt

Set a large nonstick skillet over medium-high heat. Lay in the garlic and tomatillos, cut side down. When the tomatillos are well browned, 3-4 minutes, turn everything over and brown the other side. The tomatillos should be completely soft.

Scrape the tomatillos and garlic into a blender or food processor and let cool to room temperature, about 3 minutes. Add the chiles, cilantro, and 1/4 cup water. Blend to a coarse puree. Pour into a salsa dish and thin with a little additional water if necessary to give the salsa an easily spoonable consistency.

Scoop the chopped onion into a strainer and rinse under cold water. Stir into the salsa. Taste and season with salt, usually about 1/2 tsp.

*****

Mmmmmmm...I cannot wait for this dinner!!! The chorizo I'm using is bulk chorizo, so I don't need to worry about removing the casing. It's also chicken chorizo, which I'm assuming is slightly healthier. I just started doing Weight Watchers to get rid of this darn baby weight, so I'm all about healthier choices. I'll probably cut back some on the oil, too.

I wasn't really sure what to do for a side, so I looked on RecipeZaar.com and found a potato recipe that sounded pretty good and like it would be a nice accompaniment...Ancho Chile Fries. We'll probably have a salad on the side, too.

*****

Rick Bayless is a god among men...but only in a food/cooking way, not in a blasphemous, breaking-a-commandment way. Oh man...these were so good!!! Super easy to put together, too. I'm so glad there was some left because I've already slated it for lunch today. I didn't put enough of the salsa on mine at first, so I added some more. YUM! The boy didn't really like it, but the baby ate quite a bit of the chorizo/bean mixture. Crazy, huh?! I swear that baby will eat anything. The chorizo wasn't very spicy, otherwise I wouldn't have given it to him. It could have been a little spicier, but that's really my only complaint, and really it was my own doing. I will definitely make these again!!!

Oh, and the salsa was AWESOME!! I'm kicking myself for not having bought any tortilla chips when I went grocery shopping this week. We have to go to Target today, so I'll be sure to pick some up there so I can enjoy every last drop of the tomatillo salsa.