Showing posts with label mozzarella. Show all posts

Friday, March 15, 2013

GG's Lasagna


I cannot believe I've never done a post about my grandma's lasagna recipe. But, alas, that must be the case because when I went to make it recently I couldn't find it here on the ol' blog. For those of you that don't know her, my grandma is awesome. Seriously, I've never met someone that doesn't love her as soon as they meet her. She'll be 95 in May, and she's still going strong. She takes one medication and only because her doctor thinks a woman her age should be on some sort of medication. Sheesh. She grew up on a farm in Hale, Missouri during the Great Depression, and I (still) love when she tells me stories about her youth. She is hands down one of my favorite people in the world.


We all love her lasagna recipe, and it is Boy #1's absolute favorite food in the world. He turned seven last month, and while my brother and his girlfriend were here visiting for the weekend for his birthday we had a lasagna dinner at my mom's. My grandma made her lasagna, and my brother made a vegan one. That was on a Saturday night, I think it was. The boy's birthday was Wednesday, and I asked him what he wanted me to make for his birthday dinner one night that week, and he said, "GG's lasagna." I said, "Really? But we just had that." He said, "I know, it's my favorite." Okay...I can't argue with that! So we had GG's lasagna again later that week. A few years ago I took my scanner to my grandparents' house and sat down with my grandma's recipe box to scan some of my favorite recipes of hers. I love that I have the recipe in her handwriting, too.

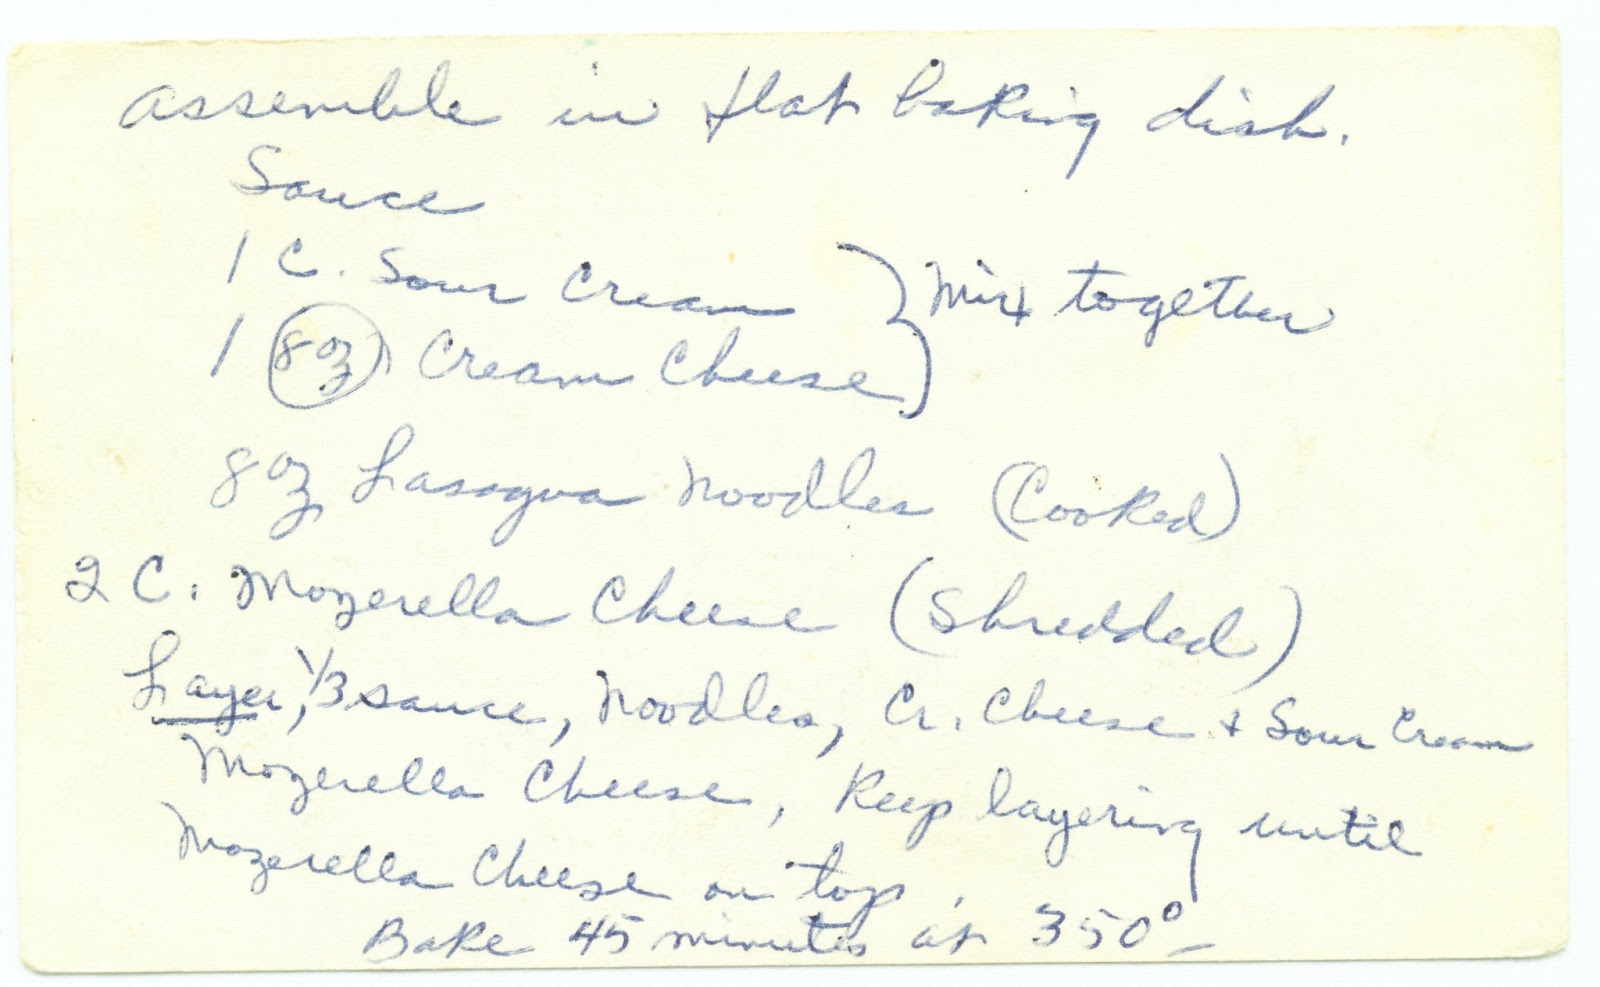


GG's Lasagna
Source: my awesome grandma

Sauce:
1-1/2 lb. ground beef
1 small onion, chopped
2 cloves garlic, minced
2 8-ounce cans tomato sauce
1 cup water
1 T. dried parsley
1 t. oregano
3/4 t. salt
1/4 t. thyme
1 bay leaf

Simmer. Remove bay leaf before using sauce.

Other ingredients:
1 cup sour cream
8 ounces cream cheese
8 ounces lasagna noodles, cooked
2 cups shredded mozzarella cheese

Mix together sour cream and cream cheese.

Assemble in a flat baking dish and layer:
1/3 cup sauce, noodles, cream cheese and sour cream, mozzarella. Keep layering until mozzarella cheese is on top.

Bake 45 minutes at 350.

*****

This lasagna does not last when I make it. There's maybe one or two servings leftover, and normally Boy #1 has it for breakfast the next day or wants to take it in his lunch. I really think he'd eat this every day if I'd make it that often.


Monday, April 2, 2012

Pizza Rolls


Slowly but surely (okay, more slowly than surely) I'm getting caught up on my blog posts. I have a note in Outlook that I update with the posts I'm going to do, and I'm hoping soon it starts getting shorter instead of longer. I feel like my time management skills have really been lacking lately. It's not just my blog, it's with everything!

This goes all the way back to the Super Bowl. I'm at least getting it in just under two months, so it could be worse I guess. My BFF Jen and her husband had a Super Bowl party for all of our friends. It was super fun but a little nuts with 16 kids running around and 12 adults hanging out watching the game. The food we had was amazing. AMAZING. Everyone brought a ton of stuff, and I gorged the whole time. I had a food baby for days afterwards. But it was worth it. On the Evite she had sent it seemed like most people were bringing some kind of dip or spread, so I wanted to do something different. I had seen these on Pinterest and thought they looked good and would be kid friendly.

Pizza Rolls
Source: Adapted from TidyMom.net via Pinterest

2 cans crescent rolls
garlic salt
Italian Seasoning
1 cup sliced pepperoni
2 cups shredded mozzarella
1/2 cup Parmesan Cheese

Preheat oven to 425

Dust a large cutting board or piece of wax paper with flour and roll out each pizza crust. Season each crust with garlic salt and Italian seasoning. Top with cheese and meat.

Starting with the long side, roll crust into a tight log. Slice into 1" sections.

Place on lightly greased pan and bake for 10-12 mins.

*****

The original recipe called for using the tubes of pizza crust dough, but I opted for crescent rolls. I don't remember why now, but it probably involved cost and coupons. It also said to roll it starting with the short side, but I rolled the long side so I'd get more out of it instead of thicker ones, if that makes sense. The crescent roll dough was a little thin once it was rolled out some, but I made it work. My five year old (well, now he's six but he was five at the time) loved helping me make these.

These were fantastic and were gobbled up at the party. There were a few left, so I left some with Jen for her son to take in his lunch and I brought the rest home and did the same for Boy #1. These are actually a great lunchbox item, too! I'll definitely be making them again, either for another party or event or to have on hand to send in lunches.

Thursday, January 26, 2012

No Carb Pizza


Last week the husband suggested to me that we have a no carb week this week. He went to Mississippi to visit his best friend and knew he'd be over indulging. Last year we started the year off with a no carb week, but this year we were running a half marathon on January 15th, so going without carbs the first week of the year was going to be more detrimental than helpful. Since we both tend to get tired of the no carb thing quickly I chose all new dinner recipes to try and keep it exciting for us. Enter Pinterest.com. I did a search on low carb meals and came up with a bevy of ideas. Some have been good, some have been okay, nothing has been awful. I've had an easier time this week than in times past cutting out carbs, maybe because I'm more used to doing it now? I don't know. Or maybe I know we're just doing it through Monday, so the end is near already.

Anyway, the husband and my kiddos love pizza. I'm a fan, but I'm not a pizza monster like the three of them are. This sounded intriguing...pizza with no carbs in the crust? But I figured it was worth a try.

No Carb Pizza
Source: AccidentalMommies.com via Pinterest.com

For the crust:
1 (8 oz.) package of full fat cream cheese (room temp.)
2 eggs
Freshly ground black pepper
Garlic powder
1/4 cup grated parmesan cheese

For the pizza:
1/2 cup marinara sauce
1/2 teaspoon oregano
1 cup shredded mozzarella cheese
Sauteed pepperoni
Garlic powder

For the crust:
Preheat oven to 350.
Butter a 9×13 baking dish
Blend cream cheese and eggs and season with pepper & garlic powder
Add parmesan cheese and stir until combined
Pour into buttered baking dish
Bake for 17 minutes or until golden brown
Let crust cool for 10 minutes before adding toppings
After crust is cooked, raise oven to 400 degrees

For the pizza:
Mix together marinara sauce, garlic powder, & oregano
Top crust with marinara and spread evenly
Top with mozzarella cheese
Add toppings
Bake for 8 minutes or until cheese is bubbly

*****

I was pretty skeptical when I pulled the "crust" out of the oven, and I was a bit worried because my universal dinner back-up plan of Little Ceasar's pizza wouldn't work with no carbs. But I forged ahead praying and crossing my fingers it would at least be edible. And you know what? It was actually pretty awesome. Boy #2 wasn't sure about the crust at first and just ate the toppings, but once the husband told him it was cheese and eggs, he was completely on board with it. There was none of this left by the time dinner was done. The husband said he'd even eat it when we were doing no carbs! I used turkey pepperoni as the only topping. It didn't even occur to me to put anything else on it, but I think next time I'd add some veggies or a second meat to make it slightly more filling. this will definitely grace our table again!

Monday, January 16, 2012

Chicken and Spinach Pasta Bake


Ah, a quiet Monday afternoon. The husband and Boy #1 are off at a hockey game, Boy #2 is upstairs watching Dumbo, I took a power nap on the couch, rolled out some king cake dough, and decided to update my blog. I wanted to get laundry put away and clean up our toy room a bit, but since the boy is upstairs watching a movie I've decided to put all that off and deal with it later to enjoy some peace and quiet downstairs. Ahhh. I have to revel in it now because I know it won't last long!!

This was another new recipe we had for dinner this past week. I had limited grocery money to use, but I had a lot of the items for this on hand already. It came from (surprise, surprise) Pinterest. I love a good casserole and this one sounded really tasty. Pasta, chicken, spinach, and cheese? Sounds scrumptious! Oh, Pinterest, where would my life be if I hadn't discovered you. If my husband were answering that question I'm sure he'd come up with some witty comment about how our house would be clean, laundry would be done, and we'd eat dinner on time every night. But, he's not, so I'll go on with my Pinterest obsession fascination.

Chicken and Spinach Pasta Bake
Source: Adapted from Saving Money Living Life blog (found via Pinterest)

8 oz uncooked whole wheat rotini pasta
1 T olive oil
1 c chopped onion
1 (10 oz) pack frozen spinach, thawed
3 c cubed, cooked chicken breasts
1 (14 oz) can Italian-style diced tomatoes, drained
1 (8 oz) container Philadelphia chive & onion cream cheese
1 cup ricotta cheese
½ t salt
½ t pepper
1½ c shredded mozzarella cheese

Prepare pasta according to package directions. Spread oil on bottom of 9x13 baking dish; add onion in a single layer. Bake at 375 for 15 minutes or just until tender. Transfer onion to large bowl, set aside.

Drain chopped spinach well. Stir pasta, spinach, chicken, & next 5 ingredients into onion in bowl. Spoon mixture into dish & sprinkle evenly with shredded mozzarella cheese. Bake uncovered at 375 for 30 minutes.

*****

I only changed up the original recipe slightly. It called for rigatoni, but I like whole wheat pasta, but my grocery stores don't carry whole wheat rigatoni, so I used rotini instead. I also added in the ricotta because 1) I was worried it wasn't going to be creamy enough, and 2) I had some in the fridge that needed to be used up. Plus we're all about extra cheeses here at my house. The original recipe also called for baking it covered for 30 minutes and then uncovered for 15. I didn't want to wait that long to eat, and I really didn't see the point in it since all the parts were cooked already and it just had to combine and heat up. It worked out fine that way. if I had more time I might try it the original way to see how it compared.

This was a total hit with everyone in my family. The husband and I especially dug it, and Boy #2 had more than one serving. Boy #1 I guess was more lukewarm about it now that I think back to dinner that night, but he still ate most of his and didn't complain. No complaining about a dinner, I take that as a win. This is definitely something I would make again. The husband and I really enjoyed the leftovers for lunch the next couple days, too.


By the way, I calculated this to be 279 calories per serving, assuming seven servings (based on the portions I served myself and the husband).


Friday, August 12, 2011

Pizza Loaf

And my updating continues! Boy #2 has taken to getting up at the ass crack of dawn, so while he's engrossed in an episode of Word World I figured I'd do some blog updating. For my meal plan last week I went through some older clipped recipes I had. For years my mom got me a subscription to Taste of Home magazine. I'd doggy-ear a bunch of recipes in each issue and then usually forget about it. I got tired of having years' worth of magazines around, so I finally went through each one and looked at all the recipes again (the husband has gotten more adventurous in his eating over the years, so I knew there'd be stuff I had originally passed up but that he'd eat now) and cut out all the recipes I wanted to try. Then I stuck them in a folder and forgot about them there. Not really, I just rarely pull that folder out to go through the recipes in it. I figured I was probably missing out on some tasty stuff, so I got it out last week and did the bulk of my meal planning using recipes from there.

Boy #1 had his first friend sleepover last week, and I thought this would be a good dinner to have while his BFF was here eating dinner with us.

Pizza Loaf
Source: Adapted from Quick Cooking Magazine, September/October 2003

1 loaf (1 pound) frozen bread dough, thawed
2 eggs, separated
1 Tbsp grated parmesan cheese
1Tbsp olive or vegetable oil
1 tsp minced fresh parsley
1 tsp dried oregano
1/2 tsp garlic powder
1/4 tsp pepper
8 ounces sliced turkey pepperoni
2 cups shredded mozzarella cheese
8 ounces sliced mushrooms
1 medium green pepper, diced
Marinara sauce for dipping

On a greased baking sheet, roll out dough into a 15-inch x 10-inch rectangle. In a bowl, combine the egg yolks, parmesan cheese, oil, parsley, oregano, garlic powder, and pepper. Brush over the dough. Sprinkle with pepperoni, mozzarella cheese, mushrooms, and green pepper. Roll up, jelly-roll style, starting with a long side; pinch seam to seal and tuck ends under.

Place seam side down; brush with egg whites. Do not let rise. Bake at 350 for 35 to 40 minutes or until golden brown. Warm the marinara sauce and serve with sliced loaf.

Yield: 10-12 slices

*****

First of all, make sure you allow enough time for the frozen dough to rise, if you're using that instead of making your own. There are three thawing options on the package, including a "quick" rise that takes around three hours instead of overnight. I didn't have that problem this time, but it has happened to me before.

This was a HUGE hit at my house. Boy #1 isn't a fan of pepperoni or anything on pizza except cheese, but even he ate it (admittedly it was somewhat begrudgingly). The husband kept going back for more pieces, and the BFF had two pieces of it. This was definitely a fun twist on pizza and something I'll make again since we all loved it so much.

(Sorry again for the cell phone pic!)


Tuesday, June 7, 2011

Lasagna Cupcakes

I'm still not caught up on older posts, but we had these last night and they were so yummy I had to post them right away. A friend of mine posted a link on Facebook to the recipe, and I thought they looked so cute and tasty. Plus I love lasagna, but I hate making it because it takes forever and makes a ton. We're pretty much eating lasagna for a week straight when I do make it. This seemed like a clever way to have lasagna, and all I needed to buy for it were the won ton wrappers.

Lasagna Cupcakes
Source: CruftBox.com via my friend Callista on Facebook

24 won ton or gyoza wrappers
Marinara sauce
1 lb. Italian sausage or ground beef
Ricotta cheese
Mozzarella cheese

Spray or wipe a cupcake/muffin tin with olive oil. Place one wrapper in the tin form it into a cup shape. Add a small dollop of pasta sauce then some sausage. Add a spoonful of ricotta cheese. Once you filled in the first layer, gently press another wrapper on top of the ricotta layer, forming another cup. Repeat the filling and top each with shredded mozzarella.

Bake at 375 for 20 minutes.

*****

Isn't that clever? Boy #1 claimed he didn't like ricotta, but the rest of us gobbled them up. I had really wanted to use gyoza wrappers for their round shape, but my grocery store only had won ton wrappers. It wasn't that big a deal except that there were corners on each of the cupcakes. I made my own marinara by heating up a can of crushed tomatoes with some seasonings added in, so I had my muffin tin on the counter next to the stove. I put the first layer of won ton wrappers in each spot/hole/whatever-you-want-to-call-it then put a spoonful of sauce in each. Then I added a spoonful of sausage, then a spoonful of ricotta. I kind of squished each layer down as I went with the back of a spoon. Then I repeated. It all came together really fast.

I'll definitely make these again. Easy, relatively inexpensive, pretty quick...all pluses in my book!


Wednesday, May 18, 2011

Rocco's Mushroom Lasagna

I have a bit of a celebrity crush on a handsome chef...Rocco DiSpirito. Haven't heard of him? here's some eye candy:


Handsome fella, don't you think? I found his most recent cookbook, Now Eat This! Diet at Costco and had to get it. I really like his first Now Eat This cookbook. I had seen this mushroom lasagna on his Facebook page and really wanted to try it. I slated it for last Friday night's dinner for just the husband and me.

Rocco's Mushroom Lasagna
Source: Now Eat This! Diet by Rocco DiSpirito

Nonstick cooking spray
2 cups reduced-fat ricotta cheese, such as Sargento
1/2 cup chopped fresh basil
2 tablespoons chopped fresh flat-leaf parsley
1 cup grated Parmigiano-Reggiano
Salt
Freshly ground black pepper
4 ounces (about 8 sheets) no-boil whole wheat lasagna noodles, such as Dalallo
10 ounces sliced cremini mushrooms
4 ounces white button mushrooms
1/2 cup shredded reduced-fat mozzarella cheese

Preheat the oven to 350°F. Coat the inside of an 8 x 8 x 2-inch baking pan with cooking spray and set aside.

In a medium bowl, add the ricotta, basil, parsley, and ¾cup Parmigiano-Reggiano. Mix with a spoon until blended. Season with salt and pepper to taste. Set aside.

Line the bottom of the prepared baking pan with two lasagna sheets. Top with ½ cup of the cheese mixture. Using the back of a spoon, spread the mixture so that the noodles are covered. Top with a layer of mushrooms. Repeat the procedure two more times. On the last layer, place two lasagna sheets on top of the mushrooms. Spread a layer of the remaining cheese mixture on top. Scatter the mozzarella and remaining Parmigiano-Reggiano on top.

Cover tightly with foil and bake in the oven for 30 minutes.

Raise the temperature of the oven to 425°F, and bake for another 15 minutes. Uncover the dish and continue to bake for another 15 minutes or until the top is golden brown.

PER SERVING
388 calories 15g fat (8g sat / 2.6g mono / 1.2g poly) 57mg cholesterol 510mg sodium 34g carbohydrates 3g fiber 28g protein

*****

I wasn't able to find the no-boil whole wheat noodles, so I just went with regular no-boil noodles instead. It worked out okay because the husband was doing an open water swim race the next day, so he was happy to have the carbs. I followed the cooking directions exactly for mine...and it came out pretty dry. I think I could have reduced the amount of time at 425 and it would have been fine. It was still good, just a little dry.

This is definitely something I'd make again. The 8x8 dish yielded four very generous servings and at only 388 calories each, that's pretty good! Oh, Rocco, you did not disappoint!


Wednesday, April 27, 2011

Green Goddess Grilled Cheese Panini

I heart cheese. That's not news. I heart paninis, too, and that's probably equally newsworthy. There's a panini blog I follow, Panini Happy. She has all sorts of amazing sandwiches on there that I'm dying to try. Ummm...grilled mac and cheese with pulled pork?! Yes, please!! I had seen her post about this Green Goddess Grilled Cheese on St. Patrick's Day and thought it sounded fantastic. I found myself needing to be somewhere near our Saturday's Farmer's Market recently and decided to stop in to get the fresh herbs I'd need to make this.

Panini Happy's Green Goddess Grilled Cheese Panini
Source: PaniniHappy.com

1 clove garlic, finely chopped
1 oil-packed anchovy, finely chopped
1 teaspoon lime zest (about 1 lime)
3 tablespoons chopped fresh Italian parsley
2 tablespoons chopped fresh tarragon
2 tablespoons chopped fresh cilantro
1 tablespoon chopped fresh basil
1 tablespoon finely chopped shallot
1/4 teaspoon Dijon mustard
2 ounces cream cheese, cut into smaller cubes
1 cup shredded mozzarella
1 cup shredded sharp cheddar
8-12 slices sourdough bread
2 tablespoons extra-virgin olive oil

Add garlic and anchovies to a mini-prep food processor and pulse for a few seconds until it’s really finely chopped, almost like a paste (if you don’t have a food processor, you can always just chop the ingredients really well with a knife on a cutting board).

Add in the lime zest, parsley, tarragon, cilantro, basil, shallot, mustard and cream cheese and pulse again until well blended. Transfer to a medium-sized bowl and stir in the mozzarella and cheddar cheeses.

Preheat the panini grill to medium-high heat.

For each sandwich: Spread a generous amount of the cheese mixture onto one slice of bread. Close the sandwich with a second slice of bread. Brush a little olive oil on top. Grill for 5 to 6 minutes until the cheese is melted and oozy and the bread is toasted. Serve immediately and enjoy!

*****

I'm lazy and didn't chop everything on my own...I tossed it all in my food processor to let it work for me. What's the point of having machines in my kitchen and me doing all the work they can do? Oh, but I didn't have any shallots. I don't know why my grocery store is so hit or miss with shallots. they aren't that uncommon an item are they? Oh what I'd give to have a store that carries everything nearby. I shouldn't complain...when we first moved to this area there was only one grocery store. Now I at least have choices. Anyway.

The cheese filling on this was FANTASTIC. Before it cooked it had a really garlicky bite to it, but that mellowed a lot while the cheesy goodness melted while the sandwich was on the panini press. My only complaint was my bread choice. I didn't buy sourdough bread for this because I figured we could just use the regular whole wheat bread we use on a regular basis. I was WRONG. Don't make my same mistake. This sandwich needs a sturdy bread, not lame-o Oroweat Double Fiber Whole Wheat bread. And be generous with the filling on said sturdy bread. It's worth it. Oh, and don't forget to put the leftover spread away and sitting on your kitchen counter all night because you'll be a sad cheese-lover in the morning when you come downstairs and discover your mistake. I'm just saying...learn from my mistake.

I'd totally make this again but only with a better kind of bread.

Sandwich filling:


Friday, February 4, 2011

Polenta Lasagna

I have some major blog catching up to do (what else is new?!), but I wanted to start with this because it was probaby the most amazing thing we've eaten recently. As I've mentioned before, I belong to a pretty amazing parenting message board. Someone posted recently asking what to do with polenta and my friend Heather (who could potentially be one of my BFFs if she and her husband weren't Alabama fans and we didn't live across the country from each other) said she had made polenta lasagna. She filled me in on the basics of how she'd done it, and since I had a tube of polenta in the pantry I slated it for dinner this week. I was pretty giddy about trying it. Heather didn't have an exact recipe of what she did, so I followed her lead and just winged it as I went along.

Heather's Polenta Lasagna

1 tube polenta (mine was 18 ounces)
1 lb sweet Italian sausage
3 cans fire roasted diced tomatoes
1 onion, diced
3 garlic cloves, minced
8 ounces mozzarella cheese, shredded
8 ounces mushrooms, sliced and sauteed

Heat large skillet sprayed with non-stick spray over medium high heat. Slice polenta into 1/2-inch rounds and place in skillet. Cook 4-5 minutes per side, then flip. Remove from skillet and chill in the refrigerator.

Remove sausage from casings and brown in a large pot. Once cooked through, remove sausage and add onions and garlic. Cook until browned (you may need to deglaze the pan...I used a bit of beef broth). Add tomatoes to the pot (do not drain tomatoes) and add sausage back to the pot. Let simmer 2-3 hours for maximum flavor.

Once polenta slices have cooled, remove them from the fridge and cut the slices in half.

Preheat oven to 375.

Spray an 8x8 baking dish with non-stick spray. Spoon some sauce into the bottom of the dish and spread it around. Place a single layer of polenta slices on top of the sauce to cover bottom of the dish. Spoon sauce to cover polenta layer. Top with a layer of mozzarella cheese. Spread sauteed mushrooms over the cheese. Repeat layers with remaining polenta slices, sauce, and mozzarella, finishing with mozzarella.

Bake for 20-25 minutes or until heated through and bubbling. For best results, let the lasagna sit for 5-10 minutes after removing from the oven.

*****

This was SO EASY. It was really a lot easier than regular lasagna because the polenta cooks a lot faster than lasagna noodles. Plus since it bakes in a smaller dish you aren't eating lasagna for days and days. Don't get me wrong--I love lasagna, but a 9x13 pan of it lasts a loooooooooong time for us. The only real planning ahead was to cook the polenta early enough to give it time to cool and to let the sauce simmer, if you're making your own. You could, of course, use jarred sauce to speed it up, but I just prefer to make my own. You could probably slice the polenta thinner to begin with, but I found it a lot easier to slice after it had cooked some than when I was initially slicing up the tube.

I hadn't ever used polenta before. I'm not entirely sure why I had bought the tube of it at Trader Joe's, but I'm sure glad I did. In fact, I went there yesterday and picked up another tube while I was there. I feel the need to embrace polenta now. The husband didn't know what it was, and since he's a southern boy, I told him "Italian grits." :)

My kids ate this pretty reluctantly, but I think that was more due to me giving them snacks too late in the day so they weren't that hungry at dinner time. The husband loved it. In fact he was just sitting here next to me a few minutes ago and commented on how much he loved it. He had some of the leftovers for lunch yesterday and raved about it again after having that. This is definitely something I'll make again!

Tube of polenta:


It was very shiny. In fact it's shininess disturbed me a bit, but I got over it.


Sliced, ready for cooking:


Post-cooking, post-second slicing, ready for layering:


The process begins...


Mmmm...polenta lasagna...


Monday, September 27, 2010

Tomato and Pesto Pizza

I wasn't going to post this because it was ridiculously easy, but my friend Jen said since I liked it so much I should document it so I remember it. She probably has a point, but I wouldn't be surprised at all if she was saying it so she remembers to make it at some point. ;)

I'm finally out of Phase 1 of the South Beach Diet (down 12 pounds!!), so I'm starting to incorporate some good carbs back into my diet. I had an apple this morning on the way to pick up my oldest from school (I don't think an apple has ever tasted so good), and then I made pizza crust with whole wheat flour for dinner. I'm still kind of timid to add carbs back in a whole lot since I had such great success with taking them out of my diet. For the first week or so I'm going to take it pretty easy and probably do something similar to what I did today--a little bit of fruit and some whole grains. Anyway, this should probably go on my weight loss blog instead of here.

I've been dying to have pizza for some reason while I was carb-free. Normally I can really take or leave pizza, but I think just not being able to eat it has made it more enticing. I was going to make a margherita pizza and a cheese pizza, but upon taking my basil out I realized the stems were fuzzy. Yuck. So, not wanting to feed my family moldy basil (or eat it myself), I had to do some quick pizza thinking. This is what I came up with.

Claire's Tomato and Pesto Pizza

1 recipe homemade pizza dough, made using all whole wheat flour
1/4 cup pesto (homemade or store bought)
3 heirloom tomatoes, sliced thin
Mozzarella cheese

On rolled out dough, spread pesto to completely cover dough. Arrange tomato slices in a single layer. Top with mozzarella cheese. Bake at 450 for 15-20 minutes.

*****

I'm sad I didn't take a picture. I thought about it before I put the cheese on because it really looked awesome with the green pesto and the various colored heirloom tomatoes. Have I mentioned that heirloom tomatoes are my new BFF? Okay, not really, but I do like them a lot. When I picked these ones out at Whole Foods today I could tell that heirloom tomato time is coming to an end. Most of the ones I picked up were pretty mushy and over-ripe. Sad. I kind of freaked out a little when I discovered my basil wasn't good anymore because I had already sliced the tomatoes, and there was no way I would let them go to waste. I was pleased with my quick thinking and coming up with what turned out to be an awesome pizza!

Wednesday, September 15, 2010

Baked Pesto Chicken

I don't know how it's been two weeks since I've updated my blog! Well, actually I do. In looking back at my meal plans we hadn't had much new, so I wasn't posting for that reason. Then once I did have new stuff to post I just never took the time to sit down and write them out. I had planned on using my kids' naptime yesterday to update my blog, but Monday evening I started feeling like I was getting sick. By bedtime I had a fever, and that sucker held on all day yesterday. Ugh. I woke up at some point last night drenched in sweat and the fever was gone. Was that an over-share? Perhaps. Sorry about that.

Anyway, a week ago today I started on The South Beach Diet at the recommendation of my doctor (want to follow my progress? Check out my other blog...Claire's a Fat Girl's Name). I was hesitant about it because I did the whole Atkins thing ten years ago and did not like it. I lost weight, but it got to the point where I wasn't ever hungry, and I constantly felt like I was going to pass out. Not cool. Plus as soon as I started eating carbs again, all the weight I lost returned. I got the SBD book from the library and read through the whole thing before deciding if I wanted to do it. I figured it was worth a try. The book is pretty interesting, as is the diet. It's no carbs for the first two weeks, then you gradually add carbs back in--but good carbs. Whole grains, whole wheat, brown rice, fruit...stuff like that. Once you reach your goal weight you move onto a maintenance phase where you still eat only good carbs but you can splurge on "bad" food occassionally. Really I think it's pretty healthy sounding, and it's not all that different from how we normally eat.

Finding recipes for dinners has been a slight challenge, but I have the SBD app on my iPhone, and I've used the SBD website for recipes. I found a blog that's almost solely SBD recipes, Kalyn's Kitchen, and there's a SBD cookbook on Food.com (formerly recipezaar.com). I found the SBD cookbook on Ebay, but it just arrived yesterday. It's been pretty easy for my family to eat along with me...I just make some kind of carb/starch side dish for them to enjoy, and I stare longingly at it. :)

This recipe was on the iPhone app, and I thought it sounded so good. I heart pesto, and this sounded super tasty and easy--a great combination in my book!

Baked Pesto Chicken

4 boneless, skinless chicken breasts
1/2 cup pesto (from a jar)
1/2 cup shredded part-skim mozzarella cheese
salt and freshly ground black pepper

Heat oven to 375. Season chicken breasts with salt and pepper. Spread 1/4 cup of the pesto in a 9x13 baking dish. Lay chicken breasts over pesto in an even layer and spread with remaining pesto.

Cover baking dish with foil and bake chicken until cooked through, 20-25 minutes. Uncover and top with cheese. Bake until cheese is melted, 5 more minutes.

*****

Seriously, dinner cannot get much easier than this. My whole family loved this...we all gobbled up our portions. It's definitely something I'll make again, diet or no diet. I normally have all these ingredients on hand, so it's a great quick, oh-my-gosh-it's-5:00-what-am-I-making-for-dinner recipe.

I forgot to take a picture. :( Oh, one more thing...I didn't like it as much reheated. The texture of the cheese was weird. I poured all the remaining pesto from the pan into the container I was using, so that might have been part of it, or maybe the olive oil in the pesto on the chicken did something funky to the cheese texture...I don't know.

Sunday, August 22, 2010

Eggplant and Mozzarella Melt

I mentioned recently that I went on a trip to the beach in CA with two of my friends from college a few weeks ago. One of them is my friend Teri, and she was nice enough to fly into Phoenix and drive to LA with me so I'd only have to do one leg of the drive by myself. Isn't that awesome of her? It was so fun, too! A long boring drive like that sure goes by a lot faster with a fun friend in the car. She was telling me about a Martha Stewart Everyday Food cookbook that she has and loves, so once I was back home I put one on hold at the library. I don't think I got the same cookbook that Teri was telling me about, but this one has some great recipes in it. I think I'll hold it hostage for awhile, or at least as long as I can. I mentioned to my friend Jen how much I liked it, and she was talking about putting it on hold, so I'll assume if I can't renew it, it's because she's going to take it from me. ;)

Last week in my Bountiful Baskets produce co-op basket I got an egpplant. I was really excited because I love eggplant and have a lot of things I like to make with it, but I had seen a recipe in the Martha Stewart cookbook I wanted to try. It worked out perfectly, too, because last Sunday I made some tomato sauce for spaghetti and meatballs, so this way I could use up most of what was left of that sauce.

Eggplant and Mozzarella Melt
From Martha Stewart's Everyday Food

2 large eggs
Coarse salt and ground pepper
3/4 cup plain dried breadcrumbs
Olive oil, for baking sheet
1 medium eggplant (about 1 pound), sliced into 1/2-inch-thick rounds
1 loaf (8 ounces) soft Italian bread
2 cups store-bought tomato sauce
8 ounces part-skim mozzarella cheese, thinly sliced

1.Preheat oven to 475 degrees. In a shallow bowl, lightly beat eggs with 1 teaspoon salt and 1/4 teaspoon pepper. Spread breadcrumbs in a pie plate or shallow bowl.

2.Oil a rimmed baking sheet. Dip eggplant rounds in egg, then dredge in breadcrumbs, turning to coat completely; transfer to prepared baking sheet. Bake (without turning) until golden and tender, 15 to 20 minutes.

3.Meanwhile, split bread lengthwise, and place cut side up on another baking sheet; press gently in centers to create a well. Layer both halves with tomato sauce, eggplant, and cheese. Bake until cheese is browned in spots, 6 to 8 minutes.

*****

This came together really fast. I used panko for the breadcrumbs because I didn't feel like getting out my food processor to make breadcrumbs. I wouldn't recommend using panko, but it turned out okay. They just didn't cover the eggplant as thoroughly as regular breadcrumbs would have. But it worked. I ended up spreading a bit of sauce on top of the eggplant slices, too, when I assembled everything and then topped with cheese.

The husband was very excited when he saw this come out of the oven. He said it looked like eggplant parmesan pizza, which I guess it kind of was. I think my loaf of bread must have been bigger than eight ounces because the recipe said this was four servings, and those seemed really huge since that basically meant cutting each half into halves. Although the husband ate 1.5 servings, and the baby ate as much as I did! He and the boy split one serving, and then he ate half of mine! So I guess he ended up having an entire serving on his own. My kid can eat!

This was super fantastic and tasty and something I will definitely make again!

One side cheesed, the other awaiting its cheese:


Mmmmmm...eggplant and mozzarella melt...

Sunday, June 20, 2010

Claire's Buffalo Chicken Pizza (aka Father's Day Pizza Fest)

Happy Father's Day!! I hope all you dads out there have been sufficiently spoiled today. My husband was inundated with gifts this morning and got to have pizza for lunch AND dinner! We've had a really nice family day, and I hope the husband is feeling loved and appreciated.

I asked him earlier this past week what he'd want for dinner tonight, and at first he wasn't sure then he decided on grilled pizza. I wanted to do something special but couldn't decide what, so I figured I'd make up a double batch of homemade pizza dough and split it into four smaller pizzas so we could have a real pizza feast and have an assortment of pizza flavors.

Two of the ones we did were pretty boring--one with a mix of cheeses and one with meat (pepperoni, sausage, and prosciutto). The husband said I could pick two fancy ones to make. I knew one would be the veggie pesto pizza I make pretty often because we love it, and I had everything on hand to make it.

The fourth pizza caused me some strife. In the March issue of Cooking Light magazine there was a special article on pizzas and several of those looked amazing. I slated one for the fourth pizza but couldn't find arugula at the grocery store. Bummer. So I remembered one I'd seen on my friend Jen's blog that used prosciutto and fontina cheese. But then when I got home and looked at the recipe it also called for ricotta, which I didn't have. Oops. I'd recently had two ideas for pizza toppings and knew I had everything for one of them. So I gave the husband his choice between a Claire creation pizza or a smoked salmon pizza from that issue of Cooking Light. He went with the Claire creation pizza.

Apparently I'm on a buffalo chicken kick lately because that's the kind of pizza he choose. I gotta say I was pretty excited to try it. I figured I'd base it on the buffalo chicken lasagna I made awhile back. All measurements below are approximate.

Claire's Buffalo Chicken Pizza

1 recipe pizza dough (or pizza dough of your choice)
1 cup pizza sauce
1/4 cup to 1/2 cup wing sauce (I used Frank's Red Hot)
2-3 cups diced, cooked chicken
1/2 cup crumbled blue cheese
1-1/2 cup shredded mozzarella (or pizza blend) cheese

Preheat oven to 450. Roll out pizza dough to desired size. Combine pizza sauce and wing sauce in a bowl. Spread over the dough. Sprinkle chicken and blue cheese on top of sauce. Cover pizza with shredded mozzarella. Bake 12-15 minutes or until crust is golden brown and the cheese is melted.

*****

Like I said, all measurements are approximate. I have no idea how much sauce I used, I poured some into a bowl, added the wing sauce, mixed it up, and called it good. For the chicken I was going to defrost and cook a chicken breast, but then I saw my bag of Naked Nuggets in the freezer (I may boycott Costco if they ever stop selling these, by the way) so figured I'd just heat up those and then chop them up.

I'm going to grill all my pizzas but I included instructions for baking them because it was just easier to type out that way.

*****

Wow. Wow. WOW!!! This pizza was phenomenal!! I think this is our new favorite pizza. The kids had already had cheese pizza by the time this one was done, so I didn't get their take on it, but the husband and I were all over this one!! I'd probably increase the amount of wing sauce I used next time, but I really have no idea how much I even used.

This pizza is definitely going to be a favorite in our house over the summer!! Especially since I always have blue cheese and wing sauce on hand.

(And I do have pictures, but I need to get them uploaded still.)

Saturday, June 19, 2010

Melted Mozzarella Casserole with Mushrooms and Smoky Chipotle Chile (Queso Fundido)

Today is FIESTA DAY at my house! Well, tonight is anyway. My brother is here visiting from Seattle, and a few weeks ago my mom said she thought we should have a fiesta while he's here. I jumped on board immediately because I'm always down for an excuse to eat Mexican food and drink margaritas. We invited my friend Jen and her family, and I think a couple of the husband's friends may swing by too. It's going to be quite the feast. My contributions are going to be this Rick Bayless queso fundido recipe, Pioneer Woman's pico de gallo, and Rick Bayless guacamole (assuming I can find the box with my Mexican Everyday cookbook).

This queso recipe came from the Rick Bayless cookbook Mexico One Plate at a Time that I was holding hostage from the library for literally months, until I had to finally return it this past week. Bummer. My brother's a vegetarian, so I wanted to find something without meat in it, and since my mom and Jen were both making main course items I thought I'd do some sides and decided on queso fundido. This recipe sounded really good...cheese, mushrooms, and chipotle peppers?! Yes please!!

(Thankfully I found the recipe on the Food Network website which means I get to copy and paste instead of typing it out...woo hoo!)

Melted Mozzarella Casserole with Mushrooms and Smoky Chipotle Chile (Queso Fundido)
Recipe from Mexico: One Plate at a Time (Scribner, 2000) by Rick Bayless

- 1 1/2 tablespoons olive oil, preferably extra-virgin
- 1 medium red onion, sliced
- 6 to 8 ounces full-flavored mushrooms, such as shiitakes, oysters or practically any wild variety, stemmed (discard woody stems or finely chop them) and sliced (you'll have about 2 generous cups)
- 2 to 3 canned chipotle chiles en adobo, seeded and thinly sliced
- Salt
- 12 corn tortillas, the fresher the better (store-bought are okay, but homemade will really shine here)
- 8 ounces mozzarella, preferably whole-milk (but not "fresh" mozzarella, which will not melt) or Mexican quesillo, shredded (you'll have about 2 cups)
- A generous 1/2 teaspoon chopped fresh thyme or generous 1 teaspoon chopped fresh epazote
- A little black pepper, preferably freshly ground

The mushroom mixture: Heat the oven to 350 degrees F. In a large skillet (preferably nonstick), heat the oil over medium-high. Add the sliced onion and cook, stirring frequently, until softening and beginning to brown, about 5 minutes. Add the mushrooms and stir nearly constantly until they have softened and any juice they release has evaporated, about 5 minutes longer. Stir in the sliced chiles, then taste and season with salt, usually about 1/4 teaspoon. Transfer the mixture to a 9- or 10-inch shallow baking dish, Mexican cazuela or pie plate.

Finishing the queso fundido: Very lightly dampen a clean kitchen towel. Check the tortillas to make sure none are stuck together. Wrap them in the towel, then in foil, sealing the edges tightly. Place in the oven and set the timer for 7 minutes. When the timer goes off, stir the shredded cheese into the warm mushroom mixture. Set in the oven alongside the tortillas and bake until the cheese is just melted, about 5 minutes longer. Sprinkle with the thyme or epazote and black pepper and serve without a moment's hesitation, accompanied by warm tortillas.

*****

I haven't decided yet if I'm going to make tortillas or not. I bought chips to serve it with but tortillas might be nice too. I don't remember if I've unpacked my tortilla press yet or not, so that will probably be the deciding factor.

I'm going to use a mixture of shiitake and cremini mushrooms for mine. They oyster mushrooms at my grocery store looked questionable. Having never used them before I wasn't entirely sure what they were supposed to look like to know if they were okay or not. So I went with shiitake, but they were pretty pricey so I figured I'd throw in some cremini to save a bit of money.

Monday, March 22, 2010

Grilled Vegetable Paninis

Recently I somehow stumbled on a food blog dedicated solely to paninis, PaniniHappy.com. Actually I think I found out from a link on Aggie's Kitchen. We love paninis, and I'm always looking for new variations. After my cheese making class I had some goat cheese (which at some point will be its own post) I wanted to use, so I checked out the panini blog for some ideas. I found a recipe for a Grilled Vegetable Panini that was pretty similar to what I wanted to do, so I used it as a basis. We needed to go to Trader Joe's, so I planned on picking up a bag of their frozen grilled zucchini and eggplant mix, but wouldn't you know they were out of it. So I bought an eggplant and a package of zucchini (really reasonably priced, by the way) and figured I'd grill my own. I still had some TJ panini rolls left in the freezer, so I used those for the sandwiches.

Grilled Vegetable Paninis

1 eggplant, sliced into 1/4-inch rounds
3 small to medium zucchini sliced lengthwise into 1/4-inch slices
4 Tbsp olive oil
3 Tbsp balsamic vinegar
1 tsp dried basil
1 tsp dried oregano
4 cloves garlic, minced
Goat cheese (chevre)
Slices of mozzarella
Panini rolls

Combine eggplant and zucchini slices in a large bowl. In separate small bowl, combine oil, vinegar, basil, oregano, and garlic. Whisk to combine, then pour over vegetables in large bowl and toss to combine. Let marinate at least one hour.

Prepare grill or grill pan. Grill vegetables in batches, approximately 3-4 minutes per side or until grill marks appear. Remove to plate and finish grilling vegetables.

To assemble sandwiches, spread layer of chevre on bottom half of panini roll (or bread of your choosing). Top with layers of vegetables, then a slice of mozzarella. Place top half of sandwich roll on sandwich and place the whole thing in a panini press for 3-4 minutes or until grill lines appear and mozzarella is melted.

*****

Mmmmmmmmm...this was so good!! We had a bit of a grill mishap, so I ended up having to use my grill pan inside. Some of the crazy storms we had this winter kept knocking over our grill, so we need to do a little maintenance on it to get it ready for grilling before we can use it. It worked out okay on the grill pan, just took a lot longer since I had to do smaller batches.

The chevre I used was what I had made at my cheese class. It was really yummy, although it was slightly more work than the other cheeses because you have to let it sit for longer, and it requires a special packet of something. I'll probably have to post about the cheese class tomorrow because I still have two posts left to do today, and the boy is getting antsy being in his room for quiet time.

Anyway, these were super tasty!!! The husband and I loved them. They were really filling, too. I did two layers each of zucchini and eggplant. I would definitely make this again--filling, healthy, vegetarian--love it!! Although I much prefer the convenience of the frozen veggies from Trader Joe's over having to do it myself.

The panini rolls I like:


My vegetables marinating. I tossed them around every now and then during the course of the hour.


Grilling the veggies on my grill pan. God bless the inventor of the grill pan.


Mmmmm...big pile of grilled veggies!!


Even more mmmmmm...cheesy, yummy grilled vegetable panini!!

Monday, March 8, 2010

Pesto Pasta Surprise

One of the other women on the message board I belong to has a food-based blog I follow, FrostedFingers.com. Every Tuesday she posts a new recipe, and last week's looked super easy and good, Angel Hair Pasta. The only downside was that it used store bought pesto and alfredo sauce--both things I love but don't generally eat because of the high fat content in both. When I was doing my meal planning for the week I thought of that recipe and decided to make something similar but with ricotta instead of the alfredo. Then when I was thinking about it more, it sounded a lot like a recipe my mom made recently for my brother when she was visiting him. I called her today and got the recipe, so I think mine is going to be a combination of the two.

Pesto Pasta Surprise

1 package whole wheat penne
1 jar marinara sauce
1/2 cup ricotta cheese
1 cup mozzarella
1/4 cup pesto
Additional mozzarella for topping

Prepare penne (or pasta of your choice) per package directions; set aside. Combine cheeses and pesto in medium bowl; set aside. In 8x12 pan, layer as follows: half of the cooked pasta, half the marinara sauce, all the cheese/pesto mixture, remaining half of the pasta, remaining marinara, additional mozzarella.

Bake at 350 for 30 minutes or until heated through and cheese is melted.

*****

I'm really excited to try this tonight. I have some pesto leftover from making Veggie Pesto Pizza last week, so however much of that I have in the freezer is what I'm going to use. I may use a bit more ricotta, too, because I like cheesy pasta.

Along with this I'm going to make Barefoot Contessa's Garlic Ciabbata Bread and a salad. Yum!!

Monday, March 1, 2010

Veggie Pesto PIzza

I realized I forgot to mention a couple other recent happenings around here that have contributed to my lack of blog posting. I finally had Lasik done!!! I was beginning to wonder if I was not meant to ever get it because I had to change from my original date so we could go to a seminar at church (that totally wasn't worth it), then both my kids got pink eye and they wouldn't let me get it done in case I ended up getting it too (which I did). So Friday was the day, and I have to say my life has been changed!!! It was definitely creepy--reminded me entirely too much of this scene from "A Clockwork Orange"--but so worth it in the end!

The other exciting happening is that my friend Jen had her twin baby girls on Friday!!! I guess it really has nothing to do with my lack of blogging, but it's very exciting!! I got to spend a good chunk of the day at the hospital with them yesterday, and aside from my own kids, they are some of the cutest babies ever!! Warning: snuggling with two cute newborn baby girls that have red bows in their hair WILL induce baby fever. And if it doesn't, there might be something wrong with you.

Anyway, I figured Jen would come home from the hospital today or tomorrow, so I slated this dinner in case they wanted me to bring some to them, as I know it's one of their favorites as well. Jen's mom is coming to stay with them for awhile, and Jen thought she'd probably want to make them dinner, but I kept it on the menu for tonight just in case. I'm really excited to have it!! It's been awhile, and lately all we've had is pepperoni or cheese pizza, so a good, homemade, veggie pizza will be fantastic!!

Veggie Pesto Pizza

Monday, October 5, 2009

Chicken Parmesan

So, did you miss me while I was gone? I realized that I forgot to post before we left. The kids and I just spent a week in Orlando with my mom and aunt, celebrating my mom's 60th birthday! We had a great time--spent two days a Sea World and one day at Disney's Animal Kingdom. We went to St. Augustine for a day and met up with my friend Nanci who I hadn't seen in a really, really long time. Her daughter is a year younger than my oldest, and they totally hit it off! They were adorable together, and he was so sad when it was time for them to head back to Jacksonville.

There wasn't really anything spectacular we ate on our trip. Orlando seems to be the land of the chain restaurant. We did eat at an awesome restaurant in St. Augustine--The Bubble Room. They had these amazing homemade potato chips covered with cheese and bacon. Yeah...they were freakin' awesome! Thankfully they were sitting at the other end of the table from me, so I didn't have that many. I had a really good veggie sandwich, but everyone's food looked fantastic. We debated going back for dinner before we left to try their signature Bubble Bread and get some desserts, but we didn't. We also ate at BB King's Blues Club that was pretty good. I was debating between two things for dinner and asked the waiter what he suggested, and it turned out one of them was his favorite thing on the menu. So, I went with that...chicken fried chicken with caramelized onion gravy and white cheddar macaroni and cheese. The whole thing was tasty, but the macaroni and cheese was amazing. It was probably the best mac and cheese I have ever had--and I've had a lot of mac and cheese! I need to do some Googling and see if I can find the recipe on one of those copycat recipe websites.

While we were gone my friend Amanda left me a note on Facebook that she was making my chicken parmesan recipe for dinner one night. I realized we hadn't had it in quite some time, so I mentally added it to my meal plan for the week. I'm excited--we all really like this, and it's easy and healthy! Thanks, Amanda, for reminding me of it!

Chicken Parmesan

I'm going to make homemade tomato sauce to go with it. This way I can freeze the rest of the sauce and use it one night next week for something. I'm going to boil up some spaghetti to go with this and steam some kind of frozen vegetable.

Wednesday, September 2, 2009

White Pizzas with Arugula

Here's the other Barefoot Bloggers recipe for August. A picture of this recipe is on the back cover of the Back to Basics cookbook, and it's always looked super tasty to me. I was excited that this was one of the recipe choices!

White Pizzas with Arugula

For the dough:
* 1 1/4 cups warm (100 to 110) water
* 2 packages dry yeast
* 1 tablespoon honey
* Good olive oil
* 4 cups all-purpose flour, plus extra for kneading
* Kosher salt
* 4 cloves garlic, sliced
* 5 sprigs fresh thyme
* 1/4 teaspoon crushed red pepper flakes

For the topping:
* 3 cups grated Italian fontina cheese (8 ounces)
* 1 1/2 cups grated fresh mozzarella cheese (7 ounces)
* 11 ounces creamy goat cheese, such as montrachet, crumbled

For the vinaigrette:
* 1/2 cup good olive oil
* 1/4 cup freshly squeezed lemon juice
* Freshly ground black pepper
* 8 ounces baby arugula
* 1 lemon, sliced

Combine the water, yeast, honey and 3 tablespoons of olive oil in the bowl of an electric mixer fitted with a dough hook. When the yeast is dissolved, add 3 cups of flour, then 2 teaspoons salt, and mix on medium-low speed. While mixing, add up to 1 more cup of flour, or just enough to make a soft dough. Knead the dough for about 10 minutes until smooth, sprinkling it with the flour as necessary to keep it from sticking to the bowl.

When the dough is ready, turn it out onto a floured board and knead it by hand a dozen times. It should be smooth and elastic. Let it rise. Place the dough in a well-oiled bowl and turn it to cover it lightly with oil. Cover the bowl with a kitchen towel and allow the dough to rise at room temperature for 30 minutes.

Place 1/2 cup of olive oil, the garlic, thyme and red pepper flakes in a small saucepan and bring to a simmer over low heat. Cook for 10 minutes, making sure the garlic doesn't burn. Set aside.

Preheat the oven to 500 degrees. (Be sure your oven is clean!)

Dump the dough onto a board and divide it into 6 equal pieces. Place the doughs on sheet pans lined with parchment paper and cover them with a damp towel. Allow the dough to rest for 10 minutes. Use immediately, or refrigerate for up to 4 hours.

Press and stretch each ball into an 8-inch circle and place 2 circles on each sheet pan lined with parchment paper. (If you've chilled the dough, take it out of the refrigerator approximately 30 minutes ahead to let it come to room temperature.)

Brush the pizzas with the garlic oil, and sprinkle each one liberally with salt and pepper. Sprinkle the pizzas evenly with fontina, mozzarella and goat cheese. Drizzle each pizza with 1 tablespoon more of the garlic oil and bake for 10 to 15 minutes, until the crusts are crisp and the cheeses begin to brown.

Meanwhile, whisk together 1/2 cup of olive oil, the lemon juice, 1 teaspoon salt and 1/2 teaspoon pepper.

When the pizzas are done, place the arugula in a large bowl and toss with just enough lemon vinaigrette to moisten. Place a large bunch of arugula on each pizza and a slice of lemon and serve immediately.

*****

The only thing I changed up was that I used my quick homemade pizza crust recipe instead of the dough/crust recipe here. Mostly because I didn't want six pizzas, I just wanted one and knew what size crust I'd get with my recipe. And it doesn't have to rise/rest for very long, so I didn't have to get it together way in advance. Getting things together in advance is not my strong suit! Oh, and I didn't have fresh thyme, so I just sprinkled in some dried. I was bummed because I really like fresh thyme, but I couldn't find it at either store I was at yesterday (Walmart and Trader Joe's...I actually didn't look at Walmart because I figured TJ's would have it...that's the first time TJ's has let me down...sigh.).

*****

Wow. WOW. This pizza was so yummy!! The husband was darn near drooling looking at the piles of shredded cheese on the counter when I was assembling the pizza. I ended up only putting the arugula on half of the pizza because the husband seemed really skeptical of it, and I didn't know if the boy would eat it that way. I LOVED it with the arugula on top...I love the peppery bite of arugula and with the lemon and olive oil mixed in it added a great flavor and texture to the pizza. I honestly thought the bites I had with just cheese and no arugula were a little too cheesy--and that's not something I say very often, if ever! We all really liked this, and this will definitely be a pizza I make again!

(Picture to come later once I get it uploaded!)

Friday, August 21, 2009

Pizza Night!

I know I missed a couple nights posting, but there wasn't anything new, so you're not missing out. I'm so, so, so, so, so excited for dinner tonight! It occurred to me that we hadn't had grilled pizza for one of our Friday mini date nights, so I put it on my meal plan for this week. I wasn't sure what toppings to do on each until today, although I did buy dough at Trader Joe's earlier this week. I was thinking back to pizzas we've really liked, and I remembered the veggie pesto pizza we had awhile back. I knew I had pesto in my freezer and most of the veggies in my fridge, so I decided it was meant to be. Here's my original post:

Veggie Pesto Pizza

I don't know why I feel the need to have two pizzas, but it's nice to have a little variety I guess. I was looking at another food blog that I really like, Aggie's Kitchen, and saw a pizza that looked fantastic. Actually I was looking at the pictures on her Facebook fan page and saw a picture of a different pizza that looked yummy and while searching her blog for that one I came across this pizza. How's that for confusing?! Anyway, I didn't think the husband would dig it if I told him what it was, so I sent him a picture of it from her blog and he thought it looked tasty. Actually I gave him the choice of this or BBQ chicken and he said "whatever" so I chose this...I interpret that as him thinking it's tasty. ;) I can't wait to try this!!

Spinach Alfredo Pizza
(From AggiesKitchen.com)

Spinach White Cream Sauce - melt 2-4 tb butter in saucepan over medium heat. Stir in 2 tb of flour into butter, cook for 1-2 minutes. Add 2 cups half and half to butter mixture. Add dash of salt, pepper, and fresh ground nutmeg to cream. Bring to a simmer, continually stirring to avoid bottom of pan burning. Simmer for few minutes until sauce starts to thicken. Take sauce off heat and bring to room temperature. Add 8oz thawed chopped frozen spinach to sauce.
Parmesan Cheese
Mozzarella Cheese

*****

Okay, so there isn't a real recipe I guess, but I'm going to assume that anyone reading this can figure out how to assemble a pizza. Dough, sauce, cheese, go! Doesn't it sound amazing? You should go see the picture of it on her blog...wow! The recipe title up there is a link to the post on her blog, and if you scroll down you'll come to it. Or if you're lazy like me, hit Ctrl+F to do a search and type in "spinach" and there you go.

I can't wait for dinner!! My kids' bedtime can't get here soon enough! Of course, the baby is still napping, so I'm thinking he's going to need to be woken up here soon so that he goes to bed at a reasonable time!

ETA: In a crazy twist, Jen B.--whom I originally got the pesto pizza recipe from--got the idea/recipe from Aggie's Kitchen as well! So I guess it's Aggie's Kitchen's Pizza Night at our house this evening!

*****

Mmmmmmm...these were both really good pizzas! My white sauce for the spinach pizza got a little too thick because I added an extra tablespoon of flour, forgetting it would thicken up as it cooled. oops. It wasn't bad, just a little thick. I probably could have put a little more pepper and nutmeg in it as well. I wouldn't hesitate to make it again, though. Tasty!!!