Showing posts with label kid-friendly. Show all posts

Monday, November 7, 2022

Southwest Tater Tot Casserole


I should have known that once I got the ol' blog up and running again and was enjoying writing posts that life would happen and get in the way.  At least I'm getting this post in under the two month mark from the last one!  I feel like we've just been swamped, although a good chunk of it was fun.  In the last two months my husband and I have taken a trip to Louisville, KY for a music festival and spent a weekend in NYC to see one of our favorite people get married.  Then I fractured my ankle hiking and came down with a cold.  Plus throw in there all the day-to-day stuff like working and managing kid activities and attending said kid activities, and life is just busy.  

Basically this meme is my life...


Anyway, my oldest is in Milwaukee, WI this weekend for a choral festival, so while he's gone I was trying to come up with meals he doesn't particularly like that the rest of us do.  This Southwest Tater Tot Casserole was the first one to pop in my head.  

In the summer of 2019 we were going to housesit for some friends in the Seattle area while they went on the trip of a lifetime to China.  My youngest and I made a road trip out of it on the way there and stopped in Boise to visit my lifelong BFF and her family for a few days.  We've been friends since our ages were single digits which is pretty incredible because we are both solidly in our 40s now.  We of course had a blast with them, and I loved that our kids played together like they've known each other forever.  Our last night at their house she made this for dinner.  I absolutely love tater tot casserole and have literally been eating it since I was a kid, and my kids love it, too, so Miles and I were super excited to try this version.  Once we were back home I made it for my family and was shocked when Will didn't like it.  What the heck, man?!  So now I make it if Will isn't going to be here for dinner, although sometimes he has to suck it up and have it because it's what I want to make for dinner.

The website where the recipe originally came from isn't up anymore, so luckily I had printed off the recipe at some point.  I've changed it up a little from the recipe I printed to adjust to how my family likes it.

Southwest Tater Tot Casserole

1 package ground turkey (I buy mine at Costco in packages of four)

1 can corn

1 can black beans, drained and rinsed

1 packet taco seasoning

1 large can green enchilada sauce, heat level of your choice (we like medium heat)

1-2 cups shredded cheese of your choice (Mexican blend, colby jack, cheddar, pepper jack...whatever)

1 bag frozen tater tots

Salt and pepper to taste


Preheat oven to 425.  Brown ground turkey in an ovenproof skillet sprayed with nonstick spray, seasoned with salt and pepper.  

Once the turkey is no longer pink, add in corn, black beans, taco seasoning, and 1/2 to 2/3 of the can of enchilada sauce.  Sitr to combine and let simmer on medium heat for 10-12 minutes so the flavors combine.  This will also help the enchilada sauce cook down a little.  If it looks or gets too dry, add in more enchilada sauce.

Turn off the burner and top the mixture with shredded cheese.  Arrange tater tots on top of cheese.

Move the skillet into the oven and bake for 25 minutes or until cheese is melted and tots are crispy.

Note: if you don't have an ovenproof skillet, you can use a 9x13 or 11x7 casserole dish.  Spray dish with nonstick spray and transfer skillet mixture to the casserole dish before topping with cheese.  Top with cheese then tater tots and bake as directed.


Jefferson is keeping a close eye on the skillet mixture.


Topping with tots. My husband makes fun of my symmetrical tot placement, but how else are you supposed to do it?  Throw on tots all willy-nilly?!


Thursday, August 15, 2013

Baked Hawaiian Ham Sandwiches


So chances are good that if you're on Pinterest, you've seen this recipe and/or pinned it.  We had these last night, and I couldn't believe they weren't on my blog because I've made them several times, and they're completely easy and delicious.

I've always loved the http://www.kingshawaiian.com/products/">King's Hawaiian breads
, and it seems that now they're a whole lot easier to find than they were many years ago.  It used to be a big treat to find them, now pretty much every grocery store has them.  And I love them.  That was selling point number one for these sandwiches.  Although it just occurred to me that I've never looked at the ingredient list.  Sigh.  I probably should, but I'm fairly certain that means I won't want to buy them anymore.  Do you ever run into this conundrum if you try and mainly eat real food?  I suppose I could find a recipe to make my own...surely there's one out there.  But I digress...
I also love sandwiches.  I'd say who doesn't love them, but I do know of someone that doesn't.  She doesn't like mixing her food together, which I understand I guess, but man alive is she missing out!  I can see not wanting your mashed potatoes and peas to mingle together on your plate, but a sandwich is something completely different.  These sounded super easy when I first saw the recipe, and I'm always up for an easy to prepare dinner!  Especially if it's a delicious sandwich.

Baked Hawaiian Ham Sandwiches

One 12-count package http://www.kingshawaiian.com/products/rolls-12-pack/">King's Hawaiian sweet dinner rolls
3 sticks butter
3 Tbsp dijon mustard
1-1/2 tsp worcestershire sauce
1 Tbsp poppy seeds
1 onion, somewhere between finely chopped and diced
1 pound thin sliced ham
6 slices Swiss cheese

Preheat oven to 350.

In a medium saucepan, melt butter and add in mustard, worcestershire, poppy seeds, and onion.  Let simmer 5-7 minutes.

Slice entire package of rolls in half horizontally, so you have 12 bottoms and 12 tops.  Keep them connected--don't break them apart into separate rolls.

Place bottom halves of rolls into a foil-lined 9x13 baking dish.  Brush 1/3 to 1/2 butter mixture on rolls.  Place ham on top, layering evenly across rolls.  Lay cheese slices in single layer on top of ham.  Place top halves of rolls over the cheese and brush remaining butter mixture on the top of the rolls.

Cover with foil.  Bake approximately 15 minutes.  Remove foil cover and bake another 5-7.  Slice into individual rolls and serve.

*****

Obviously you can probably tell from my initial comments that these are a huge hit at my house.  My kids don't like the pieces of onion on theirs that inevitably end up on the top of the roll, so they just push them off and have a little onion pile on their plate, which is okay by me.  I'm not sure how many times I've made them, but last night I actually doubled the recipe so there'd be leftovers because we'll eat a whole batch in one meal.  But then of course today, Boy #1 wanted to buy lunch at school, and the husband had an all day meeting with lunch being served, so there's a whole pan of them just sitting in my fridge now.  Good thing it's leftover clean-up for dinner tonight!

By the way, does anyone know of a ham that is free of nitrates and nitrites?  Try as I might, I cannot find one.  I'm starting to think unless I get a fresh ham and cook it myself, it's not going to happen.  And if that's the case, I'll either stick with the nitrites or do away with ham altogether.

Who am I kidding...I would never do away with ham.

Speaking of ham...check out Boy #2 posing with the sandwiches!


Monday, August 12, 2013

Grilled Chicken and Zucchini Yakitori


Well, so much for my plan of keeping my blog updated over the summer.  Boy #1 started second grade last Monday, and Boy #2 starts his last year of preschool this afternoon.  I don't know how they got to be this old.  One of my friends posted a picture on Facebook of Boy #1 and one of his BFFs on the first day of school.  They've been friends since they were one, and seeing them so big and starting second grade had me in tears.  Anyway, now that school is back in the swing, and I have four afternoons a week to myself, I'm hoping to get back on the blog wagon.  The past few weeks I haven't made a whole lot of new stuff.  It's hard to find the time to come  up with meal plans that include a bunch of new recipes when I have both kids at home.

This recipe has been one of our new favorites over the summer.  The first time I made it I was watching my friend Amanda's daughters, and I wasn't sure how the kids would receive it.  I mean, it's grilled chicken, so I figured it would be okay.  Turns out I had nothing to worry about.  This is from SkinnyTaste.com, which is one of my favorite healthy cooking blogs.  I don't think I've ever been disappointed with a recipe I've used from her website.  I love grilling in the summer, especially if we're hanging out in our pool, but I get tired of always grilling the same stuff, so finding a new grilled chicken recipe is pretty fantastic in my book.

Grilled Chicken and Zucchini Yakitori
Source: Adapted from http://www.skinnytaste.com/2013/06/grilled-chicken-and-zucchini-yakitori.html">SkinnyTaste.com

2 tablespoons rice wine vinegar
1/2 cup low sodium soy sauce (for GF use low sodium Tamari)
1 1/2 tablespoons honey
1 garlic clove, crushed
3 lb boneless skinless chicken thighs, all fat trimmed
2 medium zucchini, sliced into 1/2-inch thick rings
18 (10 inch) bamboo skewers

Bring vinegar, low sodium soy sauce, honey and crushed garlic to a boil in a medium-sized sauce pan, and cook over medium heat for about 5 minutes. Set aside to cool.

Cut the chicken into 1-inch pieces and place in a ziplock bag; pour half of the marinade over the chicken. Place the zucchini in a second large ziplock bag and pour the remaining marinade over the zucchini. Refrigerate for at least 30 minutes. Meanwhile, soak the skewers in water 30 minutes so they don't burn.

Thread the chicken onto skewers, discarding the chicken marinade.

Thread the zucchini onto skewers, reserving the marinade for basting.

Preheat the grill or a grill pan over medium-high heat. When hot, spray with oil then reduced heat to medium; grill the zucchini and chicken skewers about 5 to 6 minutes on each side brushing both sides of the skewers with the yakitori sauce during the last few minutes of cooking time.

*****

I said above that when I made this for my family and my friend's daughters I didn't have to worry about them not liking it.  The kids all had seconds of the chicken.  There were no leftovers from this, which was kind of disappointing because I had hoped to have some for the husband and me for lunch the next day.  The kids didn't eat the zucchini, but the husband and I loved it.  This thick-zucchini-slices-on-bamboo-skewers was actually my go-to way to grill zucchini over the summer when we'd have it as a side dish.  So easy!  If I wasn't making this recipe I'd brush the slices with some olive oil and sprinkle with some Lawry's or Tony Chachere's and throw them on the grill with whatever protein I was cooking.

This is super easy to put together (as long as you plan ahead for marinating time), and so good.  The original recipe called for sake instead of the rice wine vinegar, but since I didn't have sake on hand I substituted the vinegar.  It also called for green onions to be on the skewers between chicken pieces and zucchini pieces, but I haven't ever done that, so I took it out of the ingredient list.

I have already made this so many times this summer, but it's so easy and my family loves it, so it's definitely going to stay one of my go-to chicken thigh recipes!


Tuesday, June 25, 2013

Grilled Pork Ribs


I just love to grill in the summer.  It does have its downsides being in Phoenix and standing outside in the roasting heat over a hot grill, but it creates significantly less dirty dishes and doesn't heat up my kitchen by using the oven.  Plus we have a pool, so a lot of times whomever is grilling will take pool breaks or just hang out in the pool while dinner cooks.  It's a pretty sweet system.

I've always been a fan of boneless ribs.  Gnawing on ribs with the bones in them has always seemed gross and honestly a little barbaric to me.  although for a lot of years I wouldn't even eat meat with bones in it because it reminded me that it once was walking around.  Can you tell I lived with vegetarians in college?  I don't think I had my first buffalo wing until I was in my mid-20s.  I've gotten over it now, but I still won't eat bone-in ribs.  Recently boneless ribs were on sale for a super good price, so I bought a package of them planning on grilling them.  I wasn't really sure how to grill them, if I just threw them on there or what, so a little Googling directed me to a brine recipe, and I ran with it.  My uncle makes really fantastic grilled ribs, but I knew I'd need ingredients I didn't have, and I try to limit grocery store trips in the summer since I have to drag both kids with me.  This was also my first attempt at a brine, so I was pretty excited to try it out.

Grilled Boneless Pork Ribs

1 cup water
1/4 salt
1 T. sugar
3 pounds boneless country style pork ribs

In a gallon Ziploc bag, combine water, salt, and sugar.  Add in ribs, squeeze out excess air, and let sit for at least 30 minutes and up to overnight.

Preheat your grill for indirect heat grilling (is that the right phrase?).  My grill has four burners, I turned on all four to heat it up, then reduced the middle two super low.  Lay ribs in the middle of the grill and cook for 10 minutes.  Flip them over and grill another 10.  Their internal temperature should be 145 degrees.  Remove from grill and serve with your favorite barbecue sauce (or make your own if you're an overachiever like me).

*****

I really had no idea how this was going to turn out.  I'll be honest--I had visions of dried out, tough, inedible ribs, and I was working on a back up dinner plan in the back of my head the whole time.  My original plan had been to only cook about half the package of ribs, but Boy #2 was helping me make dinner, and he said we should do all of them so there'd be leftovers.  Thankfully he's a lot more optimistic than his mama because I didn't know if we should plan on leftovers in case they were awful.

These turned out AMAZING.  I don't know why I doubted myself.  Normally my go-to method of cooking boneless ribs is throwing them in the crockpot with a sweet and sour barbecue sauce that's my great aunt's recipe, but this may very well be my new go to.  It was a huge hit with my family.  There were leftovers but not many.  They were good on their own, they were good with the barbecue sauce (although my kids preferred them without the sauce, the husband and I were torn on which was better).  This was an all around winner!!


 My grill could maybe use a cleaning.

 I tried to make this one a little scenic.  See my failing garden in the background?  Those green things are my sad basil plants that are the only remnant of what I had hoped to be a successful summer garden.

Thursday, June 20, 2013

Rosemary Crackers


I have a love/hate relationship with crackers.  I love to eat them, but I hate the ingredients in most of them.  Ak-Mak crackers are the exception, but I don't buy them very often because no one else in my family likes them.  Actually I don't buy crackers very often anyway because this family is a bunch of cracker monsters.  Crackers just do not last at my house.  I don't know what it is.  I recently found a recipe to make my own crackers and figured it was worth a shot...especially since it was easy and I had all the ingredients on hand.  Plus making my own crackers sounds kind of kitchen bad ass, which I really like.  Okay, maybe not bad ass but definitely impressive, right?

Rosemary Crackers
Source: Budget Bytes blog

 2 cups all-purpose flour
1 tsp baking powder
½ tsp salt (plus more for sprinkling)
1 Tbsp rosemary
to taste freshly cracked pepper
4 Tbsp cold butter
½ to ¾ cup cold water

Chop the rosemary well so that there are no large, sharp pieces. Add the rosemary, flour, baking powder, salt, and some freshly cracked pepper to a food processor and pulse until the mixture is evenly mixed (or just stir them together in a bowl).

Cut the butter into pieces and add it to the food processor. Pulse the mixture until the butter is completely incorporated and no chunks remain. Or, cut the butter into the flour mixture with pastry cutter, two knives, or just with your hands until the butter is completely worked into the flour mixture.

Slowly add cold water to the food processor while pulsing, just until it forms a dough (or stir it in by hand until a dough forms). Depending on the humidity and moisture level in your flour, it will take between ½ and ¾ cup water. (I used closer to 3/4 cup).

Preheat the oven to 400 degrees. Turn the dough out onto a lightly floured surface and roll it out until it is approximately 1/16th inch thick. Use a pizza cutter or knife to cut the dough into small rectangles, squares, or triangles. Prick each “cracker” with a fork. Carefully transfer the cut crackers to a baking sheet lined with parchment paper.

Sprinkle the crackers lightly with salt, if desired. Bake the crackers for 20-25 minutes, or until they are golden brown. The total amount of baking time needed will depend greatly on the thickness and size of the crackers, so watch them closely. Allow the crackers to cool and then store in an air-tight container at room temperature.

*****

See what I mean?!  Super easy!  You can be a kitchen bad ass, too, and impress your friends and colleagues or whomever by making your own crackers.  Plus I love stuff that's all done in the food processor.  These were super, super tasty.  But she's right about watching them while they bake--the thinner ones came out a little too dark for my liking.  Personally I loved dipping these into homemade hummus, and they were good with some slices of cheese on top.  I've made these several times and the cracker monsters have always gobbled them up.

(Why, yes, the picture up top is from Instagram...I had to brag on my kitchen bad ass-ness when I made them the first time!)


Friday, May 24, 2013

Chocolate Snack Cake


Quite awhile ago now, my dear friend Betty sent me a recipe for a chocolate snack cake that sounded super easy to make.  It's no secret that I'm not a fan of baking, which is both bad and good.  Bad because I really love baked good and good because I really love baked goods.  Not wanting to ever take the time to make them or dirty all the dishes involved (seriously, is it just me or does baking dirty way more dishes than cooking?!) makes it pretty easy to stay away from cookies or cakes or pies that I'm just going to sit and gorge on if I make them.  But, I have two little kids, so some times I have to bake things to appease them.  For one thing they like to help me, and for another, they really love to eat stuff that I bake.  Recently we were having a family fun night, and I decided to make this cake.  I wanted a fun dessert for my family, and this sounded super easy.  And the best part?!  You mix it up in the baking dish, so there aren't a ton of dishes to deal with once you're done!  Jackpot!

Chocolate Snack Cake


1 1/2 cups all-purpose flour, (spooned and leveled)
1 cup sugar
3 tablespoons unsweetened cocoa powder
1 teaspoon baking soda
1/2 teaspoon coarse salt
6 tablespoons vegetable oil
1 teaspoon pure vanilla extract
1 tablespoon white vinegar
1 cup cold water

Preheat oven to 350 degrees. In an 8-inch square baking pan, whisk together all-purpose flour, sugar, unsweetened cocoa powder, baking soda, and coarse salt.

Make a well in center of flour mixture and add vegetable oil, pure vanilla extract, white vinegar, and cold water. Whisk until well combined. Bake until a toothpick inserted in center comes out clean, 35 to 40 minutes. Let cool completely in pan on a wire rack.

*****

Let me tell you...my family devoured this cake.  The consistency was similar to a cake-like brownie.  It was a little denser than a chocolate cake you'd make from a box mix but not chewy like a brownie, if that makes sense.  It did not last long...like maybe until the end of the movie we were watching.  I also really liked that it was vegan because my brother and his girlfriend are vegan, so it's nice to have options I can make for them when they come visit.  Normally they come for each of my kid's birthdays, and I want them to be able to have cake to celebrate with us.  Anyway, this is super easy, hardly dirties any dishes, and it's stuff I always have on hand.  I kind of wish I'd had this recipe when I was pregnant either time because I bought a lot of chocolate cake mixes and randomly baked cakes both times.

Actually writing this out and seeing the pictures kind of makes me want to whip one up to share with my boys tonight!


Note to self: put away dishes before taking pictures for blog.  A cheese grater in the chocolate cake picture?!  Come on, Claire!  Class things up a bit around here!


Friday, March 15, 2013

GG's Lasagna


I cannot believe I've never done a post about my grandma's lasagna recipe. But, alas, that must be the case because when I went to make it recently I couldn't find it here on the ol' blog. For those of you that don't know her, my grandma is awesome. Seriously, I've never met someone that doesn't love her as soon as they meet her. She'll be 95 in May, and she's still going strong. She takes one medication and only because her doctor thinks a woman her age should be on some sort of medication. Sheesh. She grew up on a farm in Hale, Missouri during the Great Depression, and I (still) love when she tells me stories about her youth. She is hands down one of my favorite people in the world.


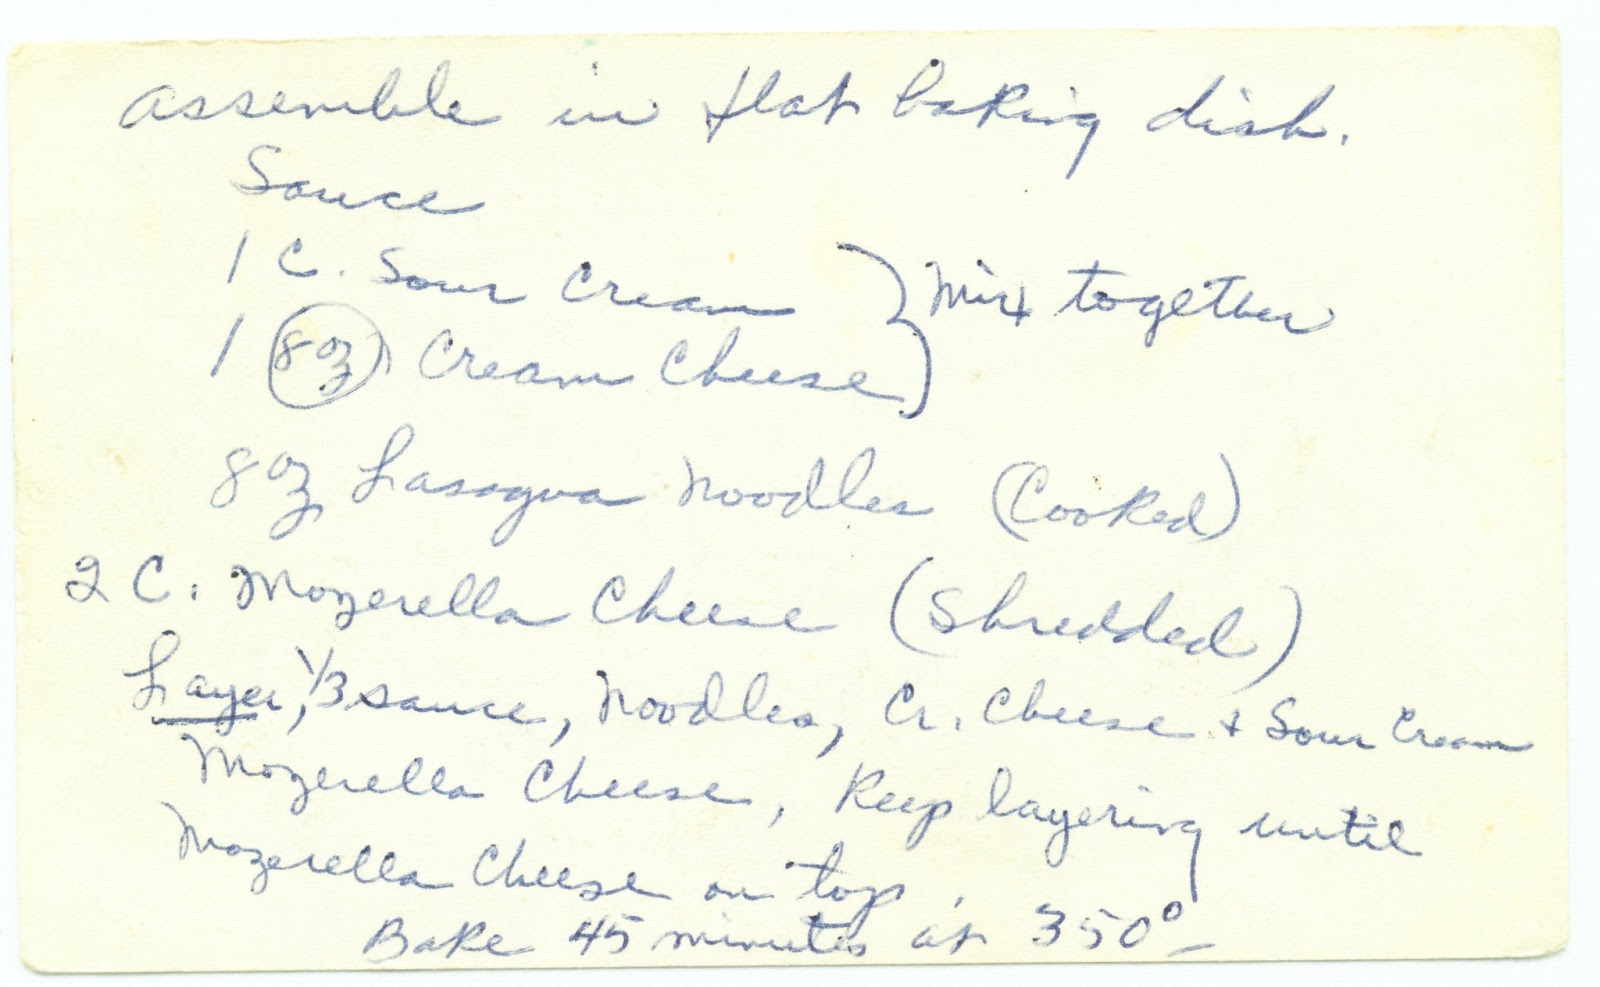
We all love her lasagna recipe, and it is Boy #1's absolute favorite food in the world. He turned seven last month, and while my brother and his girlfriend were here visiting for the weekend for his birthday we had a lasagna dinner at my mom's. My grandma made her lasagna, and my brother made a vegan one. That was on a Saturday night, I think it was. The boy's birthday was Wednesday, and I asked him what he wanted me to make for his birthday dinner one night that week, and he said, "GG's lasagna." I said, "Really? But we just had that." He said, "I know, it's my favorite." Okay...I can't argue with that! So we had GG's lasagna again later that week. A few years ago I took my scanner to my grandparents' house and sat down with my grandma's recipe box to scan some of my favorite recipes of hers. I love that I have the recipe in her handwriting, too.


GG's Lasagna
Source: my awesome grandma

Sauce:
1-1/2 lb. ground beef
1 small onion, chopped
2 cloves garlic, minced
2 8-ounce cans tomato sauce
1 cup water
1 T. dried parsley
1 t. oregano
3/4 t. salt
1/4 t. thyme
1 bay leaf

Simmer. Remove bay leaf before using sauce.

Other ingredients:
1 cup sour cream
8 ounces cream cheese
8 ounces lasagna noodles, cooked
2 cups shredded mozzarella cheese

Mix together sour cream and cream cheese.

Assemble in a flat baking dish and layer:
1/3 cup sauce, noodles, cream cheese and sour cream, mozzarella. Keep layering until mozzarella cheese is on top.

Bake 45 minutes at 350.

*****

This lasagna does not last when I make it. There's maybe one or two servings leftover, and normally Boy #1 has it for breakfast the next day or wants to take it in his lunch. I really think he'd eat this every day if I'd make it that often.


Thursday, March 7, 2013

Spicy Sweet and Sour Pork


My Wine Pie post was the swift kick in the pants I needed to get back to my blog. I really have quite a few things to share that I've made recently, so hopefully now I can get back on track and make my ol' blog here a priority again. I mean, right now I should be cleaning up my kitchen and putting a load of towels into the washer, but I'm sacrificing those things to write this. Ha! Like that was a tough decision.

I've been trying to have the husband help me meal plan some each week, and this was one of his choices a couple weeks ago. I pulled up some recipes I'd saved on Pinterest and had him flip through them and see what looked good. This is one he chose. I'm always down for a stir fry, and my kids love sweet and sour anything, so I figured this would be a good choice.

Spicy Sweet and Sour Pork
Source: adapted from Cooking Light

1 pound boneless pork chops, cut into 3/4-inch cubes
2 tablespoons cornstarch, divided
3 tablespoons low-sodium soy sauce, divided
1 (8-ounce) can pineapple chunks in juice, undrained
1/4 cup cider vinegar
1/4 cup sugar
2 tablespoons ketchup
1 teaspoons Sriracha (hot chile sauce, such as Huy Fong)
1 tablespoon canola oil
1 cup chopped onion
1 teaspoon minced ginger
1/2 teaspoon minced garlic
1 cup chopped green bell pepper

Combine pork, 1 tablespoon cornstarch, and 1 tablespoon soy sauce; toss well to coat. Drain pineapple in a sieve over a bowl, reserving juice. Combine juice, remaining 1 tablespoon cornstarch, remaining 2 tablespoons soy sauce, vinegar, and next 3 ingredients (through Sriracha), stirring with a whisk.

Heat a large nonstick skillet over medium-high heat. Add canola oil to pan; swirl to coat. Add pork to pan; sauté 3 minutes, stirring frequently. Add 1 cup onion, ginger, and garlic; sauté 1 minute. Stir in pineapple and bell pepper; sauté 3 minutes, stirring frequently. Stir in vinegar mixture; bring to a boil. Cook 1 minute, stirring constantly. Serve.

*****

The original recipe called for pork tenderloin, but I had pork chops on hand. Although, instead of grabbing two packages of pork chops from my freezer, I accidentally grabbed a package of pork chops and a package of chicken breasts. Oops. So ours was a pork/chicken combo. It worked out okay, and my kids thought it was kind of fun to try and figure out which pieces were pork and which were chicken. Anyway, it also called for more Sriracha, but I cut back on it since my kids don't like spicy food.

This was a total winner of a dinner! Everyone in my family loved it. Boy #1 even wanted to take leftovers to school for lunch the next day!! What?! I believe he rated this a "triple A+, 100" which is pretty freakin' good. I'll definitely make it again since my whole family enjoyed it!

Sunday, January 13, 2013

Broccoli Cheddar Soup


It's cold here. If you don't live in AZ you're probably chuckling and shaking your head saying, "Silly girl...it doesn't get cold in Phoenix." But it is. Right now according to the weather on my phone it's 34 degrees at 11:50 AM. Brrrr. Once it's cold (or even AZ cold which usually means low 60s for the high), I want to eat soup. I love soup, and I'm always looking for a tasty homemade soup recipe. I rarely eat canned soup anymore because the ingredients are mostly stuff I don't want to put in my body, and they're just too darn salty for my taste. Except Campbell's tomato soup. I'll eat that when I'm sick, HFCS be damned! I like it made with milk and crushed up saltine crackers stirred in. Yum.

Anyway, one of my online friends, Stephanie, posted this recipe on the message board website I frequent, and I was dying to try it. My kids are pretty hit or miss when it comes to soup, but they love broccoli and cheese, so I took a chance that this one would be something they'd like. Plus Stephanie is a nutrition consultant, so I knew I could trust that this was something healthy to feed my family.

Broccoli Cheese Soup
Source: The Mamasphere via Stephanie

1 tablespoon melted butter
1/2 medium chopped onion
1/4 cup melted butter
1/4 cup flour
2 cups half-and-half cream
2 cups chicken stock (I use homemade)
1/2 lb fresh broccoli
1 cup carrots
1/4 teaspoon nutmeg (optional)
8 ounces grated sharp cheddar cheese
salt and pepper

1. Sauté onion in tablespoon butter. Set aside.

2. Cook melted butter and flour using a whisk over medium heat for 3-5 minutes.

3. Stir constantly and add the half & half.

4. Add the chicken stock. Simmer for 20 minutes.

5. Add the broccoli, carrots and onions. Cook over low heat 20-25 minutes.

6. Add salt/pepper/nutmeg to taste. Puree with immersion blender.

7. Return to heat and add grated cheese.

*****

I've made this twice in about the past month, and it's a big hit with my family. My boys always grumble a little when I've made it, but they both eat it all up. Actually I made it this past week and doubled the recipe to take some to an injured friend and her family. They all liked it, too. It's really hearty and filling, and it comes together pretty easily, too. I really should just double it on a regular basis so I have some to eat for lunches or stick in the freezer because one batch goes pretty quickly. This is definitely a great addition to my go-to soup repertoire! Add a salad and some crusty bread or rolls, and you have a great meal!


Sunday, November 18, 2012

Coconut Chicken Satay


My baby boy turns four tomorrow. I just cannot believe it. I say it every year, but I really just can't believe it. I've been running around like a madwoman for the past few weeks getting stuff ready for his party that we had yesterday. I don't know how I always end up busy lately. My brother and his girlfriend are in town for the weekend, and they went on a hike this morning, the husband took Boy #1 out for some quality daddy time, so it's just Boy #2 and me hanging out while he plays with his loot of toys from his friends yesterday. So I thought it was a perfect time to work on my blog.

I know I'm so far behind (hey, but at least I won't go a whole month without posting!), so I will work my way backwards I guess. Mostly because the most recent new recipe I tried was awesome and worthy of sharing.

Boy #2's preschool teacher emailed me recently that she'd stumbled across my blog and wanted to let me know about a website she loves, 100 Days of Real Food. I had seen it before, but I had forgotten about it and certainly didn't have it in my food blog rotation that I usually check when I'm looking for new ideas. So I decided to see what all I could find on there. Turns out there was a ton, and I think after Thanksgiving we are going to start with the 10 day challenge and see how it goes. Shouldn't be too hard because we already don't eat many processed foods, but I'm excited for the challenge to see what more we can give up. This was one of the meals I chose from it for last week's meal plan.

Coconut Chicken Satay
Source: 100 Days of Real Food website

1 lb chicken breasts, preferably locally and/or organically raised
1/2 cup peanut butter
1/2 cup unsweetened whole coconut milk
1 tablespoon + 1 teaspoon fresh-squeezed lime juice
1 tablespoon rice wine vinegar
1 tablespoon honey
3 cloves garlic
1/2 fresh jalapeno, seeds & stem removed (use the other half to make some overnight refried beans…yum!)
1/8 teaspoon chili powder
1/3 cup unsweetened shredded coconut, lightly toasted (note: coconut can burn quickly and needs to be stirred/checked frequently while toasting…we do ours in the toaster oven for no more than 2 or 3 minutes)
Also need: skewers and foil lined baking sheet


Preheat the oven broiler on high. Soak skewers in water if you don’t want them to cook/burn in the oven.

Cut the chicken breasts into strips and thread them onto about a dozen skewers. Place the prepared skewers on a foil-lined baking sheet and set aside.

In a food processor or blender puree the peanut butter, coconut milk, lime juice, vinegar, honey, garlic, jalapeno, and chili powder together. Remove 1/4 cup of the peanut mixture and drizzle/brush it over the raw chicken skewers.

Place chicken under the broiler to cook. After 4 – 5 minutes take the baking sheet out, turn the skewers over, drizzle another 1/4 cup peanut sauce on top, and cook for 4 or 5 more minutes or until cooked all the way through.

Once the chicken is done take it out, drizzle on the remaining peanut sauce (or serve it as extra dipping sauce on the side), and sprinkle the toasted coconut on top. Serve warm and enjoy!

*****

We had this on a Wednesday night, which is when we lead a Bible study group for our church. I ended up getting a late start on it, so I didn't get to eat with my family because I had to go pick up our babysitter. The husband texted me that it was fantastic and they all loved it. I ate it when I got home, and it was super tasty! It was really easy to do and came together fast, which was great. I think my boys enjoyed the novelty of eating dinner off a stick. I skipped the jalapeno in the sauce because my kids don't like spicy, and I thought it still had good flavor without that. I did add a little extra chili powder to compensate for the missing jalapeno. I ended up having another skewer as a snack the next day. This is definitely going into my meal rotation since it was a hit with all of us!

Oh, I should note that I had an awful time finding unsweetened coconut. I finally found it at Fry's, which is a Kroger grocery store for those of you out of state, but it was tucked behind a display for something else. Sheesh. Hopefully you don't have such an awful time getting ahold of some!


Saturday, October 20, 2012

Jam Stuffed Biscuits


Normally I try to avoid buying processed foods and stick with foods that I can easily pronounce all of the ingredients, but I'm a sucker for a few things that I will buy on occasion. Like Grands biscuits. I can't help it, they're so flaky and delicious. My grocery store recently had them on sale for super cheap, so I bought quite a few. Well, I think I bought three. But that seemed like quite a few. I didn't really know what I was going to do with all of them, so I looked on the Pillsbury website for ideas. I saw this recipe and thought my kids would love it and it would be a quick breakfast. I love quick breakfasts...I'm not not a morning person, but I definitely prefer things to be easy in the morning so we can get out the door and take Boy #1 to school.

Jam Stuffed Biscuits
Source: Pillsbury.com


1 can (16.3 oz) can Pillsbury® Grands!® Flaky Layers refrigerated biscuits
1/2 cup jam or preserves of your choice
1/2 cup butter, melted
1/2 cup sugar

Heat oven to 400°F. Spray large cookie sheet with cooking spray.

Separate dough into 8 biscuits. Gently separate each biscuit halfway into 2 layers. Spoon 1 tablespoon jam into center of each biscuit. Pinch edges to seal.

Dip each biscuit into melted butter; dip each in sugar. Place on cookie sheet. Bake 14 to 16 minutes or until golden brown around edges.

*****

These were a huge hit at my house. My kids loved them and so did the husband. I used homemade peach jam inside this biscuits, and it was super tasty. I'd definitely make these again. They were even easy for a school morning!


Monday, April 9, 2012

Honey Sesame Chicken


Lately my afternoons have been starting out with me camped out on the floor outside Boy #2's room waiting for him to fall asleep for his nap. Otherwise he constantly gets out of bed and I'm constantly coming upstairs to put him back in bed. I think he's heading towards dropping his nap, but so far he still takes one most days, thankfully. Some days I sit here for a very long time. Other days he falls asleep pretty quickly. Normally I have my phone with me and do something like catch up on Scrabble or Words With Friends or Draw Something, but today I brought my laptop up and decided to do a blog post. I just uploaded our Easter pictures and that included some dinner pics from recently. It was a tough choice which one to do because we've had some tasty things, but I figured I'd start with this one. I tend to be somewhat against cooking chicken in the crockpot because it ALWAYS seems to turn out dry. Dry chicken is not delicious, and personally I like to eat delicious food. This one sounded tasty and since there was a sauce with it, I thought that maybe it would be okay...because sometimes dry chicken can at least be masked with enough sauce.

Honey Sesame Chicken
Source: Adapted from Table For Two blog via Pinterest

1 to 1.5 lb. boneless, skinless chicken breasts
Salt and pepper
3/4 cup of honey
1/2 cup of low sodium soy sauce
1/2 cup ketchup
2 tbsp. vegetable oil
1/2 tsp garlic powder
1 tsp onion powder
1/4 tsp. red pepper flakes
Cornstarch
Sesame seeds

Place the chicken breasts in the crockpot insert and sprinkle salt and pepper on both sides.
In a medium sized bowl, combine honey, soy sauce, ketchup, oil, garlic powder, onion powder, and red pepper flakes. Stir to combine well. Pour over the chicken in the crockpot.

Cook on low for 3-4 hours or high for 1 1/2-2 1/2 hours.

When done, remove chicken and cut into chunks. Prior to putting the chicken back in the stockpot, combine some cornstarch in water and whisk it into the crockpot to thicken up the sauce a bit. Throw the chicken back in and stir around to recoat the chicken in the sauce.
Serve hot over a bed of white rice or quinoa (optional) and sprinkle some sesame seeds on top.

*****

The original recipe called for chicken thighs, but I only had chicken breasts. And the original recipe had more honey and less ketchup and real garlic and real onion, but I didn't have enough honey, I accidentally used too much ketchup, and I was too lazy to chop up garlic and onion. Hey, at least I'm honest. Also, since I'm being honest, I forgot to get this started when I had planned, so I had to throw my chicken into the crockpot frozen and say a prayer and cross my fingers it was done in time for dinner. Thankfully it was. And you know what? It wasn't dried out!!! Perhaps using frozen chicken and checking the chicken when you think it might not be cooked yet are the keys? Maybe I've just been leaving it in the crockpot for too long all these years. I don't know. But, I do know that this was DELICIOUS and my whole family really liked it. I opted to serve it with quinoa instead of rice because I only had brown rice and not enough time for it to cook, plus I love the nutritional content of quinoa over rice.

This is definitely something we'll have again, especially since most of the ingredients are things I always have on hand.


Monday, April 2, 2012

Pizza Rolls


Slowly but surely (okay, more slowly than surely) I'm getting caught up on my blog posts. I have a note in Outlook that I update with the posts I'm going to do, and I'm hoping soon it starts getting shorter instead of longer. I feel like my time management skills have really been lacking lately. It's not just my blog, it's with everything!

This goes all the way back to the Super Bowl. I'm at least getting it in just under two months, so it could be worse I guess. My BFF Jen and her husband had a Super Bowl party for all of our friends. It was super fun but a little nuts with 16 kids running around and 12 adults hanging out watching the game. The food we had was amazing. AMAZING. Everyone brought a ton of stuff, and I gorged the whole time. I had a food baby for days afterwards. But it was worth it. On the Evite she had sent it seemed like most people were bringing some kind of dip or spread, so I wanted to do something different. I had seen these on Pinterest and thought they looked good and would be kid friendly.

Pizza Rolls
Source: Adapted from TidyMom.net via Pinterest

2 cans crescent rolls
garlic salt
Italian Seasoning
1 cup sliced pepperoni
2 cups shredded mozzarella
1/2 cup Parmesan Cheese

Preheat oven to 425

Dust a large cutting board or piece of wax paper with flour and roll out each pizza crust. Season each crust with garlic salt and Italian seasoning. Top with cheese and meat.

Starting with the long side, roll crust into a tight log. Slice into 1" sections.

Place on lightly greased pan and bake for 10-12 mins.

*****

The original recipe called for using the tubes of pizza crust dough, but I opted for crescent rolls. I don't remember why now, but it probably involved cost and coupons. It also said to roll it starting with the short side, but I rolled the long side so I'd get more out of it instead of thicker ones, if that makes sense. The crescent roll dough was a little thin once it was rolled out some, but I made it work. My five year old (well, now he's six but he was five at the time) loved helping me make these.

These were fantastic and were gobbled up at the party. There were a few left, so I left some with Jen for her son to take in his lunch and I brought the rest home and did the same for Boy #1. These are actually a great lunchbox item, too! I'll definitely be making them again, either for another party or event or to have on hand to send in lunches.

Tuesday, March 20, 2012

Turkle Burgles


We were on a spring break trip in CA last week, and the husband pointed out that I hadn't updated my blog in awhile. I knew he was right, so today I decided to make blog updating a priority. and then I got distracted by Pinterest and going through my picture folders to see what exactly I wanted to blog about, so now I only have time to do one post instead of the two or three I had planned. Oh well! I was amazingly efficient today, so let's hope that carries over to tomorrow. Of course, it helps that Boy #2 is being entertained by an alphabet/phonics video.

This isn't anything we've had recently, but it's super yummy, and Boy #1 keeps talking about them, so I figured I should write a post about them. I have no idea where the name of this came from, but it's something my family has always eaten, especially with leftover Thanksgiving turkey. The sandwiches are so easy to put together, and really tasty! Hey, if my six year old asks for them repeatedly, you know it has to be something good! he even took them for his lunch, cold!

Turkle Burgles
Serves 4

4 hamburger buns or sandwich rolls (I use Oroweat Sandwich Thins)
8 slices cooked bacon
8 slices turkey (or enough for four sandwiches)
4 slices cheese
Thousand Island salad dressing (or homemade with mayo, ketchup, and relish)

Heat broiler. Toast hamburger buns. Place bottom half of buns on a cookie sheet. Top with 2 slices of turkey, 2 strips of bacon (I tore mine in half to get more bacon coverage), and slice of cheese. Place under broiler until cheese begins to melt. Spread dressing on top half of bun and top sandwich.

*****

Seriously, the hardest part of these was mixing up my own Thousand Island dressing. We had these a couple nights in a row when we had leftover turkey after the holidays because 1) they're so easy to put together, and 2) we all loved them. I'm sure they could be made using turkey lunchmeat, too, if you didn't have any leftover turkey meat, I've just always had them with leftover turkey.

Typing this out and looking at the pictures almost makes me want to find a turkey to cook...almost!


Tuesday, February 28, 2012

Baked Sweet and Sour Chicken


It's 7:30 in the morning right now which is by no means an optimal time at my house for me being on the computer, but this dinner last night was so good that I couldn't wait! Plus my kids are upstairs (supposedly getting dressed, but I think in actuality they're watching Pink Panther cartoons) and I'm waiting for my coffee to cool off a bit, so I figured I might as well jump on the computer. I'm sure I'll regret it when I'm scrambling an hour from now to get us out the door. Oh well.

This, of course, came from Pinterest. Boy #1 LOVES sweet and sour chicken when we get Chinese take-out, so I thought he'd be all over this. I was going to make it one night last week until I saw it had to bake for an hour and knew that just wasn't going to fit into the time frame I had to prepare dinner that night. Boy #1 was disappointed, but he was super excited to come home from school yesterday and find out we were having it last night.

Baked Sweet and Sour Chicken
Source: Life As A Lofthouse blog via Pinterest.com

The chicken coating:
3-4 boneless chicken breasts
salt + pepper
1 cup cornstarch
2 eggs, beaten
1/4 cup canola oil

The sweet and sour sauce:
3/4 cup sugar
4 tbs ketchup
1/2 cup vinegar
1 tbs soy sauce
1 tsp garlic salt

Start by preheating your oven to 325 degrees. Rinse your chicken breasts in water and then cut into cubes. Season with salt and pepper to taste. Dip chicken into the cornstarch to coat then dip into the eggs. Heat your 1/4 cup oil in a large skillet and cook your chicken until browned but not cooked through. Place the chicken in a 9x13 greased baking dish. Mix all of your sweet and sour sauce ingredients in a bowl with a whisk and then pour evenly over the chicken. Bake for one hour and during the baking process you will need to turn the chicken every 15 minutes.

*****

I have to say that this was pretty time consuming to make. It took me awhile to find a groove with the breading/egg wash/frying. Eventually I figured out to move a batch to the egg wash once I had put a batch in the skillet and start a new batch then in the cornstarch. When I flipped the chicken in the skillet, I flipped the chicken pieces in the egg wash, then they were ready to go once I took the skillet batch out. Did you follow that? I also had to adjust the cooking time and temperature. My chicken took longer to thaw than I anticipated, and we had to eat at a certain time last night. I ended up baking it for 30 minutes at 375, and it turned out great. I stirred it around once during baking and then again once it came out of the oven.

We all really liked this. REALLY liked it. Boy #1 is taking the leftovers in his lunch today. The husband and I were both standing over the baking dish taking bites last night once we were done eating. My only real concern with it was the 3/4 cup of sugar in the sauce. It seems like a lot. Next time I may try to scale that back a bit and see what happens. This is definitely something I'll make again, I'll just be sure to allow enough time for all the steps!

Friday, August 12, 2011

Pizza Loaf

And my updating continues! Boy #2 has taken to getting up at the ass crack of dawn, so while he's engrossed in an episode of Word World I figured I'd do some blog updating. For my meal plan last week I went through some older clipped recipes I had. For years my mom got me a subscription to Taste of Home magazine. I'd doggy-ear a bunch of recipes in each issue and then usually forget about it. I got tired of having years' worth of magazines around, so I finally went through each one and looked at all the recipes again (the husband has gotten more adventurous in his eating over the years, so I knew there'd be stuff I had originally passed up but that he'd eat now) and cut out all the recipes I wanted to try. Then I stuck them in a folder and forgot about them there. Not really, I just rarely pull that folder out to go through the recipes in it. I figured I was probably missing out on some tasty stuff, so I got it out last week and did the bulk of my meal planning using recipes from there.

Boy #1 had his first friend sleepover last week, and I thought this would be a good dinner to have while his BFF was here eating dinner with us.

Pizza Loaf
Source: Adapted from Quick Cooking Magazine, September/October 2003

1 loaf (1 pound) frozen bread dough, thawed
2 eggs, separated
1 Tbsp grated parmesan cheese
1Tbsp olive or vegetable oil
1 tsp minced fresh parsley
1 tsp dried oregano
1/2 tsp garlic powder
1/4 tsp pepper
8 ounces sliced turkey pepperoni
2 cups shredded mozzarella cheese
8 ounces sliced mushrooms
1 medium green pepper, diced
Marinara sauce for dipping

On a greased baking sheet, roll out dough into a 15-inch x 10-inch rectangle. In a bowl, combine the egg yolks, parmesan cheese, oil, parsley, oregano, garlic powder, and pepper. Brush over the dough. Sprinkle with pepperoni, mozzarella cheese, mushrooms, and green pepper. Roll up, jelly-roll style, starting with a long side; pinch seam to seal and tuck ends under.

Place seam side down; brush with egg whites. Do not let rise. Bake at 350 for 35 to 40 minutes or until golden brown. Warm the marinara sauce and serve with sliced loaf.

Yield: 10-12 slices

*****

First of all, make sure you allow enough time for the frozen dough to rise, if you're using that instead of making your own. There are three thawing options on the package, including a "quick" rise that takes around three hours instead of overnight. I didn't have that problem this time, but it has happened to me before.

This was a HUGE hit at my house. Boy #1 isn't a fan of pepperoni or anything on pizza except cheese, but even he ate it (admittedly it was somewhat begrudgingly). The husband kept going back for more pieces, and the BFF had two pieces of it. This was definitely a fun twist on pizza and something I'll make again since we all loved it so much.

(Sorry again for the cell phone pic!)


Friday, May 20, 2011

Marinated Grilled Chicken Legs

I have to say, I'm on a roll with the new Cooking Light recipes I've been trying. So much so that the husband said we should have Cooking Light Month at our house. I gotta say, I'm not opposed to the idea. Three of the six recipes I still need to post about are CL recipes and were all tasty. I don't remember how I came across this one. I think it was an article on their website about 101 ways to cook chicken or something. Boy #1 LOVES chicken legs, and they were on sale last week, so I thought this would be good. It's pretty funny because he calls them "chicken bones." Let me tell you, it took awhile to figure out what he meant when he was asking for chicken bones.

Marinated Grilled Chicken Legs
Source: Cooking Light website

1 cup fresh orange juice
2 tablespoons fresh lemon juice
4 teaspoons low-sodium soy sauce
1 tablespoon dry sherry
1 1/2 teaspoons bottled minced garlic
1 1/2 teaspoons balsamic vinegar
1 1/2 teaspoons basil oil
1 teaspoon onion powder
1 teaspoon dark sesame oil
1/2 teaspoon salt
1/4 teaspoon hot pepper sauce
8 chicken drumsticks (about 2 1/4 pounds), skinned
Cooking spray
Green onion strips (optional)

Combine the first 11 ingredients in a large zip-top plastic bag. Add chicken to bag; seal. Marinate in refrigerator 2 hours, turning bag occasionally.

Prepare grill.

Remove chicken from bag, reserving marinade. Place reserved marinade in a small saucepan; cook over medium heat 3 minutes. Place chicken on grill coated with cooking spray; grill 30 minutes or until chicken is done, turning and basting occasionally with reserved marinade. Garnish with green onion strips, if desired.

Amount per serving (2 drumsticks)
Calories: 215
Calories from fat: 31%
Fat: 7.5g
Saturated fat: 1.8g
Monounsaturated fat: 2.8g
Polyunsaturated fat: 1.8g
Protein: 30g
Carbohydrate: 4.4g
Fiber: 0.1g
Cholesterol: 97mg
Iron: 1.5mg
Sodium: 339mg
Calcium: 18mg

*****

I figure since the nutritional info was there I might as well include in case anyone else is counting calories like we are.

This chicken was REALLY good. The only thing I left out was the basil oil because I don't have any and didn't really want to buy any for the small amount that is used. Although in hindsight I probably could have just bought some fresh basil and made my own. Oh well. I used sriracha for the hot sauce and was worried I'd added too much, but it wasn't spicy at all. Dodged a bullet there because Boy #1 does not like spicy and would have been very disappointed if he couldn't eat the chicken bones.

We all really liked this. I wished I'd thrown a few more legs into the marinade so I could have had another and/or some leftovers. This will definitely be a go to recipe for chicken bones in the future!

Monday, December 13, 2010

Pioneer Woman's Spicy Roasted Chicken Legs

I know I have a ton of posts to go back and catch up on, but I figure it's better to start with the current and then move backwards, otherwise I'll get overwhelmed thinking about it and sit in the corner in the fetal position rocking back and forth. Maybe not quite that severe, but I have put off updating the ol' blog here for awhile because it overwhelmed me to think about what all I wanted to post. Sigh.

I was recently looking at the Pioneer Woman's website and saw this recipe for chicken legs. I had a package of them out in the freezer, so it seemed the stars aligned. Plus I had everything on hand to make them, which was a bonus because I was trying to use up things I had here because my freezer, pantry, and fridge all seemed to be overflowing.

If you want to see all of PW's nice pictures, here's the recipe on her website. I'm a slacker and forgot to take pictures. Oops.

Pioneer Woman's Spicy Roasted Chicken Legs

24 whole Chicken Legs
2 sticks Butter
1 Tablespoon Hot Salt (or You Favorite Seasonings)
½ cups Lemon Juice (or To Taste)

Melt 2 sticks of butter in a saucepan. Pour ½ cup of lemon juice (fresh or bottled). Now add your seasonings. In this case, 1 tablespoon of Morton’s Hot Salt. You can use whatever seasonings makes your skirt fly up, be it minced garlic, salt and Cayenne pepper … let your imagination run wild. Stir it together until combined.

Rinse and pat your chicken legs dry. With metal tongs, transfer them one by one into the butter mixture and place on a baking sheet. Once all of the chicken legs are coated and on the baking rack, take a pastry brush and give them one last coating of the butter mixture. Sprinkle them with some more of your seasonings.

Place them into a 400-degree oven for 30 minutes. If they need a bit more color, turn on the broiler for a couple minutes and watch them closely. Remove them when they are nice and golden brown.

*****

I was going to get the Hot Salt when I went grocery shopping yesterday, but I decided to stay home and hang out with the husband instead of going to the store, so I worked with what I had. I went with Tony Chachere's because everything is better with some Tony's on it. I also added in some garlic powder and Lawry's seasoning salt just for kicks. I kept the Tony's pretty minimal because the boy doesn't dig on spicy. I probably could have stepped it up a little because you couldn't really taste it at all.

This was a super easy chicken recipe, and we all really liked it. My kids love eating drumsticks...God sure got it right when he made that part of the chicken for us to eat, didn't He. It's such a perfect kid food with its built in handle and all. I didn't have 24 drumsticks, I think there were more like 15 in my package. It was quite a lot for my family of four. I only used one stick of butter, which was plenty.

This is something I'll definitely make again. In fact, chicken legs are on sale this week at my grocery, so I may just pick up another package when I'm there today.

Again, sorry there's no picture...but check out PW's website if you want to see better pictures than I take anyway. ;)

Friday, November 26, 2010

Prosciutto and Gruyere Strombolis

I get a daily email from MyRecipes.com with a featured recipe of the day. Sometimes they look great and then find their way into my Recipes folder in Outlook, other times they meet the sad fate of the Deleted Items folder. When this one showed up one morning I had a sudden flashback because I had made these years and years ago. In fact, when I first made this may have been one of the first times I'd ever used prosciutto. I don't remember when it was exactly, but it was two houses ago, so it was some time between February 2003 and September 2005. It was a Cooking Light recipe, and how I forgot about it, I'm not sure. It's really yummy and really easy, which, as you know, is a combination I love!!

Prosciutto and Gruyere Strombolis

1 (11-ounce) can refrigerated French bread dough
2 ounces thinly sliced prosciutto
1 cup trimmed arugula
1/2 cup (2 ounces) shredded Gruyère cheese
1/4 cup chopped fresh parsley

Preheat oven to 425°.

Unroll dough onto a baking sheet; pat into a 14 x 11-inch rectangle. Cut dough into quarters to form 4 (7 x 5 1/2-inch) rectangles. Top each rectangle with 1/2 ounce prosciutto, 1/4 cup arugula, 2 tablespoons cheese, and 1 tablespoon parsley. Beginning at short side of each rectangle, roll up the dough, jelly-roll fashion; pinch seam to seal (do not seal ends of rolls). Arrange rolls 4 inches apart on baking sheet. Bake at 425° for 10 minutes or until rolls are lightly browned. Serve warm.

CALORIES 275 (28% from fat); FAT 8.5g (sat 4.4g,mono 2.1g,poly 0.5g); IRON 2.3mg; CHOLESTEROL 24mg; CALCIUM 158mg; CARBOHYDRATE 34.4g; SODIUM 754mg; PROTEIN 14g; FIBER 1.5g

*****

So according to the website, this was published in Cooking Light's August 2004 issue. One of the reasons I slated this dinner (whenever it was we had it weeks ago) was because I had arugula in the fridge, but by the time I made them the arugula had seen better days. I skipped that part of it and just had prosciutto and gruyere inside them. This was a huge hit with everyone. The boy was strangely excited for this dinner when I told him what we were having. Now that I've remembered this recipe it's something we'll have again for sure. Yum!

sadly I did not take a picture. :(

Wednesday, October 6, 2010

Steph's Mom's Chicken Marsala

I'm so mad at myself right now! I do all my menu planning on an Excel spreadsheet. Each week when I do my new plan I make a copy of the previous week's worksheet, delete that week's plan, and then make my new one. Apparently this week I forgot the step where I put the copy on a new worksheet. Sigh. And now because my two kids have somehow sucked away any sort of memory (and intelligence) I used to have, I can't remember what we even had to know if there was anything worthy of posting. I don't think there was...I got in a cooking funk at the end of last week and was just burned out on making dinner.

Anyway, on to this week I suppose. We had some friends over last night for dinner, and I had originally planned on making Baked Pesto Chicken, but then I realized yesterday afternoon that making that would require a trip to the store with both kids after nap/quiet time. So instead of having to deal with that potential catastrophe (no, my kids are both good at the grocery store, I just hate having to take them both for only one item) I went looking for something else I could make. I pulled out my cookbook compiled by members of a parenting message board I belong to because I knew my friend Benah had a balsamic chicken recipe in there that I'd wanted to try. Unfortunately it required overnight marinating which wasn't going to work since this was roughly three hours prior to our friends' arrival. I kept flipping through the chicken section and finally arrived on this chicken marsala recipe submitted by my friend Steph. Her caption under the recipe (which is titled Stolen Chicken Marsala in the cookbook) says, "Shh! Don't tell my mother! I had to steal it--it's SO GOOD!!" Worked for me, and I had everything on hand and figured it would come together quickly.

Steph's Mom's Chicken Marsala

2 pounds chicken, pounded even
1/2 cup seasoned breadcrumbs
1/2 cup flour
1/8 tsp pepper
1/8 tsp paprika
1/4 tsp oregano
1 cup marsala wine

Mix all ingredients (except chicken and marsala). Dredge chicken. Heat 2 Tbsp oil and 2 Tbsp butter in frying pan. Saute meat and chicken about 1 minute until brown. Place chicken pieces in a baking dish. Add 1 cup marsala wine to frying pan remains and deglaze the pan. Pour over the chicken, and bake at 350 for 15-20 minutes.

*****

See, totally easy! I made my own breadcrumbs by throwing a couple pieces of whole grain sandwich bread into my food processor with some Italian seasoning. For the flour I used whole wheat. I wasn't sure how that was going to turn out as I've never used whole wheat flour for dredging, but I didn't think you could even tell it was whole wheat in the finished dish.

This chicken was amazing and fantastic and yummy and amazing and fantasic. Everyone really liked it, even the kiddos ate all of their portions. These are generally all ingredients I have on hand, so this will definitely go into my repertoire of "Akkk!! What am I going to make for dinner?!" recipes. There was one piece of chicken left last night, and after our guests left I was so tempted to eat it because I loved it so much. I was glad I had some self control because it made for a tasty lunch today!


I had to take a picture of the only piece left in the pan.