Thursday, December 23, 2010

Oatmeal Cream Cheese Butterscotch Bars

I've missed my blog, so while my kids are being entertained by a dog-themed Disney Christmas movie I figured I'd post my most recent Christmas treat. My search for new Christmas cookie recipes lead me to the Food Network website a few weeks ago and somehow I stumbled upon this recipe from Anne Burrell. I like her a lot. How could you not with her fun, spiky hair?? Plus she's worked with some great chefs at some great restaurants.

Once I saw this recipe I couldn't wait to make them. I made sure I picked up everything I needed for them the next time I was at the store after seeing the recipe. I decided earlier this week that my mom and I needed a normal day doing normal Christmastime stuff so we should make Christmas cookies. Of course we ended up doing a bunch of stuff around the house and with the kids, so it didn't work out exactly as I'd planned, but I did make these and those peanut butter cookies where you put the Hershey Kiss on top of them when they come out of the oven. Since everyone knows that recipe, I figured this one was more worth sharing, even though you could very easily find it yourself on the Food Network website. I'm just enabling I guess...making it easier for everyone to discover these.

Oatmeal Cream Cheese Butterscotch Bars
Recipe courtesy Anne Burrell, from FoodNetwork.com

2 sticks unsalted butter, at room temperature, cut into pea-sized pieces, plus more for pan
2 cups all-purpose flour
1 1/2 cups old fashioned rolled oats
3/4 cup firmly packed brown sugar
1 teaspoon ground cinnamon
1 (11-ounce) bag butterscotch chips
1 (8-ounce) package cream cheese, at room temperature
1 (14-ounce) can sweetened condensed milk
1 lemon, zested and juiced
1 teaspoon vanilla extract

Preheat the oven to 350 degrees F. Drape a 9 by 13-inch pan with overlapping pieces of aluminum foil, creating handles for easy removal. Butter the paper, and reserve.

In a food processor add the flour, oats and brown sugar and pulse to combine. Add the 2 sticks of butter, the cinnamon and the butterscotch chips. Pulse, pulse, pulse until the mixture forms clumps when pressed between your fingers. Transfer the mixture to a large bowl. Press half of the mixture into the bottom of the prepared pan in an even layer, reserve the other half. Bake in the preheated oven just until slightly golden and set, about 12 to 15 minutes. Remove from the oven and cool completely.

Beat together the cream cheese, condensed milk, lemon zest and juice and vanilla in an electric stand mixer fitted with a paddle, or with an electric hand mixer until no lumps of cream cheese remain. Spread evenly over the baked and cooled oatmeal mixture. Sprinkle the remaining half of the oatmeal mixture over the cream cheese. Bake until the top is golden, about 40 minutes.

Cool and chill before cutting. Run a knife around the edge of the pan, and using the foil handles, transfer the bars to a cutting board. Cut into 2-inch squares with a sharp knife and serve.

Call yourself a superstar!!!

*****

Now, don't be like me and forget the part about buttering the pan and just assume that since there are two sticks of butter it won't be a problem. Really it wasn't too bad, but I did have to yank on the foil to get them out of the pan. The only thing I changed about this was decreasing the amount of lemon zest. I thought with the juice of a lemon and the zest from a lemon, that would give me more lemon flavor than I wanted. So I juiced the lemon and then zested maybe a quarter of a lemon. I'm not a huge lemon fan, so I didn't want there to be too much lemon flavor, especially since I LOVE butterscotch, so I wanted that to stand out more.

These are AMAZING. I'm having a hard time keeping myself from eating the entire batch. My friend Jen ran to my house yesterday and was kind enough to sample these for me. She approved. As do my kids, the husband, my mom, and me. They were really easy to make too. Dry ingredients in the food processor, wet ingredients in the stand mixer. I skipped putting the dry stuff once blended into a separate bowl--why dirty an extra bowl when I could just grab it out of the food processor bowl? These may in fact be my new favorite Christmas cookie. I'm making the husband's favorite today, then we figure we'll have a taste test in case there's a new favorite to be declared in our house.

Dry ingredients. I forgot to take a picture of the wet ingredients or as I was assembling the bars. Cut me some slack...it was 10:00 at night, and I was wrapping Christmas presents.


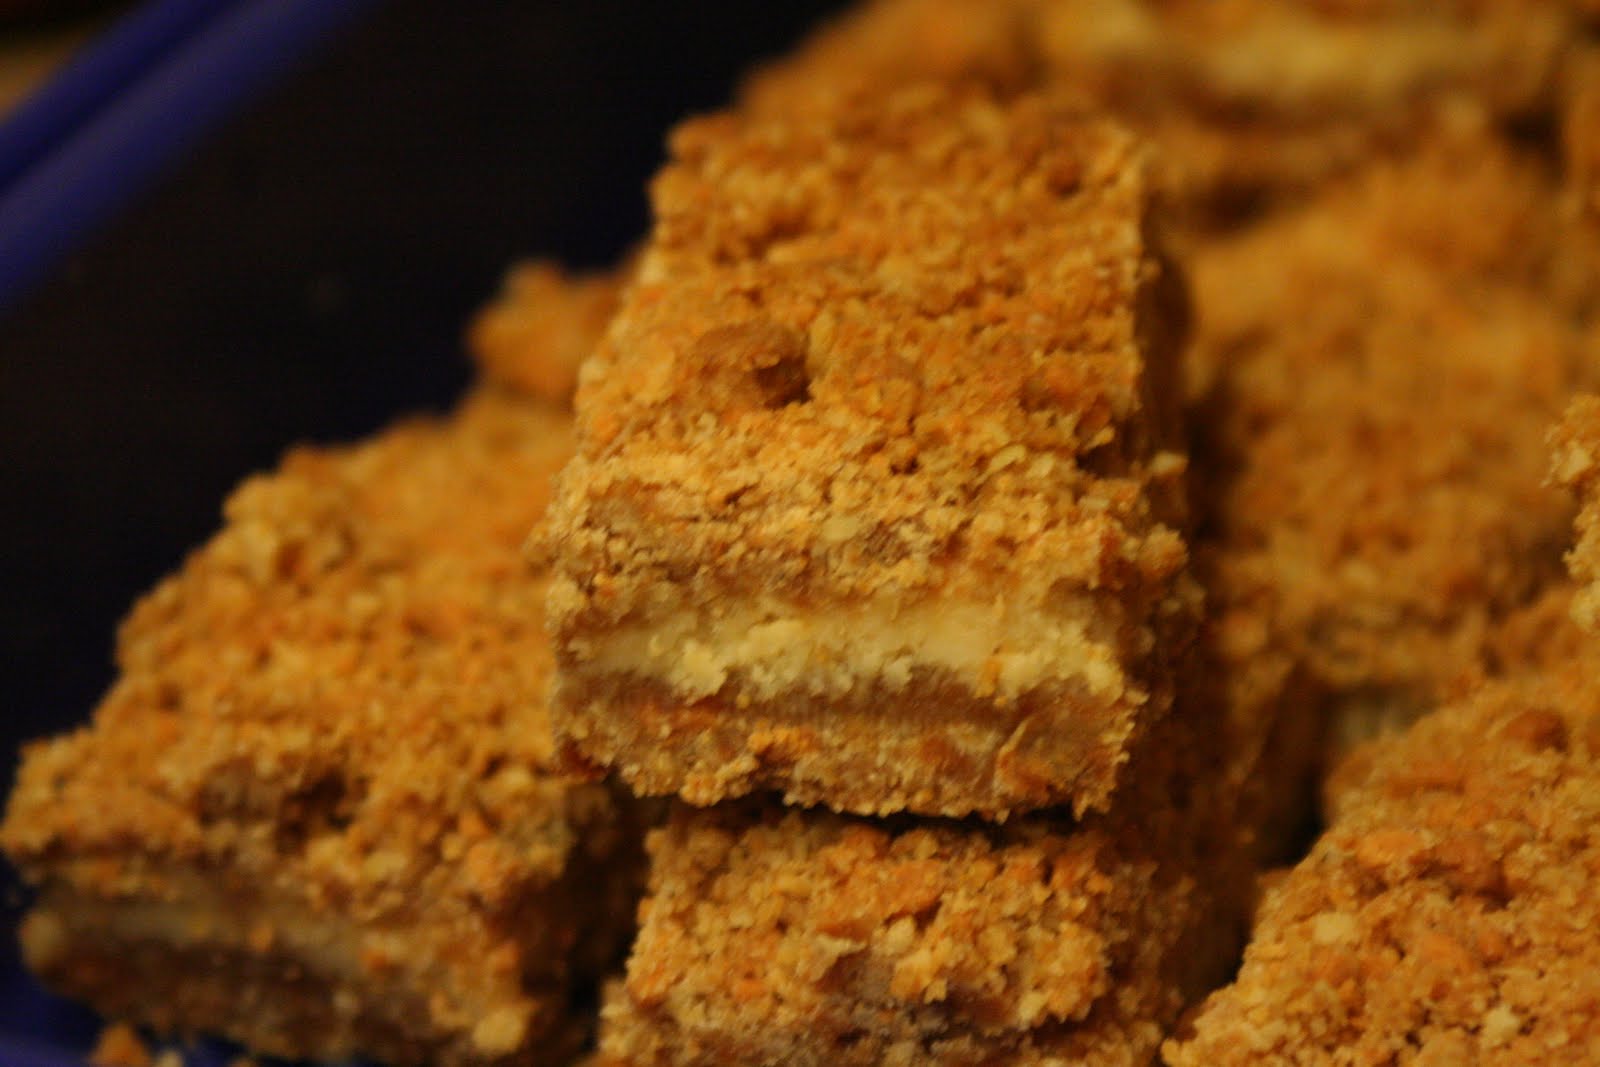
Mmmmm...container of bars!


Mmmmm...close up of bar!

Thursday, December 16, 2010

Another Hiatus

I know I've been slacking on posting lately and had a bunch of things I wanted to catch up on, but my dad passed away yesterday morning. My BFF Jen and my friend Jill graciously stepped up and coordinated meal support through two of my mommy groups from now until Christmas basically. What a blessing. My dad had Parkinson's Disease, so it wasn't unexpected that he passed, but it's still difficult. So I have some of my amazing friends bringing dinners for us for the next week while my brother is here and my mom is staying with me. I may try to go back and work on some updates when I have some time with nothing to do, but it's just a weird, weird time.

If you pray, please consider praying for my family that we can get through this very difficult time.

Rest in Peace, Dad! I love you so much!


Me, my brother, and my dad in 2004.

Monday, December 13, 2010

Pioneer Woman's Spicy Roasted Chicken Legs

I know I have a ton of posts to go back and catch up on, but I figure it's better to start with the current and then move backwards, otherwise I'll get overwhelmed thinking about it and sit in the corner in the fetal position rocking back and forth. Maybe not quite that severe, but I have put off updating the ol' blog here for awhile because it overwhelmed me to think about what all I wanted to post. Sigh.

I was recently looking at the Pioneer Woman's website and saw this recipe for chicken legs. I had a package of them out in the freezer, so it seemed the stars aligned. Plus I had everything on hand to make them, which was a bonus because I was trying to use up things I had here because my freezer, pantry, and fridge all seemed to be overflowing.

If you want to see all of PW's nice pictures, here's the recipe on her website. I'm a slacker and forgot to take pictures. Oops.

Pioneer Woman's Spicy Roasted Chicken Legs

24 whole Chicken Legs
2 sticks Butter
1 Tablespoon Hot Salt (or You Favorite Seasonings)
½ cups Lemon Juice (or To Taste)

Melt 2 sticks of butter in a saucepan. Pour ½ cup of lemon juice (fresh or bottled). Now add your seasonings. In this case, 1 tablespoon of Morton’s Hot Salt. You can use whatever seasonings makes your skirt fly up, be it minced garlic, salt and Cayenne pepper … let your imagination run wild. Stir it together until combined.

Rinse and pat your chicken legs dry. With metal tongs, transfer them one by one into the butter mixture and place on a baking sheet. Once all of the chicken legs are coated and on the baking rack, take a pastry brush and give them one last coating of the butter mixture. Sprinkle them with some more of your seasonings.

Place them into a 400-degree oven for 30 minutes. If they need a bit more color, turn on the broiler for a couple minutes and watch them closely. Remove them when they are nice and golden brown.

*****

I was going to get the Hot Salt when I went grocery shopping yesterday, but I decided to stay home and hang out with the husband instead of going to the store, so I worked with what I had. I went with Tony Chachere's because everything is better with some Tony's on it. I also added in some garlic powder and Lawry's seasoning salt just for kicks. I kept the Tony's pretty minimal because the boy doesn't dig on spicy. I probably could have stepped it up a little because you couldn't really taste it at all.

This was a super easy chicken recipe, and we all really liked it. My kids love eating drumsticks...God sure got it right when he made that part of the chicken for us to eat, didn't He. It's such a perfect kid food with its built in handle and all. I didn't have 24 drumsticks, I think there were more like 15 in my package. It was quite a lot for my family of four. I only used one stick of butter, which was plenty.

This is something I'll definitely make again. In fact, chicken legs are on sale this week at my grocery, so I may just pick up another package when I'm there today.

Again, sorry there's no picture...but check out PW's website if you want to see better pictures than I take anyway. ;)

Friday, November 26, 2010

Prosciutto and Gruyere Strombolis

I get a daily email from MyRecipes.com with a featured recipe of the day. Sometimes they look great and then find their way into my Recipes folder in Outlook, other times they meet the sad fate of the Deleted Items folder. When this one showed up one morning I had a sudden flashback because I had made these years and years ago. In fact, when I first made this may have been one of the first times I'd ever used prosciutto. I don't remember when it was exactly, but it was two houses ago, so it was some time between February 2003 and September 2005. It was a Cooking Light recipe, and how I forgot about it, I'm not sure. It's really yummy and really easy, which, as you know, is a combination I love!!

Prosciutto and Gruyere Strombolis

1 (11-ounce) can refrigerated French bread dough
2 ounces thinly sliced prosciutto
1 cup trimmed arugula
1/2 cup (2 ounces) shredded Gruyère cheese
1/4 cup chopped fresh parsley

Preheat oven to 425°.

Unroll dough onto a baking sheet; pat into a 14 x 11-inch rectangle. Cut dough into quarters to form 4 (7 x 5 1/2-inch) rectangles. Top each rectangle with 1/2 ounce prosciutto, 1/4 cup arugula, 2 tablespoons cheese, and 1 tablespoon parsley. Beginning at short side of each rectangle, roll up the dough, jelly-roll fashion; pinch seam to seal (do not seal ends of rolls). Arrange rolls 4 inches apart on baking sheet. Bake at 425° for 10 minutes or until rolls are lightly browned. Serve warm.

CALORIES 275 (28% from fat); FAT 8.5g (sat 4.4g,mono 2.1g,poly 0.5g); IRON 2.3mg; CHOLESTEROL 24mg; CALCIUM 158mg; CARBOHYDRATE 34.4g; SODIUM 754mg; PROTEIN 14g; FIBER 1.5g

*****

So according to the website, this was published in Cooking Light's August 2004 issue. One of the reasons I slated this dinner (whenever it was we had it weeks ago) was because I had arugula in the fridge, but by the time I made them the arugula had seen better days. I skipped that part of it and just had prosciutto and gruyere inside them. This was a huge hit with everyone. The boy was strangely excited for this dinner when I told him what we were having. Now that I've remembered this recipe it's something we'll have again for sure. Yum!

sadly I did not take a picture. :(

I'm Not Dead!

Kind of a strange blog post, but it's been so long I figured some people might be wondering. I swear, once October hits things are absolutely nuts around here until about February. It's maddening, but there's no avoiding it. October brings birthdays for my mom, grandma, husband, cousin (although she lives on the east coast), and one of our nephews, our wedding anniversary, and Halloween. November is the baby's birthday and Halloween. December is busy for obvious reasons, but add in that most of the baby's friends have birthdays that month and it's even more busy. The boy's friends' birthdays all seem to start in January, so most weekends that month we're busy attending birthday parties. It's exhausting just hearing about it, isn't it??

So that's why I haven't been as diligent in updating my sad, neglected blog. We went to Las Vegas the weekend of November 12th which added in some craziness, along with me having strep throat the week before we went, then the husband got sick with that while we were in Vegas. My brother came to visit for the baby's second (!!!) birthday, now my in-laws are here for Thanksgiving. I feel like I haven't been doing much cooking (prior to yesterday) because we've been so busy. I do have some updates I want to do, including a review of the most amazing meal I've ever eaten and my first time ever hosting Thanksgiving. I'm hoping to get those done over the weekend, but we'll see.

I really just wanted to say hang in there, blog readers, and I'll be back to posting on a regular basis soon!! My kitchen is ridiculously stocked with food, so I'm thinking the next couple weeks will be a pantry/fridge/freezer challenge time for me so I can clear out some space everywhere. Seriously, you should have seen the pile of chicken breasts I wrapped up to freeze last week. It was almost comical.

I hope you all are having a fabulous Thanksgiving weekend, eating yummy food and enjoying time with loved ones!

Friday, November 5, 2010

Prosciutto-Wrapped Chicken with Green Beans

I've been down with strep throat most of this week. I had figured I'd update my blogs while stuck in bed, but I did something like 10 entries for my family blog and was all blogged out after that. Plus every time I'd think of it I'd realize most of the recipes I'd made weren't online and the actual recipes were downstairs which would require me leaving my sickbed. Hopefully over the weekend I can get caught up on everything.

We had this a week or so ago, and I honestly wasn't sure what my family members would think. I generally assume prosciutto-wrapped anything is going to be awesome, but everyone else in my house doesn't share my affinity for olives. Their loss I guess. It's a recipe from America's Test Kitchen 30-Minute Suppers Summer 2010. Honestly I'm not sure how I never noticed it before because I've looked through this magazine hundreds of times.

Prosciutto-Wrapped Chicken with Green Beans
From America's Test Kitchen 30-Minute Suppers Summer 2010

4 Tbsp unsalted butter, softened
1/4 cup pitted mixed olives
1/4 cup lightly packed sage leaves
4 boneless, skinless chicken breasts
Salt and pepper
8 thin slices prosciutto
2 Tbsp olive oil
3 garlic cloves, sliced thin
1 pound green beans, stem ends trimmed
1/4 cup water

Adjust oven rack to upper middle position and heat oven to 400 degrees. Process butter, olives, and sage in food processor until smooth.

Pat chicken dry with paper towels and season with salt and pepper. Spread butter mixture on 1 side of each chicken breast. Working with 1 breast at a time, slightly overlap 2 slices of prosciutto on work surface. Lay chicken, butter side down, in center of slices, then fold prosciutto over chicken. Repeat with remaining prosciutto and chicken.

Heat oil in large skillet over medium-high heat until just smoking. Add chicken, seam side down, and cook until well browned, about 2 minutes per side. Transfer chicken to baking sheet and bake until chicken registers 160 degrees, about 8 minutes. Transfer to platter and tent with foil.

Reduce heat to medium. Add garlic to skillet and cook until lightly browned, 1-2 minutes. Add green beans and toss to coat thoroughly. Add water, cover, and cook until bright green and tender, 8-10 minutes. Season with salt and pepper to taste. Serve chicken with green beans.

*****

I didn't change anything with the chicken and used a mix of green and kalamata olives. I went to the olive bar at my grocery store and picked out a few olives of two different kinds. I've used the green olives before in muffuletta sandwiches and knew they were quite yummy because they're marinated in olive oil and garlic. Yum! I used frozen green beans because it was what I had. I was feeling lazy and didn't want to slice garlic, so instead I just threw some dried garlic in the pan.

This chicken was AMAZING. I took one bite and was in l-o-v-e!! Yes, I feel like I'm 13 writing this but I don't care. It was so fantastically good. We all loved it. The husband and I both devoured ours. Just thinking about it makes me salivate some. The salty olives, the slightly crisped prosciutto...lordy mama. This will definitely go into high dinner rotation or as often as I rotate dinners anyway!

Sorry the picture isn't better...I couldn't find my good camera. I didn't know which was "better," the picture that looked orange or the one with the glaring flash. Sigh.


Sunday, October 17, 2010

Green Chile Cheeseburgers

I've been intrigued by green chile cheeseburgers for quite awhile. I saw an episode of Throwdown with Bobby Flay where he made a version, and they looked SO GOOD! Then I got a Cook's Illustrated special edition that had a recipe for them, and ever since I saw that I knew I wanted to make them. I had originally planned to make these for a Friday date night dinner, but then I needed to reorder my meal plan a couple weeks ago and decided to have them during the week but just make regular burgers for my kiddos. I didn't know how spicy these would be, and the boy doesn't like spicy.

Green Chile Cheeseburgers
From Cook's Illustrated

3 Anaheim chiles, stemmed, halved lengthwise, and seeded
3 jalapeno chiles, stemmed, halved lengthwise, and seeded
1 onion, peeled and sliced into 1/2-inch thick rounds
1 medium garlic clove, minced or pressed through garlic press (about 1 teaspoon)
table salt and ground black pepper
1 1/2 pounds 85 percent lean ground beef
4 slices deli American cheese

Using a charcoal grill, gas grill or indoor grill pan, grill chiles and onion until vegetables are lightly charred and tender. Transfer vegetables to bowl, cover, and let cool 5 minutes. Remove skins from chiles and discard; separate onion rounds into rings.

Transfer chiles, onion, and garlic to food processor and pulse until coarsely chopped. Transfer all but 1/4 cup chopped chile mixture to empty bowl and season with salt and pepper to taste; set aside. Process remaining mixture until smooth.

Combine beef, pureed chile mixture, 1/2 teaspoon salt and 1/4 teaspoon pepper in large bowl and knead gently until well incorporated. Form mixture into four 3/4-inch-thick patties and make shallow indentation in center of each.

Grill burgers, covered, over hot fire until well browned on first side, 3 to 5 minutes. Flip burgers, top with chopped chile mixture and cheese, and continue to grill, covered, until cheese is melted and burgers are cooked to desired doneness, 3 to 5 minutes. Serve.

*****

Our grill was out of commission when I made these, so I roasted the peppers under the broiler and skipped the onion. I added some onion powder to the chiles in the food processor to make up for it a bit. Ours were probably a little more on the hot side because I did the whole chile mixture between two burgers, plus I was only using a pound of ground beef. My only complaint was that I thought the burgers could have used two slices of cheese instead of just one, but if the chile mixture were reduced (or the amount it's supposed to be) one slice would probably be okay. These were definitely tasty and definitely a burger that will grace our table again at some point.

Chicken "Pot Pie" with Crunchy Brown Rice Crust

I know I've mentioned before that I heart the Whole Foods iPhone app. Often when I'm bored or just messing around on my phone I'll open it up and do various recipe searches to see what I find. I came across this one by searching for "low sugar" recipes to accomodate the South Beach Diet. This recipe would be Phase Two friendly because of the rice, but you'd want to avoid it during Phase One when you can't have carbs. This sounded like an interesting twist on pot pie, and I love pot pie, so I figured it was worth a go.

Chicken "Pot Pie" with Crunchy Brown Rice Crust
From the Whole Foods iPhone app, also available on the Whole Foods website

1 tablespoon vegetable oil, plus more for greasing
1 tablespoon butter
1 pound boneless, skinless chicken breasts, cut into 1-inch pieces
1/4 pound sliced button mushrooms
2 teaspoons chopped thyme, divided
1 large carrot, chopped
1 rib celery, thinly sliced
1 small yellow onion, chopped
Salt and pepper to taste
1/4 cup brown rice flour
1 1/2 cups low-sodium gluten-free chicken broth
1 cup whole milk
1 cup cooked brown rice or brown and wild rice blend
1/4 cup shredded Parmesan cheese
1/2 teaspoon sweet paprika
1/2 cup frozen peas

Preheat oven to 400°F. Lightly grease a 9-inch pie dish with oil; set aside.

Heat oil and butter in a large skillet over medium high heat. Add chicken and cook, stirring occasionally, until no longer pink, 4 to 5 minutes. Add mushrooms, 1 teaspoon of the thyme, carrots, celery, onions, salt and pepper and cook until just tender, 6 to 8 minutes. Add flour and cook, stirring constantly, for 1 minute. Add broth and milk, stir well and bring to a simmer. Reduce heat to medium low and simmer until very thick, about 10 minutes. Meanwhile, combine rice, cheese, paprika, remaining 1 teaspoon thyme, salt and pepper in a medium bowl.

Stir peas into chicken mixture then season with salt and pepper and transfer to prepared dish. Scatter rice mixture evenly over the top then arrange dish on a baking sheet to catch any drips. Bake until bubbly and crust is crisp, about 30 minutes.

Nutrition
Per serving (about 9oz/256g-wt.): 240 calories (80 from fat), 9g total fat, 3.5g saturated fat, 55mg cholesterol, 370mg sodium, 20g total carbohydrate (2g dietary fiber, 4g sugar), 21g protein

*****

For some reason I kept putting off making this. I think it was on my meal plan for a couple weeks, but I'd continually bump it to the next week. I finally broke down and made it, and I was so glad I did. This was nothing like a tradtional pot pie, it reminded me more of a chicken, veggie, and rice casserole, which was great. I found a package of Uncle Ben's brown and wild rice blend at the store, and you just had to microwave it for 90 seconds. And surprisingly, the ingredients weren't a bunch of nasty, unpronounceable junk! I was very surprised.

We all really liked this. The husband is not a fan of pot pies, and he thought this was a good twist on it. I loved the casserole aspect of it; it reminded me a lot of a recipe I used to make often, Chicken Spectacular. This is definitely something I'd make again. There weren't a whole lot of leftovers either!

Quick Chile Relleno Casserole

I kind of have a thing for chile rellenos. My mom LOVES them and would always order them at Mexican restaurants when I was growing up. I never really understood them and thought they sounded gross. Then I tried one and was hooked. Since they're ridiculously unhealthy (filled with cheese, battered, and fried), and I assume not super easy to make at home, I generally don't eat them very often anymore. I was at Walmart on Friday picking up a few things for the husband's birthday yesterday and saw they had Anaheim chiles for $0.10 per pound. I had originally slated us to have steak for our Friday date night dinner, but I hadn't bought any steak yet. I saw the chiles and figured I'd scrap the steak plan and do some kind of chile relleno casserole instead.

At one point several years ago I made a chile relleno casserole in the crockpot, but I had no idea where that recipe was, so I turned to Google. Because isn't that what you do when you need to find something? One of the results that came up was from Food.com, and since I've generally had good luck with recipes from there, I figured it was worth a shot. The first recipe I came across sounded good and had good reviews, but it took almost an hour to bake. Conveniently for me, at the bottom of that page was a link to another recipe for Quick Chile Relleno Casserole. That one sounded much better because it only needed 30 minutes in the oven. It called for canned green chiles, so I modified it since I had fresh chiles I was using. The recipe below is my amended version.

Quick Chile Relleno Casserole
Adapted from Quick Chile Relleno Casserole on Food.com

4 Anaheim chiles
1/2 lb monterey jack cheese, sliced
4 eggs
1/3 cup milk
1/2 cup all-purpose flour
1/2 teaspoon baking powder
1 cup shredded cheddar cheese

Roast chiles under the broiler or over gas flame until skin is charred. Place chiles in a bowl, cover with plastic wrap and let stand at least 10 minutes. Remove skins from chiles while trying to keep chiles intact. Cut a slit in each chile, remove seeds, and stuff with sliced cheese.

Coat an 11x7 baking dish with nonstick spray. Place chiles in prepared dish.

Beat eggs with whisk or electric mixer until thick and foamy. Add milk, flour, and baking powder and beat until smooth. Pour mixture over chiles. Top with cheddar cheese.

Bake, uncovered, in a 375F oven for about 30 minutes or until casserole is puffed and appears set when gently shaken.

*****

The only thing I would change about this would be to use more chiles next time. The husband and I ate the entire dish of this. There was enough of the batter in the dish to accomodate a few more chiles, but since I wasn't sure what I was going to do with them when I bought them, I didn't know how many to get. If I was making this for the whole family I'd definitely up the number of chiles. I used Egg Beaters in my batter as I was saving the eggs we had on hand for a birthday breakfast for the husband, so Egg Beaters were my only choice. Plus I figured it made the recipe that much healthier.

This is something I'll definitely make again. We both loved it. The husband ate his in record time.

Roasted chile stuffed with cheese:


Stuffed chiles swimming in the batter:


Finished product! Oh man...I wish I could have somehow captured the smell of this because it was AMAZING!!

Thursday, October 14, 2010

Barefoot Bloggers: East Hampton Clam Chowder

I love clam chowder. LOVE IT. I'm sure part of it stems from growing up in Seattle which is home to some of the world's best clam chowder. Or at least I think it's some of the best. I'm sure there are a few cities in the Northeast that claim to have the best, and I'm sure there are some there that are quite good, but I'm biased. I'm okay with that.

As much as I love clam chowder, I don't think I've ever tried to make my own. I was pretty excited when I saw that Laura from Family Spice Home had chosen Ina's East Hampton Clam Chowder as the Barefoot Blogger's first recipe for October. Technically if I stick to my diet it's not something I'm supposed to have because of the potatoes, milk, and flour, but it's not like I'm going to eat the whole pot of it.

East Hampton Clam Chowder
From Barefoot Contessa Family Style, 2002, All Rights Reserved

12 tablespoons (1 1/2 sticks) unsalted butter, divided
2 cups chopped yellow onions (2 onions)
2 cups medium-diced celery (4 stalks)
2 cups medium-diced carrots (6 carrots)
4 cups peeled medium-diced boiling potatoes (8 potatoes)
1 1/2 teaspoons minced fresh thyme leaves (1/2 teaspoon dried)
1 teaspoon kosher salt
1/2 teaspoon freshly ground black pepper
1 quart (4 cups) clam juice
1/2 cup all-purpose flour
2 cups milk
3 cups chopped fresh chowder clams (1 1/2 pounds shucked clams)

Melt 4 tablespoons (1/2 stick) of the butter in a large heavy-bottomed stockpot. Add the onions and cook over medium-low heat for 10 minutes, or until translucent. Add the celery, carrots, potatoes, thyme, salt, and pepper and saute for 10 more minutes. Add the clam juice, bring to a boil, and simmer, uncovered, until the vegetables are tender, about 20 minutes.

In a small pot, melt the remaining 8 tablespoons of butter and whisk in the flour. Cook over very low heat for 3 minutes, stirring constantly. Whisk in a cup of the hot broth and then pour this mixture back into the cooked vegetables. Simmer for a few minutes until the broth is thickened.

Add the milk and clams and heat gently for a few minutes to cook the clams. Taste for salt and pepper. Serve hot.

*****

Since it's still in the 90-degree range here for the daily high temperature I decided to cut the recipe in half. Who wants to be eating a steaming bowl of chowder when it's still hot outside? Plus I didn't think the boys would really eat it, and I can't eat a ton of it so I can keep getting skinny. I mention this so you can avoid a potentially very big mistake that I made. Make sure you cut all the ingredients in half. Like...don't put in the full amount of flour when you're only supposed to do half of what is listed. Of course I realized this after I had the roux going and couldn't figure out why it wasn't melting down more once I added in the broth. D'oh! I ended up pulling out some of it, adding more butter, and I used canned clams so I put the juice from their cans in with the roux. I think that managed to salvage it.

Having never bought canned clams before (although I should do it more because my uncle makes an awesome clam dip, and I bet since I'm his favorite niece he'd give me the recipe), I didn't realize how absolutely tiny chopped clams would be. Yikes. They were minced as fine as garlic. I'd much prefer chunks of clams in my chowder, but that's my own mistake.

The recipe itself is really tasty. Not as good as some of the chowder restaurants in Seattle, but given that this was my first attempt at making it on my own, I was pretty pleased. The husband sampled it as well and rated it highly. It was relatively easy to put together, too. I gave myself an hour for it, and that's about how long it took, but I was also working on something else in the kitchen, so I wasn't completely focused on the chowder.

This is definitely better than any canned chowder I've tasted, and really it's better than most chowders I get here in Phoenix. If I get them, which is rare since the quality is generally subpar. When I get a hankering for chowder and flying to Seattle for chowder from Totem House or Ivar's is out of the question, this will definitely be my go-to recipe.

Clam juice. Interestingly enough, my mom was asking recently where to buy clam juice. Mom, it's with the canned meats. Safeway and Fresh & Easy both carried it, but it was about half the price at F&E!


Mmmmm...bowl of chowder. Normally I like it with extra pepper and oyster crackers mixed in, but this time I just had it plain.

Wednesday, October 13, 2010

GG's Carrot Cake

Isn't it funny how once you have kids you start referring to people how your kids do? I rarely refer to my mom as mom anymore...it's usually Gaga. My grandmas have become GG and Granny. I guess it's just easier and avoids confusion as to whom you are discussing or trying to talk to. My mom? Your mom? Me? My grandma? My mom as grandma? Yeah, it's a lot simpler using whatever term my kids use.

My grandma, whom my kids call GG, makes a fantastic carrot cake. It's always been my dad's favorite and always what he chooses for his birthday. At some point the boy became obsessed with carrot cake. I'm not sure how or why as I don't think it's a favorite of most four year olds, but who knows. My mom's birthday was earlier this month, and the boy wanted to make her a carrot cake. I said why didn't we make carrot cake cupcakes instead. He went for it, which was good because I knew I could easily sit and eat a plethora of pieces of GG's carrot cake. Several years ago I took my scanner over to my grandparents' house for a day so I could scan my grandma's recipes. Not to be morbid, but I figured when she passes away there would be an annoying fight over who got her recipe cards, plus this way I could have copies of them in her handwriting. This was one that I scanned.

GG's Carrot Cake

2 cups sugar
2 cups flour
2 cups grated carrots
1 can (8-1/4 oz) crushed pineapple
1 cup shredded coconut
2 tsp cinnamon
2 tsp baking soda
1 tsp salt
1 cup chopped nuts
2 tsp vanilla
3 eggs
1-1/4 cup vegetable oil

Combine all ingredients. Do not mix a whole lot. Bake at 350 for 45 to 50 minutes or until cake is done. Makes 3 8" layers or large flat pan.

Frosting

1 cup margarine or butter
1 8 ounce package cream cheese
1 package powdered sugar (I assumed 1 pound)
1 cup nuts
2 tsp vanilla

Cream margarine and cream cheese together. Add sugar, vanilla, and nuts. Spread on cake when cool.

*****

I was really good and stuck to my diet and only had one cupcake. Well, one at my mom's party. I had one the day before sans frosting to make sure they tasted okay. And I have to say...I'm not entirely sure how a carrot muffin is all that different from a carrot cake cupcake. This is definitely one of my most favorite cakes ever. I heart my grandma so much!!

The boy helped me put this all together and was really pleased with himself for helping make Gaga's (see...there I go again!) birthday cupcakes. They were a huge hit. Oh, and I used chopped walnuts as my nut of choice for this...mostly because it's what my mom said my grandma uses when she makes it (GG was at lunch when I needed to know what kind of nut to get). I wasn't sure how long to bake them, so I did some Googling and found 15 to 20 minutes would be the ideal cupcake baking time. Changing this into cupcakes I got 24 cupcakes and an 8x8 square dish single layer cake out of it. I was pretty pleased with my creativity and cut the square cake into fourths and made a little layer cake out of it for my dad (I mean Baba since that's what my kiddos call him).

And I should probably admit that I'm completely frosting inept. I cannot frost a cake to save my life. Well, maybe if I really needed to save my life I could do a decent job frosting one, but normally they look pretty horrible. Or like my almost two year old did the job for me. Sadly I'm not exaggerating that much. Maybe that's a subconscious reason why I chose cupcakes instead of a regular layer cake...


I'm fairly certain my baby is going to be a ninja. Or a football player...but a very stealthy one. Somehow he managed to sneak three cupcakes down from the counter, take them to the table, sit down, and start eating them without the husband or me noticing. I didn't know whether to laugh or be mad when I saw him. He was very methodical about it all, too. He lined them up, then he'd take a bite from one and put it down, move to the next and take a bite and put it down, move to the next and take a bite and put it down, then start the cycle over again. What a goof!!

Wednesday, October 6, 2010

Steph's Mom's Chicken Marsala

I'm so mad at myself right now! I do all my menu planning on an Excel spreadsheet. Each week when I do my new plan I make a copy of the previous week's worksheet, delete that week's plan, and then make my new one. Apparently this week I forgot the step where I put the copy on a new worksheet. Sigh. And now because my two kids have somehow sucked away any sort of memory (and intelligence) I used to have, I can't remember what we even had to know if there was anything worthy of posting. I don't think there was...I got in a cooking funk at the end of last week and was just burned out on making dinner.

Anyway, on to this week I suppose. We had some friends over last night for dinner, and I had originally planned on making Baked Pesto Chicken, but then I realized yesterday afternoon that making that would require a trip to the store with both kids after nap/quiet time. So instead of having to deal with that potential catastrophe (no, my kids are both good at the grocery store, I just hate having to take them both for only one item) I went looking for something else I could make. I pulled out my cookbook compiled by members of a parenting message board I belong to because I knew my friend Benah had a balsamic chicken recipe in there that I'd wanted to try. Unfortunately it required overnight marinating which wasn't going to work since this was roughly three hours prior to our friends' arrival. I kept flipping through the chicken section and finally arrived on this chicken marsala recipe submitted by my friend Steph. Her caption under the recipe (which is titled Stolen Chicken Marsala in the cookbook) says, "Shh! Don't tell my mother! I had to steal it--it's SO GOOD!!" Worked for me, and I had everything on hand and figured it would come together quickly.

Steph's Mom's Chicken Marsala

2 pounds chicken, pounded even
1/2 cup seasoned breadcrumbs
1/2 cup flour
1/8 tsp pepper
1/8 tsp paprika
1/4 tsp oregano
1 cup marsala wine

Mix all ingredients (except chicken and marsala). Dredge chicken. Heat 2 Tbsp oil and 2 Tbsp butter in frying pan. Saute meat and chicken about 1 minute until brown. Place chicken pieces in a baking dish. Add 1 cup marsala wine to frying pan remains and deglaze the pan. Pour over the chicken, and bake at 350 for 15-20 minutes.

*****

See, totally easy! I made my own breadcrumbs by throwing a couple pieces of whole grain sandwich bread into my food processor with some Italian seasoning. For the flour I used whole wheat. I wasn't sure how that was going to turn out as I've never used whole wheat flour for dredging, but I didn't think you could even tell it was whole wheat in the finished dish.

This chicken was amazing and fantastic and yummy and amazing and fantasic. Everyone really liked it, even the kiddos ate all of their portions. These are generally all ingredients I have on hand, so this will definitely go into my repertoire of "Akkk!! What am I going to make for dinner?!" recipes. There was one piece of chicken left last night, and after our guests left I was so tempted to eat it because I loved it so much. I was glad I had some self control because it made for a tasty lunch today!


I had to take a picture of the only piece left in the pan.

Tuesday, September 28, 2010

Claire's Smothered Turkey Burgers

I'm really not sure what else to call this recipe, but I think what I've dubbed it will work. In figuring out my meals for the week I was looking at recipes on the Whole Foods app on my phone (oh how I heart Whole Foods) and saw one that sounded good and easy. It was Mushroom and Swiss Patty Melts with Peas. Somehow, though, I combined that recipe with one I'd seen in a Cook's Illustrated magazine for salisbury steak. I could have sworn there was a gravy of some sort for the patty melts. So much so, in fact, that when I was grocery shopping I was surprised that beef broth wasn't on my grocery list to make said gravy. Although in hindsight I don't know why I thought there'd be a beef gravy with turkey burgers. Who knows. I'm not completely with it if I have one or more kids with me while I grocery shop. If you're a mom, you know what I'm talking about.

Anyway, when I checked the recipe this afternoon to see how long it was going to take I was surprised there was no gravy included. When it came time to make dinner I decided I'd go ahead and make a gravy on my own. I love gravy, and once I had the thought of it in my head there was no way I was going without gravy tonight.

Claire's Smothered Turkey Burgers

1 lb. ground turkey
4 slices Monterey Jack cheese
1 Tbsp olive oil
8 ounce container mushrooms, sliced
1 onion, thinly sliced
1 cup beef broth
2 Tbsp beef gravy mix
Salt
Pepper
Onion powder
Garlic powder

Coat skillet with non-stick spray and heat over medium high heat. Add salt, pepper, onion powder, and garlic powder to ground turkey. Mix well and form into four patties. Place patties in heated skillet. Cook 4-5 minutes per side. When burgers are flipped, place cheese slices on patties and let cheese melt.

Meanwhile, in another skillet, heat olive oil over medium high heat. Add mushrooms and onion and saute until golden brown, about 5 minutes. Add beef broth to pan, reserving 1 tablespoon. In a small bowl, combine beef gravy mix with reserved tablespoon beef broth. Add to mushroom, onion, and broth mixture. Stir to combine and stir until thickened.

Remove patties from pan when cooked through and top with gravy.


*****

I really liked this. Ground turkey is just so bland to me, so the gravy really gave it a lot of flavor. Only the husband and I had gravy on ours. The boy doesn't like mushrooms or onions, so I figured he wouldn't be interested, but I knew he'd eat just the burger. The baby might have eaten it with the gravy, but he's in love with ketchup, so I figured he'd be fine without gravy as long as he had ketchup on his plate. I had originally planned on mixing some cornstarch with beef broth to thicken it up, but I couldn't find any in my pantry. I saw the container of brown gravy mix and figured that would work great--and it did! This was really easy to make and came together really fast, so it's definitely something I'll make again.

Monday, September 27, 2010

Tomato and Pesto Pizza

I wasn't going to post this because it was ridiculously easy, but my friend Jen said since I liked it so much I should document it so I remember it. She probably has a point, but I wouldn't be surprised at all if she was saying it so she remembers to make it at some point. ;)

I'm finally out of Phase 1 of the South Beach Diet (down 12 pounds!!), so I'm starting to incorporate some good carbs back into my diet. I had an apple this morning on the way to pick up my oldest from school (I don't think an apple has ever tasted so good), and then I made pizza crust with whole wheat flour for dinner. I'm still kind of timid to add carbs back in a whole lot since I had such great success with taking them out of my diet. For the first week or so I'm going to take it pretty easy and probably do something similar to what I did today--a little bit of fruit and some whole grains. Anyway, this should probably go on my weight loss blog instead of here.

I've been dying to have pizza for some reason while I was carb-free. Normally I can really take or leave pizza, but I think just not being able to eat it has made it more enticing. I was going to make a margherita pizza and a cheese pizza, but upon taking my basil out I realized the stems were fuzzy. Yuck. So, not wanting to feed my family moldy basil (or eat it myself), I had to do some quick pizza thinking. This is what I came up with.

Claire's Tomato and Pesto Pizza

1 recipe homemade pizza dough, made using all whole wheat flour
1/4 cup pesto (homemade or store bought)
3 heirloom tomatoes, sliced thin
Mozzarella cheese

On rolled out dough, spread pesto to completely cover dough. Arrange tomato slices in a single layer. Top with mozzarella cheese. Bake at 450 for 15-20 minutes.

*****

I'm sad I didn't take a picture. I thought about it before I put the cheese on because it really looked awesome with the green pesto and the various colored heirloom tomatoes. Have I mentioned that heirloom tomatoes are my new BFF? Okay, not really, but I do like them a lot. When I picked these ones out at Whole Foods today I could tell that heirloom tomato time is coming to an end. Most of the ones I picked up were pretty mushy and over-ripe. Sad. I kind of freaked out a little when I discovered my basil wasn't good anymore because I had already sliced the tomatoes, and there was no way I would let them go to waste. I was pleased with my quick thinking and coming up with what turned out to be an awesome pizza!

Thursday, September 23, 2010

Chargrilled Oysters Acme Oyster House Style

I know I've mentioned before that the husband grew up in New Orleans. We love to go visit, although it doesn't happen very often since it's not cheap to get there, and it's definitely not cheap once you're there. But when we do go, it's our tradition to head straight to Acme Oyster House. Heaven on a plate, I'm telling you! Well, if you like oysters. Oysters are another food I refused to eat growing up. They just seemed so slimy and gross. My parents loved them and would buy jars of them and have fried oysters. Ugh. The husband finally convinced me to try oysters on the half shell at some point, and I loved them. I know as a Pac Northwest girl at heart I shouldn't say this, but gulf oysters are so much tastier than the oysters you get in Washington. Those oysters are too briny, whereas gulf oysters taste sweet.

Anyway, we were in New Orleans in January for the husband's cousin's wedding, so after we checked into our hotel we headed straight for Acme Oyster House. I don't remember if we saw someone having the Chargrilled Oysters or our waiter told us about them or we just thought they sounded good. They were one of the best things I've ever eaten. EVER. I'm pretty sure I texted, called, or emailed my friend Jen about them as soon as I was done eating. Actually I don't think I got cell service in the restaurant so I had to wait until we were outside. But I digress.

Recently these delectable oysters popped into my head, and I couldn't stop thinking about them. Since a trip to New Orleans is out of the question, I did some Googling and found a recipe on Food.com for Chargrilled Oysters Acme Oyster House Style. You have no idea how elated I was. My mom was keeping the kids for us this past weekend so the husband and I could have a date weekend and a little staycation at home. I wanted to have some awesome yummy snacks for us while the kids were gone, so I decided to make these. We were actually supposed to go out to dinner but ended up staying home and eating these instead.

Chargrilled Oysters Acme Oyster House Style
From Food.com

12 fresh shucked oysters, on the half shell
1/2 lb unsalted butter
1 tablespoon fresh lemon juice
1/2 tablespoon Worcestershire sauce
1 bunch green onions, finely chopped
10 garlic cloves, pureed
1/2 teaspoon crushed red pepper flakes
1 1/2 tablespoons finely chopped fresh thyme
1 1/2 tablespoons finely chopped fresh oregano
1 tablespoon creole seasoning
1 ounce white wine
1/2 cup grated romano cheese

Melt half the butter in a medium sauce pan over medium heat. Add your lemon juice, Worcestershire sauce, green onions and all herbs and seasonings. Cook for 2-3 minutes, then stir in wine. Keep stirring and remove from heat as soon as the green onions wilt. Let cool for 3-4 minutes. Add the rest of the butter and stir until completely incorporated.

Heat grill to to 350°F Place oysters on grill. When the oyster liquor starts to bubble, spoon 1 tablespoon of sauce on top of each, then top with 1 tablespoon of Romano cheese. Let the cheese melt. When oysters begin to slightly brown at the edges, remove from grill and place on a heat proof plate or tray.

Top each oyster with an additional tablespoon of the butter sauce and serve immediately with slices of french bread for dipping.

*****

My mouth started watering just thinking about these. If Whole Foods were closer and the baby wasn't napping, I'd be tempted to run out and get some oysters to make these again. In case you couldn't tell, we LOVED these. The recipe on the website actually calls for four servings, but I halved it. The sauce smelled amazing as it was cooking (although when doesn't butter smell amazing?!).

This was my first time shucking and cooking oysters. I was a little nervous about the shucking, but I looked up how to do it (what did we do before the internet?!). Plus my brother has shucked oysters before, so I figured if he could do it, so could I. It wasn't as hard as I thought. I just held the oyster in a thick kitchen towel, stuck a knife in and twisted it open. There were two that I couldn't open which kind of pissed me off, but I figured it wasn't worth the fight, so I just tossed them.

There isn't anything I would change about this recipe, except I'd make more of it. The butter sauce was so amazing, the husband went scrounging around in the freezer for some ciabatta rolls I thought were there so we could mop up the sauce. He found them, we heated them up and ate every last drop of sauce from our plates. Man alive was this tasty!!! Healthy, no. Tasty, yes!

Lucky for you, I took copious amounts of pictures!

Well, hello, one dozen oysters ready to be shucked...


Oysters are weird looking. But tasty.


Grill, baby, grill!


Excuse me while I wipe the drool off my keyboard...


Fighting urge to go buy more oysters...

Greek Meatballs

I'm nearing the end of my two week Phase One period of the South Beach Diet. Technically yesterday should have been my last day, but I went off the diet over the weekend while the husband and I had a little staycation at our house while my mom kept the kids. So to compensate for that I'm staying on it until at least tomorrow, maybe Sunday. I'm down 11 pounds since I started, and I'm fitting in to clothes I haven't worn in YEARS, so I'm really pleased with the results I'm getting.

I did some Googling for low carb recipes to get some different ideas for dinner. The SBD website has a pretty limited number of recipes. The actual diet book has some in it, but a lot are beef which we don't eat much of. I found a low carb recipe section on SimplyRecipes.com, a website I like anyway. My kids love meatballs, so when I saw this I thought it would be a great dinner. I love the flavor profile of Greek food, although I used to really not like it. My parents always went to a Greek festival at a Greek Orthodox church in Seattle, and they'd come home raving about what they'd eaten, and it sounded so gross to me. Now I'm kind of sad we don't live there anymore because I'd really like to go!

Greek Meatballs
From SimplyRecipes.com

1 tablespoon olive oil
1 clove garlic, minced
1 jalapeño, seeded and minced
1 large shallot, minced
1 pound ground lamb
4 ounces salt pork, ground or finely minced
Zest of 1 orange
2 tablespoons chopped mint
Freshly ground black pepper
Greek yogurt for dipping

1 Heat a small pan over medium heat and add oil, garlic, jalapeño and shallot, and cook for 1 minute, then let cool.

2 Meanwhile, crumble lamb into a large bowl. Evenly scatter salt pork, orange zest and mint over lamb, and season with pepper. Sprinkle the cooled garlic mixture over lamb. Gently mix until just combined, then form into 1¼-inch balls and transfer to a plate or sheet pan.

3 Heat a large cast iron pan over medium to medium high heat. Working in batches if necessary to prevent crowding, brown meatballs on all sides until cooked through, 8 to 10 minutes. Serve warm with toothpicks or skewers with plain yogurt.

Note: Meatballs can also be cooked ahead, refrigerated and reheated in the microwave on high for 2 minutes.

Makes about 20 meatballs.

*****

I used grass-fed beef instead of the ground lamb. I had a bad experience with ground lamb, so I'm kind of turned off from it after that. I also left out the salt pork because I didn't have any, nor did I have anything on hand to use in its place. Instead of Greek yogurt for the dipping sauce I bought some tzatziki at Trader Joe's (actually I'm snacking on it now with some celery).

These meatballs were fantastic!! I love the addition of mint to savory dishes. My only complaint was that these on their own weren't really enough for dinner. They're listed as an appetizer, which they'd be great for. I told the husband I thought they'd be fantastic in my Greek spaghetti. Or I thought they'd be good if you put a little chunk of feta inside them. Mmmmm. These are definitely something I'll make again, I just need to plan better so we're not all still hungry once dinner is done!

Wednesday, September 15, 2010

South Beach Stuffed Peppers

I love stuffed peppers. The husband used to not like green peppers (I don't know, he may still not like them, but I love them so he's forced into eating them), so I never had them. I'd buy the Stouffer's frozen peppers and take in my lunch to work or keep on hand at home for when I was on my own for dinner. I've made stuffed peppers a few times (my friend Jen has a really good stuffed peppers recipe), so I was excited to see a recipe for them that didn't have rice or pasta as part of the stuffing.

South Beach Stuffed peppers
From Food.com

4 bell peppers
olive oil
1 lb ground turkey
1 stalk celery, chopped with top
1 -2 garlic clove, minced
1 small onion, chopped
1 tablespoon minced fresh parsley
1 tablespoon Worcestershire sauce
1 teaspoon spike all purpose seasoning (for zest)
28 ounces ground peeled tomatoes
1/2 cup shredded cheese (or more)

Wash the peppers, cut the tops off, and place in oiled glass dish. Cover and microwave the peppers for 5 minutes.

Saute the veggies and ground turkey with a dollop of olive oil. (I chop up the usable remainders of the pepper tops as well). Add the tomatoes and cook for 3-4 minutes to evaporate some of the liquid.

Stuff the peppers and top with cheese. Bake at 350 for 10 minutes or until the peppers are soft and the cheese is toasted.

Add Ins: you could add cooked rice or stir in extra cheese to the mixture before baking.

*****

I didn't make any changes, other than using different colored peppers. I made five peppers and used yellow, orange, and red peppers. I used reduced fat sharp cheddar for my cheese.

These were some of the easiest peppers I've ever made. I love the idea of cooking the peppers slightly in the microwave first...10 minutes of cooking time at the end is fantastic! Our friend Steve was over for dinner, and we all really liked these. My kids shared one, the adults each had one, but I don't think any of us finished our entire peppers. I had enough filling for another pepper. It's actually still in my fridge because I figured it would be easy enough to just heat up a pepper, stuff it, and bake it in my toaster oven for a hearty lunch. Perhaps that will be my lunch for tomorrow!

I'll definitely make this one again, too...diet or no diet! (Don't you love finding diet food like that?!)

Jamaican Jerk Kabobs

I figured since Jamaican jerk usually equates to spicy, this would be a good dinner for the husband and I to have on our Friday night mini date, where we eat dinner after the kids go to bed. The boy doesn't like spicy, so I generally save spicy dinners for just the husband and I...it's easier than fighting at the dinner table. I love kebabs, so I was really excited to try this recipe, plus it sounded super easy.

Jamaican Jerk Kabobs
From Food.com

1 lb boneless skinless chicken breast, and cut into 24 chunks
2 green onions
1 jalapeno, seeded and chopped
3 tablespoons extra virgin olive oil
1 tablespoon gingerroot, peeled and chopped
2 tablespoons white wine vinegar
1 teaspoon ground allspice
1 teaspoon dried thyme
1/2 teaspoon salt
2 red bell peppers, cut in 1 inch pieces

In a blender at high speed, blend onions, chile, ginger, vinegar, allspice, thyme, salt, and 2 tablespoons olive oil until combined. Place Chicken chunks in a zip-tight plastic bag with marinade, turning to coat. Place in refrigerator for 30 minutes. Meanwhile, toss red pepper pieces with remaining olive oil in small bowl.

Preheat the broiler or grill with rack close to heat source.

On 4 metal skewers, alternately thread chicken and red pepper. Brush Kabobs with any remaining marinade. Cook a total of ten minutes, turning once, or until chicken is no longer pink inside.

*****

I have to say, this marinade smelled really weird. I was not excited about this dinner at all. The vinegar seemed really overpowering. So I figured I'd tinker with it. I increased the amount of olive oil--probably another two tablespoons--and added in some crushed red pepper. I still wasn't 100% sure about it, but I didn't really know what else to do with it to jazz it up. I figured if it was bad, we'd have turkey roll-ups for dinner instead.

We ended up really liking it! I was honestly surprised. When I went out to the grill to flip the skewers I was surprised that they actually smelled good. I was still skeptical. Even when I dished up our plates I still wasn't sure what to think. I even started eating red peppers first instead of the chicken pieces. I let the husband try the chicken first, and he said it was good, so then I went for it. He was right, it was pretty tasty. I don't know if it's something I'd necessarily make in high rotation, but I'd probably make it again.

Baked Pesto Chicken

I don't know how it's been two weeks since I've updated my blog! Well, actually I do. In looking back at my meal plans we hadn't had much new, so I wasn't posting for that reason. Then once I did have new stuff to post I just never took the time to sit down and write them out. I had planned on using my kids' naptime yesterday to update my blog, but Monday evening I started feeling like I was getting sick. By bedtime I had a fever, and that sucker held on all day yesterday. Ugh. I woke up at some point last night drenched in sweat and the fever was gone. Was that an over-share? Perhaps. Sorry about that.

Anyway, a week ago today I started on The South Beach Diet at the recommendation of my doctor (want to follow my progress? Check out my other blog...Claire's a Fat Girl's Name). I was hesitant about it because I did the whole Atkins thing ten years ago and did not like it. I lost weight, but it got to the point where I wasn't ever hungry, and I constantly felt like I was going to pass out. Not cool. Plus as soon as I started eating carbs again, all the weight I lost returned. I got the SBD book from the library and read through the whole thing before deciding if I wanted to do it. I figured it was worth a try. The book is pretty interesting, as is the diet. It's no carbs for the first two weeks, then you gradually add carbs back in--but good carbs. Whole grains, whole wheat, brown rice, fruit...stuff like that. Once you reach your goal weight you move onto a maintenance phase where you still eat only good carbs but you can splurge on "bad" food occassionally. Really I think it's pretty healthy sounding, and it's not all that different from how we normally eat.

Finding recipes for dinners has been a slight challenge, but I have the SBD app on my iPhone, and I've used the SBD website for recipes. I found a blog that's almost solely SBD recipes, Kalyn's Kitchen, and there's a SBD cookbook on Food.com (formerly recipezaar.com). I found the SBD cookbook on Ebay, but it just arrived yesterday. It's been pretty easy for my family to eat along with me...I just make some kind of carb/starch side dish for them to enjoy, and I stare longingly at it. :)

This recipe was on the iPhone app, and I thought it sounded so good. I heart pesto, and this sounded super tasty and easy--a great combination in my book!

Baked Pesto Chicken

4 boneless, skinless chicken breasts
1/2 cup pesto (from a jar)
1/2 cup shredded part-skim mozzarella cheese
salt and freshly ground black pepper

Heat oven to 375. Season chicken breasts with salt and pepper. Spread 1/4 cup of the pesto in a 9x13 baking dish. Lay chicken breasts over pesto in an even layer and spread with remaining pesto.

Cover baking dish with foil and bake chicken until cooked through, 20-25 minutes. Uncover and top with cheese. Bake until cheese is melted, 5 more minutes.

*****

Seriously, dinner cannot get much easier than this. My whole family loved this...we all gobbled up our portions. It's definitely something I'll make again, diet or no diet. I normally have all these ingredients on hand, so it's a great quick, oh-my-gosh-it's-5:00-what-am-I-making-for-dinner recipe.

I forgot to take a picture. :( Oh, one more thing...I didn't like it as much reheated. The texture of the cheese was weird. I poured all the remaining pesto from the pan into the container I was using, so that might have been part of it, or maybe the olive oil in the pesto on the chicken did something funky to the cheese texture...I don't know.

Monday, August 30, 2010

Confetti Corn

My entire family came over for dinner on Saturday night because my grandmas and my cousin hadn't seen the new house yet. I had a bunch of corn in the freezer from my recent purchase of 48 ears (ugh...I'm so done with cooking corn!), and I thought there were a couple different Barefoot Contessa corn recipes from which to choose. The first cookbook of hers I grabbed off my shelf--"Back to Basics"--had a corn dish in it that sounded fantastic and easy. That's one of the things I love most about Ina's recipes, none of them require a lot of ingredients, but the ingredients they do use need to be high quality and fresh so you can really appreciate the taste. I'd much rather prepare dishes that way than ones that require 30 different ingredients.

Barefoot Contessa's Confetti Corn
2008, Barefoot Contessa Back to Basics, All Rights Reserved

2 tablespoons good olive oil
1/2 cup chopped red onion
1 small orange bell pepper, 1/2-inch diced
2 tablespoons unsalted butter
Kernels cut from 5 ears yellow or white corn (4 cups)
1 1/2 teaspoons kosher salt
1 teaspoon freshly ground black pepper
2 tablespoons julienned fresh basil, minced fresh chives, and/or minced fresh parsley leaves

Heat the olive oil over medium heat in a large saute pan. Add the onion and saute for 5 minutes, until the onion is soft. Stir in the bell pepper and saute for 2 more minutes.

Add the butter to the pan and allow it to melt. Over medium heat, add the corn, salt, and pepper and cook, stirring occasionally, for 5 to 7 minutes, until the corn just loses its starchiness. Season to taste, gently stir in the basil or other green herbs, and serve hot.

*****

I don't know if I've gone on before about olive oil, but it really does make a huge difference to use good quality olive oil instead of whatever is cheapest at the store. I used to be one of the "buy whatever is cheapest" shoppers until I was at Sur La Table one day and was convinced by the sales lady to try an olive oil they had on special. Oh man, did it ever make a difference!! You could taste how much better it was, and the smell is so flowery and yummy and awesome. If you don't already, try buying a really good olive oil sometime and put a little in a dish and put some of the cheap stuff in a dish. Dip some bread in each (don't mix them, you want to taste each on its own) and see what I mean.

Back to my review, this was super easy to make, and it was a huge hit!! Everyone really liked it. My mom was still talking about it yesterday when I called her for something. I think I cooked the onions a bit too long because they were starting to take on that gray tinge that cooked red onions can have, but they were still good. This was a great summer dish, and so flavorful and pretty! Now I'm kind of glad I have all that corn in my freezer!

Barefoot Bloggers: Ultimate Grilled Cheese

Wow, I had no idea how behind I was on Barefoot Bloggers assignments until I just went to my Barefoot Bloggers tag and saw it's been quite some time since I've done any of them. Oops!! I hope I don't get kicked out of the group. I'll have to look over what ones I've missed and try to incorporate them into my next couple weeks' meal plans. I tell ya, moving a couple months ago really threw a wrench into a lot of things!

I was excited to see a bonus recipe for August from Ina's not-yet-released new cookbook. And it claimed to be the Ultimate Grilled Cheese. Why wouldn't I try something like that?! We're big fans of grilled cheese around here. Plus it had bacon...cheese and bacon together?! Yes please!!

Ultimate Grilled Cheese
From Ina Garten's Barefoot Contessa How Easy Is that?

•12 slices thick-cut bacon, such as Nodine’s applewood smoked
•1 cup good mayonnaise
•1/4 cup Dijon mustard
•1/4 cup freshly grated Parmesan cheese
•1 1/2 teaspoon kosher salt
•1/2 teaspoon freshly ground black pepper
•1 white pullman loaf or sourdough bread, sliced 1/2-inch thick (12 slices)
•6 tablespoons salted butter, at room temperature (for spreading, you probably won’t use it all)
•6 ounces aged Gruyere or Comte cheese
•6 ounces extra-sharp Cheddar, such as Cabot or Shelburne Farms

1. Preheat the oven to 400 degrees F. Arrange the bacon on a baking rack set over a sheet pan in a single layer and roast for 20 to 30 minutes, until nicely browned. Drain on a plate lined with paper towels and cut in 1-inch pieces.

2. Meanwhile, combine the mayonnaise, mustard, Parmesan, salt, and pepper in a small bowl. Lay 12 slices of bread on a board and spread each one lightly with butter. Flip the slices and spread each one generously with the mayonnaise mixture. Don’t neglect the corners!

3. Grate the cheeses in a food processor fitted with the largest grating disk and combine. Distribute the bacon evenly on half the slices of bread. Pile 1/3 cup grated cheese evenly on top of the bacon and top with the remaining bread slices, sauce side down.

4. Heat an electric panini press. When the press is hot, cook the sandwiches for 3 to 5 minutes in batches until the bread is toasted and the cheese is melted. (Or, heat a nonstick skillet on medium-low, place two sandwiches at a time inside, and use a lightweight metal cake pan to weigh them down gently. Cook for 3 to 5 minutes. Flip the sandwiches, press them down with the cake pan, and cook for about 2 minutes, until golden brown. Repeat until all of the sandwiches are done.)

5. Allow the sandwiches to cool for 2 minutes. Cut in half, and serve warm.

*****

We were too excited to try these, so we cooked the bacon in a skillet instead of in the oven. That's the only change I made because I trust Ina and assumed they'd be awesome. Well, I was right. They were freakin' fantastic!!! I probably went overboard on my cheese usage, but for the ULTIMATE grilled cheese, I figured that was acceptable. The husband thought these would be better on a Texas Toast style bread and done in the skillet instead of a panini press, but he ate two sandwiches so he must not have had too much of a problem with them.

This will definitely go into our sandwich/panini rotation for sure!! Way to go, Ina!!

We like cheese in our house!


My husband is the bacon cook in our house. He was a master grill operator at the Waffle House back before I knew him, so all breakfast food cooking duties are his.


Cover your keyboards so you don't get drool on them!!

Turkey Sliders

While grocery shopping recently I saw packages of ground turkey on sale BOGO, so I figured I'd buy a couple. The husband is not a fan of turkey, but I'm forcing him to eat it anyway. I think it's growing on him. It's funny, he's a completely different eater than he was when we met. I wouldn't say he was picky then, but he was definitely particular about what he ate, and there were hardly any vegetables he'd eat. I'm so proud of him. :)

I didn't really know what to do with the turkey when I bought it, I just figured since we don't eat red meat very often it would be nice to have on hand. Then I thought of a recipe my friend Jen had made for sliders, so I thought why not do those but with ground turkey instead. Plus sliders are awesome!!

I'll post the link to the recipe Jen used; she modified it slightly from wherever she found it, so instead of a big long "adapted from Jen, adapted from so-and-so, adapted from another-so-and-so" you can go check the post on her blog if you're that interested.

Turkey Sliders
Adapted from Jen's White Castle Style Sliders

1/2 cup dried onion flakes
1 package ground turkey (I think it's 1.25 lbs)
1/2 teaspoon of Lawry's seasoned salt
6 slices of American cheese
12 whole wheat dinner rolls
Dill pickle relish to taste

Combine onion flakes, ground turkey, and seasoned salt in a large bowl and mix together. Spread the mixture in an 11x7 glass baking dish. Press evenly making one giant pattie.

Bake in a 400 degree oven for 20 minutes.

Using a paper towel, pat the excess grease from the top of the pattie. Top with cheese slices, return to oven for 2 more minutes. Remove from oven, let set 5 minutes then cut into patties (I did 12 patties). Slice open and separate each dinner roll. Using a spatula lift pattie onto each bun bottom. Top each slider with some pickle relish on the bun lid and serve immediately.

*****

Oh man. OH MAN, were these good!! I gave the kids each two, and the boy ended up wanting a third. That's almost unheard of around here. And it was slightly disappointing because I was banking on him only eating two so I could have another one. Oh well. The only issue was that my turkey shrank up a lot...there was quite a bit of turkey shrinkage. Haha...shrinkage. Anyway, I figured it would happen, and it wasn't really a problem, just something to note.

These are something I will definitely be making again!

Mmmmm...sliders!


Mmmmm...sliders and baked kale chips!

Baked Kale Chips

Wow, I have a lot of catching up to do here! I didn't think we'd really had anything interesting (other than this past Friday and Saturday night), but when I went through the pictures on my camera and made a list of what all I needed to post there were eight things! Yowza! Guess I'd better get to typing.

I've been seeing a lot about kale chips recently. I was intrigued with the idea of them and really anxious to try them out. I saw some kale at a market last week for only $0.69/bunch, so I figured I'd get some and try it. I'd seen a recipe on the same blog on which the infamous Bacon Salted Caramel Brownie recipe, so I went back looking for that. The blog is Savour-Fare.com and she has some really yummy looking stuff posted there! Her recipe for kale chips called for sprinkling furikake over them once they were done, but I just stuck with salt and pepper.

Baked Kale Chips
Adapted from Savour-Fare.com

1 head curly kale
2 tsp. red wine vinegar
1 T olive oil
Kosher salt

Preheat oven to 350.

Remove the central vein from each leaf and tear the kale into bite sized pieces. Place kale pieces in a large bowl. Pour vinegar and olive oil over leaves, and toss the kale in the vinaigrette and spread on a baking sheet, lined with foil.

Bake until crisp, about 15 minutes. Season with salt.

*****

Like I said, I was really excited to try this, but apparently I was the only one. Neither of my kids would even try it. I take that back--I made the boy try a piece and he wanted nothing to do with it. The husband said he liked the flavor at first but not at the end of the bite, that it tasted too "vegetable-y." I however, really liked these! Talk about healthy, and I loved the crisp texture and the flavor of them. Since kale is a winter vegetable, maybe I'll have more luck feeding this to my guys when it's actually in season. If not, it's their loss!!

Kale in chopped form:


Kale in baked chip form:

Wednesday, August 25, 2010

Food, Inc.

I've wanted to watch the documentary "Food, Inc." for quite some time now. It had been on our Netflix queue for MONTHS, if not over a year. Actually as soon as a friend of mine saw it in the theater and posted about it on Facebook, I added it to our queue, so whenever that was. A long time ago. Last night after the kids were in bed we didn't have anything to watch or do, so I suggested watching it. Don't you love streaming Netflix?! Best use of the Xbox and Wii EVER!

I knew the premise of the movie, and I knew a lot of it was pretty shocking. I've read two of Michael Pollan's books, and I knew he was involved with this, so I figured I knew what to expect. Even with that knowledge I was still shocked. Shocked is even a bit of an understatement. My friend Jen had watched it with her husband recently, so when she called this morning we talked about how disgusting it all was and how detrimental the way our society eats is to our health.

The movie is downright shocking. If you've seen it, you know what I mean. If you haven't, YOU NEED TO. It's mind boggling how little control we--and farmers--have over the food we eat. I don't even know where to begin with my thoughts on the movie. It was eye opening, maddening, and heartbreaking all at the same time.

I've always been an advocate of healthy eating (okay, maybe not always, but at least since my early 20s), but I've realized I need to take it to a whole other level. I've done my best to cut out items from my kitchen with ingredients like high fructose corn syrup, red dye #40, partially hydrogenated anything...basically if it has ingredients I can't pronounce, I try to not buy it. But it angers me to no end that no matter how hard I try to stick with all that, we basically have a tainted meat supply that we're feeding ourselves--and our kids--from each time we eat conventional beef, pork, or chicken. They're given food they weren't ever intended to eat, they're covered in other animals poop, they're given genetically altered food to make them grow faster and bigger than nature intended . Heck, even farm-raised fish are fed corn. I'm by no means a botanist, but I'm fairly certain corn doesn't grow underwater and was, therefore, inaccessible to fish, which in my mind means they shouldn't be eating it. If God wanted fish to eat corn, it would be growing in the ocean.

It angers me to no end that this is what we're stuck with. I'm pleased and excited that there are people out there trying to change this and have their voices heard in saying that this is not acceptable. It angers me that people are dying from eating meat that doesn't have to be contaminated. Jen and I have talked before (and I've had the same conversation with the husband) about whether there is a genuine concern about where our food comes from or if we're just more in-tune with it because we've educated ourselves about it. I'm still not sure what my answer is to that. I'd like to think that everyone would be as riled up as I feel after seeing this movie and want to change the system somehow, but maybe people are indifferent or just don't care. I don't know. I do know that if the little people don't stand up for themselves to be heard against these giant corporations that change will never happen. I'm going to start researching what I can do, and I urge you to do the same. I'm also completely changing the way I grocery shop. We're switching to organic as much as possible. I'm curious to do an entirely organic grocery shop and see what the price difference is. I figure regardless, I'll find a way to make it work. I want my family to be healthy, and if we have to give up certain things to make that happen, then so be it. In the long run I'd rather spend more now on eating well than spend it later on healthcare costs.

If you haven't seen the movie, go watch it now! Go! Do it!

Here's the website for the movie if you want more information on it or other resources: Food, Inc. Movie Website

(Stepping down off my soap box now...sorry if any of this is rambling and disjointed...I didn't really know where I was going with it, I'm just enraged and needed to vent about this issue...)

ETA: I was doing some Googling of Kevin's Law (a law that would give the USDA power to shut down meatpacking plants that have repeated contamination problems) and came across another blog entry about "Food, Inc." It was really good so I thought I'd share:

http://theorganicchic.com/blog/food-inc-if-you-dont-know-now-you-know/