Friday, May 24, 2013

Chocolate Snack Cake


Quite awhile ago now, my dear friend Betty sent me a recipe for a chocolate snack cake that sounded super easy to make.  It's no secret that I'm not a fan of baking, which is both bad and good.  Bad because I really love baked good and good because I really love baked goods.  Not wanting to ever take the time to make them or dirty all the dishes involved (seriously, is it just me or does baking dirty way more dishes than cooking?!) makes it pretty easy to stay away from cookies or cakes or pies that I'm just going to sit and gorge on if I make them.  But, I have two little kids, so some times I have to bake things to appease them.  For one thing they like to help me, and for another, they really love to eat stuff that I bake.  Recently we were having a family fun night, and I decided to make this cake.  I wanted a fun dessert for my family, and this sounded super easy.  And the best part?!  You mix it up in the baking dish, so there aren't a ton of dishes to deal with once you're done!  Jackpot!

Chocolate Snack Cake


1 1/2 cups all-purpose flour, (spooned and leveled)
1 cup sugar
3 tablespoons unsweetened cocoa powder
1 teaspoon baking soda
1/2 teaspoon coarse salt
6 tablespoons vegetable oil
1 teaspoon pure vanilla extract
1 tablespoon white vinegar
1 cup cold water

Preheat oven to 350 degrees. In an 8-inch square baking pan, whisk together all-purpose flour, sugar, unsweetened cocoa powder, baking soda, and coarse salt.

Make a well in center of flour mixture and add vegetable oil, pure vanilla extract, white vinegar, and cold water. Whisk until well combined. Bake until a toothpick inserted in center comes out clean, 35 to 40 minutes. Let cool completely in pan on a wire rack.

*****

Let me tell you...my family devoured this cake.  The consistency was similar to a cake-like brownie.  It was a little denser than a chocolate cake you'd make from a box mix but not chewy like a brownie, if that makes sense.  It did not last long...like maybe until the end of the movie we were watching.  I also really liked that it was vegan because my brother and his girlfriend are vegan, so it's nice to have options I can make for them when they come visit.  Normally they come for each of my kid's birthdays, and I want them to be able to have cake to celebrate with us.  Anyway, this is super easy, hardly dirties any dishes, and it's stuff I always have on hand.  I kind of wish I'd had this recipe when I was pregnant either time because I bought a lot of chocolate cake mixes and randomly baked cakes both times.

Actually writing this out and seeing the pictures kind of makes me want to whip one up to share with my boys tonight!


Note to self: put away dishes before taking pictures for blog.  A cheese grater in the chocolate cake picture?!  Come on, Claire!  Class things up a bit around here!


Tuesday, May 14, 2013

Calico Relish


I think I've shared my childhood aversion to zucchini before.  I really didn't like it, and somehow my mom always had an abundance of it in the summers when I was little.  I don't remember her growing it, so I have no idea how it would end up in our kitchen, but she would use it in everything.  My mom was never big on baking, so my brother and I learned to get very skeptical if all of a sudden there were cookies since it usually meant there was zucchini in them.

There was a delicious relish we'd have a lot in the summer with grilled hot dogs or sausages or brats.  It was my dad's aunt's recipe, and I loved it.  Then I found out the main ingredient was zucchini.  I stopped eating it.  I didn't want anything to do with it because of the zucchini.  I kind of forgot about said relish until recently.  I've since learned to appreciate zucchini and actually eat it pretty often.  I don't begrudge my kids a whole lot for not eating it since I didn't when I was little.  Plus there are enough vegetables they eat willingly that I don't see the point in fighting with them about one that they don't like.

Anyway, remember how I recently mentioned Market on the Move?  One of last month's offerings was a ton of zucchini.  Not an actual ton, but it may have come close.  I was trying to figure out what to do with it since there's only so much sauteed zucchini or zucchini bread one can eat.  Well, maybe not on zucchini bread, especially chocolate zucchini bread.  But I digress.  I remembered I had gotten this recipe from my mom (once I learned to embrace the zucchini) maybe last summer when for some reason I had a bunch of zucchini to use up.  I was so excited to make up some of this, especially with it getting to be the time of year that I do a lot of grilling, so I know we'll be having it alongside a lot of meals coming up.

Calico Relish
Source: my great aunt Irene

4-6 unpared zucchini, coarsely ground (3.5 cups)
6 medium carrots, ground (1.5 cups)
2 medium onions, ground (1 cup)
2 Tbsp uniodized salt
2 1/2 cups sugar
1 1/2 cups vinegar
1 1/2 tsp celery seed
1 1/2 tsp dry mustard

Combine ground vegetables, stir in salt.  Let stand 3 hours.  Drain well, squeeze if necessary.  Combine remaining ingredients and bring to boil.  Add vegetables, simmer 20 minutes uncovered.  Seal in jars.  Makes 2-1/2 pints.

*****

I found the easiest way to do this was bust out my food processor.  Oh how I love my food processor.  I put in one of the grating/shredding blades (I'm sure there's an official name for it, but I can't think of it and don't feel like looking it up...I only have 15 minutes until I need to leave to pick up kids from school) and put it on the finer of the two options so my shreds of everything would be smaller.  Actually for the onions I put in the regular blade and just pulsed until the pieces of onion were tiny.

I could barely wait to have some of this.  Shortly after making it the husband and I had grilled sausages for dinner one night after the kids had gone to bed, so I got out one of my jars and served some up with our sausage.  Oh it was so tasty!  Just as good as I remembered.  And the husband liked it, too!  It's super easy to make up, and it will be a great way to use up some of that summer bounty of vegetables!

My shredded veggies, awaiting their salt.

Boy #2 was helping with the process. This kid loves the food processor!  He wanted in on one of the pictures.  Don't mind his shaggy-way-overdue-for-a-haircut face or the yogurt stains on the table behind him.  Hmmm...maybe I shouldn't have pointed those out?

Relish cooking away.

 How freakin' adorable are these jars?!  They're wide mouth half pint jars.  I love them.

Tuesday, April 23, 2013

Refrigerator Pickles


If you follow me on Facebook you might have seen me say recently that I have some great posts to do but was in the middle of a big recipe card project using my camera. My great uncle recently passed away, so my mom went back to Kansas to get some things from their house that had been left to her and things she wanted to keep. Her aunt died 12 or 13 years ago, my grandma's oldest sister. One of the things my mom brought back was her aunt's recipe collection. In case it's not obvious, I'm a sucker for a recipe collection. Especially old ones written on recipe cards in swirly, cursive handwriting and filed away in recipe card boxes. Conveniently shortly after she returned from that trip my mom left on another trip (she's a traveling fool, that lady!), so I brought the box of recipes home with me to take pictures of ones I wanted to have. It was quite an undertaking. I wanted to wait to upload my memory card until I was done, so that meant blog updates got put on hold.

Now, as if that wasn't enough of a tangent, do you have Market on the Move where you live? I don't know if it's just an AZ thing, but it's pretty awesome. The first saturday of the month (dates vary by location, I believe. Mine just happens to be the first Saturday.) you can get up to 60 pounds of produce for $10. Yup...60 pounds, $10. It's all stuff that's too ripe for grocery stores to take, so they sell it for super cheap. This last MOM (as it's affectionately known as) had butternut squash, zucchini, yellow squash, green and red peppers, poblano peppers, roma tomatoes and cucumbers. There are certain amounts of some things you can take, others are unlimited. This time each person was allowed 19 cucumbers. Did I mention they were organic? Score!! I decided to try my hand at making refrigerator pickles. I had wanted to try them at some other point when I had a bunch of cucumbers, but I never did. I don't remember why. Probably my kids ate them. Or they were forgotten in my garage fridge. But this time I was not going to let that happen! I busted out my cukes, vinegar, sugar, and some canning jars, and got busy!

Refrigerator Pickles
Source: adapted from allrecipes.com

1 cup distilled white vinegar
1 tbsp salt
2 cups white sugar
6 cups sliced cucumbers
1 cup sliced onions

In a medium saucepan over medium heat, bring vinegar, salt and sugar to a boil. Boil until the sugar has dissolved, about 10 minutes. Place the cucumbers and onions in a large bowl. Pour the vinegar mixture over the vegetables. Transfer to sterile containers and store in the refrigerator.

*****

I had slightly more than six cups of cucumbers. I think I used five cukes, but they were pretty big. I really wasn't sure how this was going to turn out, but we had some on turkey burgers a few nights later, and they were really good! They're on the sweeter side, but not as sweet as an actual sweet pickle. They were just so crisp and fresh tasting. I loved them! So much better than store bought pickles, and I know exactly what went in to them! In fact, I liked these so much I made a second batch a few days later. So now I have six jars of pickles in my fridge. From what I read they'll last up to several months in the fridge. These were also super fast to make. While the vinegar/sugar/salt mixture was coming to a boil I did all my slicing. I did let it all cool in the bowl a little before I put them in jars. And you'll probably want to wipe off your jars after you're done--mine were really sticky!

(Complete side note...speaking of jars, I was at Costco last week, and they had a sozen pint canning jars for $6! That's a smokin' deal! I bought three packages--one for me and two for my friend Amy. One of the employees said they were going really fast, so if you want some, I suggest going soon to check on them!)


Thursday, March 21, 2013

Fontina Macaroni and Cheese


It's no secret that we're cheese lovers at my house. Nor is it a secret or surprise that we also love macaroni and cheese. I grew up eating the stuff in the blue box and honestly when I was little, I didn't like homemade mac and cheese. Now that's switched, and I'd much rather have a big plate of homemade than the stuff from the box. I really try and avoid giving it to my kiddos, too, because of all the junk that's put in it. By the way, did you know there's currently a petition going around attempting to get Kraft to remove harmful food dyes from the blue boxed mac and cheese? Interestingly the same product sold in the UK does not contain these dyes because of consumer outcry there. Why not take a second and add your name to the petition? I believe the goal was to get 250,000 names, and it's currently at 249,910! So close!!

Petition to remove harmful dyes from Kraft mac and cheese

I'll get down off my soapbox now and back to my regularly scheduled post.

Although I have a go-to mac and cheese that I make pretty often and we all love, I'm easily convinced to try a new version. The husband helped me meal plan recently, and I pulled up a few things on Pinterest that I'd been wanting to try. This is one he chose because, like I said, we're a family of suckers for mac and cheese. Plus I love fontina cheese, so I jumped on board with the idea. We made sure to have it before a big cardio workout day to really justify having it as our main course instead of a side.

Fontina Macaroni and Cheese
Source: Annie's Eats via Pinterest

1 lb. small or medium pasta shells
5 tbsp. unsalted butter, divided
1 cup heavy cream
8 oz. Fontina cheese, shredded
Salt
Pinch of grated nutmeg
1/3 cup panko bread crumbs
¼ cup freshly grated Parmesan cheese

Preheat the oven to 400˚ F. In a large pot of boiling salted water, cook the pasta according to the package directions just until 1-2 minutes shy of al dente.

Meanwhile, dice 4 tablespoons of the butter and place in a large mixing bowl. Warm the cream in a small saucepan or the microwave. Cover to keep warm.

Once the pasta is cooked, add to the bowl with the butter and toss to coat well. Stir in the warm cream and the Fontina until the cheese starts to melt. Mix in salt to taste, and add the nutmeg.

Pour the mixture into a buttered 2-quart casserole dish. In a small bowl, melt the remaining 1 tablespoon of butter. Mix in the panko breadcrumbs and shredded Parmesan. Toss with a fork to coat evenly with the butter. Sprinkle the bread crumb mixture evenly over the pasta in the baking dish.

Bake until the sauce is bubbling and the topping turns golden brown, about 20 minutes. Serve immediately.

*****

Talk about decadent!! Butter, cream, cheese. Yowza! This was definitely a hit with my family. This was definitely tasty, but I don't think it will necessary replace my normal mac and cheese just because it was so rich and decadent. It was definitely a nice change of pace and something I'd make again when I had a hankering for fancy mac and cheese!


I'll admit, it's a little blah looking before going in the oven. I left panko off one end because one of my kids didn't want any on theirs. Worked for me.


Delish!

Friday, March 15, 2013

GG's Lasagna


I cannot believe I've never done a post about my grandma's lasagna recipe. But, alas, that must be the case because when I went to make it recently I couldn't find it here on the ol' blog. For those of you that don't know her, my grandma is awesome. Seriously, I've never met someone that doesn't love her as soon as they meet her. She'll be 95 in May, and she's still going strong. She takes one medication and only because her doctor thinks a woman her age should be on some sort of medication. Sheesh. She grew up on a farm in Hale, Missouri during the Great Depression, and I (still) love when she tells me stories about her youth. She is hands down one of my favorite people in the world.


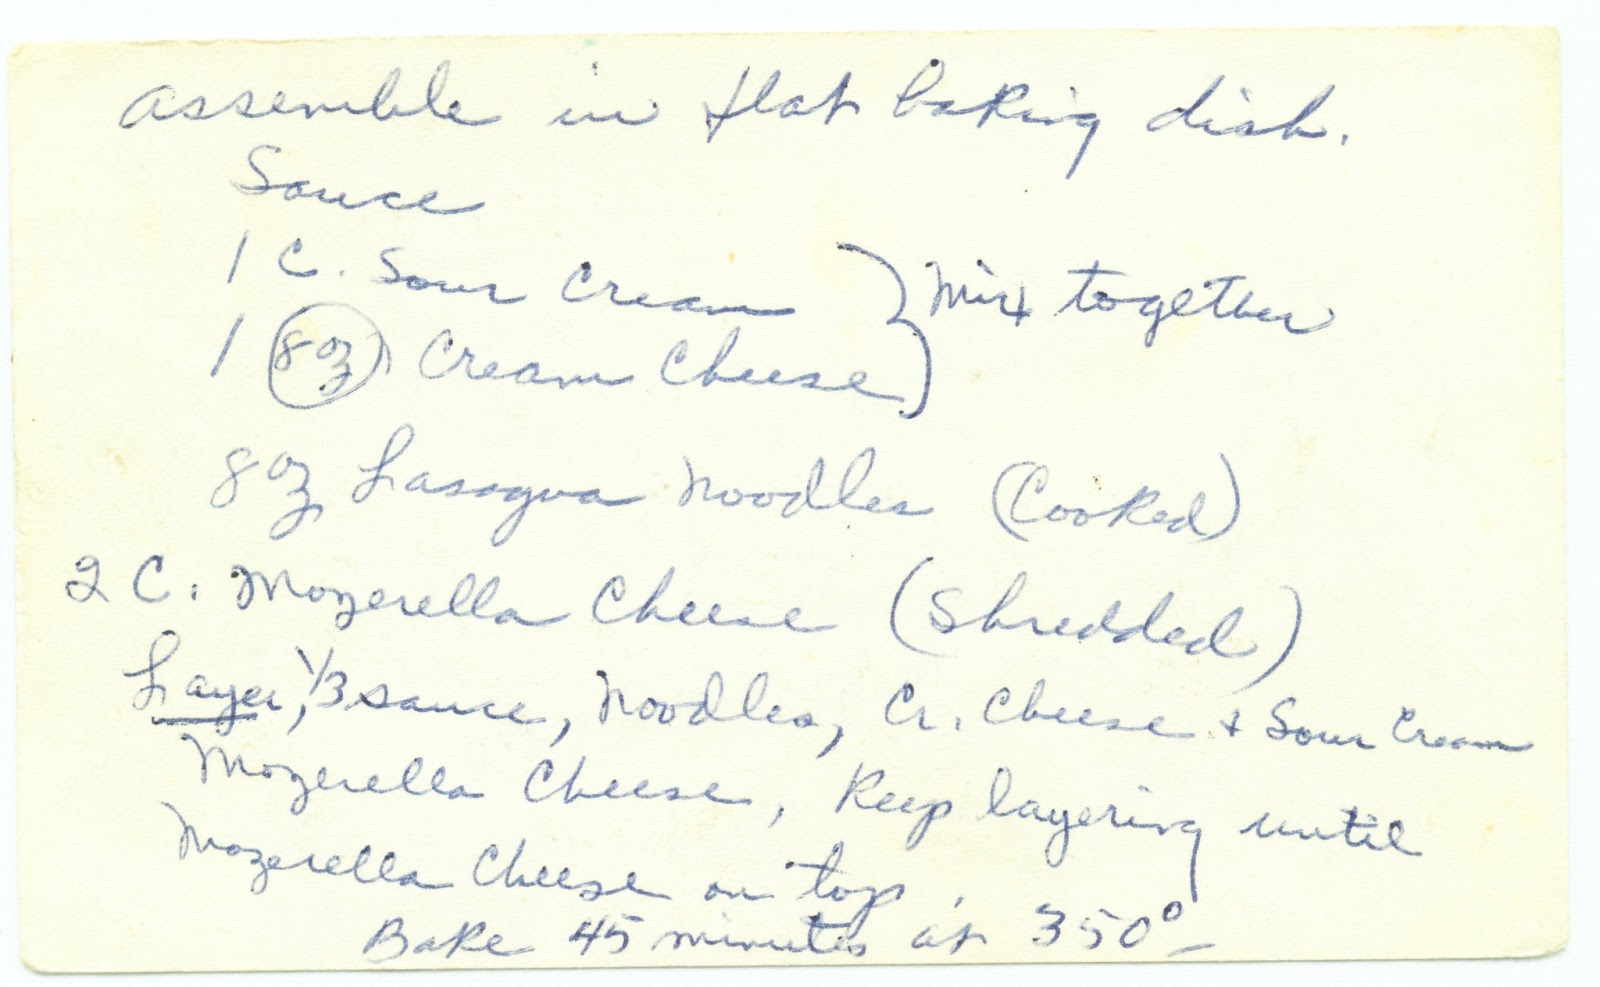
We all love her lasagna recipe, and it is Boy #1's absolute favorite food in the world. He turned seven last month, and while my brother and his girlfriend were here visiting for the weekend for his birthday we had a lasagna dinner at my mom's. My grandma made her lasagna, and my brother made a vegan one. That was on a Saturday night, I think it was. The boy's birthday was Wednesday, and I asked him what he wanted me to make for his birthday dinner one night that week, and he said, "GG's lasagna." I said, "Really? But we just had that." He said, "I know, it's my favorite." Okay...I can't argue with that! So we had GG's lasagna again later that week. A few years ago I took my scanner to my grandparents' house and sat down with my grandma's recipe box to scan some of my favorite recipes of hers. I love that I have the recipe in her handwriting, too.


GG's Lasagna
Source: my awesome grandma

Sauce:
1-1/2 lb. ground beef
1 small onion, chopped
2 cloves garlic, minced
2 8-ounce cans tomato sauce
1 cup water
1 T. dried parsley
1 t. oregano
3/4 t. salt
1/4 t. thyme
1 bay leaf

Simmer. Remove bay leaf before using sauce.

Other ingredients:
1 cup sour cream
8 ounces cream cheese
8 ounces lasagna noodles, cooked
2 cups shredded mozzarella cheese

Mix together sour cream and cream cheese.

Assemble in a flat baking dish and layer:
1/3 cup sauce, noodles, cream cheese and sour cream, mozzarella. Keep layering until mozzarella cheese is on top.

Bake 45 minutes at 350.

*****

This lasagna does not last when I make it. There's maybe one or two servings leftover, and normally Boy #1 has it for breakfast the next day or wants to take it in his lunch. I really think he'd eat this every day if I'd make it that often.


Friday, March 8, 2013

A Special Valentines Drink


I'll come right out and say it. I'm not a huge fan of Valentines Day. I kind of attribute it to many years of being boyfriend-less and seeing other girls with flowers, balloons, etc. and I had nothing. It's okay, I know it's a petty reason, but tell me you're not still holding on to issues like that of some sort from high school. ;) Thankfully the husband isn't really a big fan of it either, so we've never made a big deal out of it. Actually when we first met it was a few weeks before V-Day, and he randomly said one night, "So, what are you doing next Wednesday?" My response--not realizing what day that was--was something along the lines of, "Probably working late, maybe having some wine when I get home." You know, because my roommate at the time and her boyfriend would be there being all lovey-dovey. So we've never made a big deal out of it. But now that I have little boys, I really want to teach them that they should make a big deal out of it, so I'm trying to mend my ways. This year I planned a bunch of secret stuff to do for them while they were both at school. I dropped off Boy #2 at preschool and headed to the dollar store for some decorations. Note to self: next year get them ahead of time because there's not a whole lot left at the dollar store on Valentines Day. But I made do. I wanted to give my boys a fancy, fun snack when they got home from school and I had seen this on Pinterest. They rarely get soda--especially one whose main ingredients are HFCS, corn syrup, sugar, and red dye #40--so I knew they'd freakin' flip for this. It probably helped I also bought them each a bag of Cheetos.

A Special Valentines Drink
Source: Adapted from Sweet Cheeks Tasty Treats

Strawberry sherbet
Red Fanta (I think it's strawberry flavor?)
Whipped cream
Valentine sprinkles

In a tall glass (or short glass if you want a little drink), place one or two scoops strawberry sherbet. Slowly pour soda over the sherbet. Top with a swirl of whipped cream and Valentine sprinkles.

*****

Easy peasy! The original recipe called for raspberry sherbet and raspberry ginger ale, but I couldn't find those at my store, so I went the strawberry route. Actually I think it was a strawberry sorbet that I got, if you want to be all fancy. Want to know one of my pet peeves? When people say sherBERT instead of sherBET. There's no "r" in the word! It drives me freakin' nuts and no one believes me when I complain about it that they're pronouncing it wrong. So I've learned to keep my mouth shut about it.

Anyway, my boys loved this. I made one for myself, too, and it was quite tasty. This could easily be adapted to any holiday, just change the color of your ingredients. If I can figure a non-Mountain Dew green soda I may make it again for St. Patrick's Day using lime sherbet. I guess I could do Sprite and that would work.


Thursday, March 7, 2013

Spicy Sweet and Sour Pork


My Wine Pie post was the swift kick in the pants I needed to get back to my blog. I really have quite a few things to share that I've made recently, so hopefully now I can get back on track and make my ol' blog here a priority again. I mean, right now I should be cleaning up my kitchen and putting a load of towels into the washer, but I'm sacrificing those things to write this. Ha! Like that was a tough decision.

I've been trying to have the husband help me meal plan some each week, and this was one of his choices a couple weeks ago. I pulled up some recipes I'd saved on Pinterest and had him flip through them and see what looked good. This is one he chose. I'm always down for a stir fry, and my kids love sweet and sour anything, so I figured this would be a good choice.

Spicy Sweet and Sour Pork
Source: adapted from Cooking Light

1 pound boneless pork chops, cut into 3/4-inch cubes
2 tablespoons cornstarch, divided
3 tablespoons low-sodium soy sauce, divided
1 (8-ounce) can pineapple chunks in juice, undrained
1/4 cup cider vinegar
1/4 cup sugar
2 tablespoons ketchup
1 teaspoons Sriracha (hot chile sauce, such as Huy Fong)
1 tablespoon canola oil
1 cup chopped onion
1 teaspoon minced ginger
1/2 teaspoon minced garlic
1 cup chopped green bell pepper

Combine pork, 1 tablespoon cornstarch, and 1 tablespoon soy sauce; toss well to coat. Drain pineapple in a sieve over a bowl, reserving juice. Combine juice, remaining 1 tablespoon cornstarch, remaining 2 tablespoons soy sauce, vinegar, and next 3 ingredients (through Sriracha), stirring with a whisk.

Heat a large nonstick skillet over medium-high heat. Add canola oil to pan; swirl to coat. Add pork to pan; sauté 3 minutes, stirring frequently. Add 1 cup onion, ginger, and garlic; sauté 1 minute. Stir in pineapple and bell pepper; sauté 3 minutes, stirring frequently. Stir in vinegar mixture; bring to a boil. Cook 1 minute, stirring constantly. Serve.

*****

The original recipe called for pork tenderloin, but I had pork chops on hand. Although, instead of grabbing two packages of pork chops from my freezer, I accidentally grabbed a package of pork chops and a package of chicken breasts. Oops. So ours was a pork/chicken combo. It worked out okay, and my kids thought it was kind of fun to try and figure out which pieces were pork and which were chicken. Anyway, it also called for more Sriracha, but I cut back on it since my kids don't like spicy food.

This was a total winner of a dinner! Everyone in my family loved it. Boy #1 even wanted to take leftovers to school for lunch the next day!! What?! I believe he rated this a "triple A+, 100" which is pretty freakin' good. I'll definitely make it again since my whole family enjoyed it!

Wednesday, March 6, 2013

Wine Pie

Oh, dear blog, how I've missed you. I have no good excuse for why I've been away (except maybe Candy Crush Saga). As I was scrolling back through pictures in my "Cooking Blog" photo folder, I saw these and giggled and thought it would be perfect, albeit probably not very helpful or interesting or even entertaining to anyone except Jen.

In 2011 Jen and her family came and celebrated Thanksgiving with my family at my mom's house. It was a blast. This past Thanksgiving it turned out her family was going to be alone again, so they joined us for 2012 Thanksgiving as well. We were both taking a side dish and pie. Neither of us are bakers, and the husband had plans to go out with a friend the night before Thanksgiving, so Jen came over here and we threw back a few bottles of wine and made our pies together. I don't remember what hers was...something with pudding maybe? At some point (maybe because I had an extra crust?) we had the idea to make a pie with random ingredients and see how it turned out. Wine Pie was born.

We started with taking any potential pie ingredients out of my pantry, fridge, and freezer. I'm not sure if the Goldfish were out as a consideration or had been left out after my kids had a snack. And maybe Jen's pie was pumpkin of some sort, hence the opened can of pumpkin.


We systematically went through the ingredients to figured out what was realistic to use and what wasn't. By process of elimination, this is what we ended up with. Cool Whip, Nutella, Bananas, Puffins cereal, Teddy Grahams, chocolate chips, pudding mix, Cookie Butter (although I don't see it in this picture), almonds, a Toblerone bar. I think that was it. Oh, I think we dug through my kids' Halloween candy buckets, too.


Now, how to proceed. A layer of cookie butter spread on the crust. By the way, if you haven't tried Cookie Butter, I'm really torn on whether or not to advise you to try it. Crack in a Jar is what it could easily be called. My brother bought it when he was here for Boy #2's birthday, and we all ate it by the spoonful. And it's vegan! Or at least I assume it is because my brother is vegan. It's the consistency of peanut butter but tastes like cookies.


Cookie Butter was topped with another crack-like ingredient, Nutella.


Lovely Jen layering on some bananas. The bananas were a delicious addition to Wine Pie, but the husband and I had to run to the store the next morning to get some for fuel before a seven mile run. Oops. We were a couple bottles deep at this point.


Next: vanilla pudding.


Topped with Cool Whip...because what's a pie without Cool Whip on top?


And to really show off how drunk we were, the toppings. Mini chocolate chips, sliced almonds, crumbled Puffins cereal and Teddy Grahams, and to make it really festive: candy corns.


So, the verdict? This pie was AWESOME. Seriously, it was so good!! So don't let the lack of an official recipe for something hinder your kitchen creativeness. Great things can come from randomly combining ingredients you have on hand!

And the last picture...the pie after having been cut into on Thanksgiving:

Sunday, January 13, 2013

Broccoli Cheddar Soup


It's cold here. If you don't live in AZ you're probably chuckling and shaking your head saying, "Silly girl...it doesn't get cold in Phoenix." But it is. Right now according to the weather on my phone it's 34 degrees at 11:50 AM. Brrrr. Once it's cold (or even AZ cold which usually means low 60s for the high), I want to eat soup. I love soup, and I'm always looking for a tasty homemade soup recipe. I rarely eat canned soup anymore because the ingredients are mostly stuff I don't want to put in my body, and they're just too darn salty for my taste. Except Campbell's tomato soup. I'll eat that when I'm sick, HFCS be damned! I like it made with milk and crushed up saltine crackers stirred in. Yum.

Anyway, one of my online friends, Stephanie, posted this recipe on the message board website I frequent, and I was dying to try it. My kids are pretty hit or miss when it comes to soup, but they love broccoli and cheese, so I took a chance that this one would be something they'd like. Plus Stephanie is a nutrition consultant, so I knew I could trust that this was something healthy to feed my family.

Broccoli Cheese Soup
Source: The Mamasphere via Stephanie

1 tablespoon melted butter
1/2 medium chopped onion
1/4 cup melted butter
1/4 cup flour
2 cups half-and-half cream
2 cups chicken stock (I use homemade)
1/2 lb fresh broccoli
1 cup carrots
1/4 teaspoon nutmeg (optional)
8 ounces grated sharp cheddar cheese
salt and pepper

1. Sauté onion in tablespoon butter. Set aside.

2. Cook melted butter and flour using a whisk over medium heat for 3-5 minutes.

3. Stir constantly and add the half & half.

4. Add the chicken stock. Simmer for 20 minutes.

5. Add the broccoli, carrots and onions. Cook over low heat 20-25 minutes.

6. Add salt/pepper/nutmeg to taste. Puree with immersion blender.

7. Return to heat and add grated cheese.

*****

I've made this twice in about the past month, and it's a big hit with my family. My boys always grumble a little when I've made it, but they both eat it all up. Actually I made it this past week and doubled the recipe to take some to an injured friend and her family. They all liked it, too. It's really hearty and filling, and it comes together pretty easily, too. I really should just double it on a regular basis so I have some to eat for lunches or stick in the freezer because one batch goes pretty quickly. This is definitely a great addition to my go-to soup repertoire! Add a salad and some crusty bread or rolls, and you have a great meal!


Wednesday, December 26, 2012

Crockpot Cheesy Spinach Artichoke Dip


Merry Christmas, everyone!! Did you have a nice time celebrating? Ours was pretty fantastic, although the days leading up to Christmas were pretty stressful, to the point where I didn't even care about Christmas and wasn't excited at all. But I had a nice, long, nine mile run on Christmas Eve that cleared my head a little and lots of family here with us for church and dinner on Christmas Eve. And with two little boys, it's hard to not catch their excitement. We were all very spoiled by my family, and now today the boys and I are hanging out at home playing with all our new toys while the husband has to go to work.

We went to my mom's house for Christmas "dinner" last night. We had our usual Christmas "dinner" spread of tons of appetizers. I had four I planned on making, but I ended up whittling it back to two. One of them I made to take to a party last Friday, and while they were tasty, they were time consuming, and I didn't want to deal with them. Then another I decided to skip after seeing how much food there was already, plus I was tired of being in the kitchen and wanted to hang out and drink my wine. It sounds like a super tasty dip, so I will make it at some point.

When I was deciding what I'd make this year I perused my Snacks board on Pinterest and got really, really overwhelmed. So many good appetizers! But I knew I wouldn't want to be in the kitchen slaving away either here or at my mom's, so the fact that this was a slow cooker recipe appealed to my lazy nature. I ended up changing it a bit because of time constraints and lack of ingredients, so there will be a link to the original recipe, but the one below is how I ended up making it.

Crockpot Cheesy Spinach Artichoke Dip
Source: Adapted from Cooking Light

1 (14-ounce) can quartered artichoke hearts, drained and coarsely chopped
1 (10-ounce) package frozen chopped spinach, thawed, drained, and squeezed dry
1 (8-ounce) block light cream cheese, softened
1 (8-ounce) carton low-fat sour cream
3/4 cup grated Parmesan cheese
1/2 cup (2 ounces) crumbled reduced-fat feta cheese
1/2 cup diced onion
1/2 cup mayonnaise
1 tablespoon white wine vinegar
1/4 teaspoon freshly ground pepper
2 garlic cloves, crushed

Place all ingredients in a 3 1/2-quart electric slow cooker; stir well. Cover with lid; cook on low-heat setting 2 hours or until cheese is melted and dip is heated through. Serve warm with toasted pita wedges or tortilla chips.

*****

The original recipe called for 3/4 cup milk. I debated calling my mom to see if she had milk because sometimes she doesn't. But I figured she would. Then she didn't. My uncle and husband both offered to run to the gas station to get some for me, but I opted to not. I figured I'd see how it turned out and if it needed some liquid, I'd come up with a solution of some sort. After it cooked for awhile, I checked on it and found the consistency of it was perfect! I was so glad I had skipped the milk; it would have been way too runny with that added to it. I had bought tortilla chips to serve with this because I have the hardest time finding pita chips at my Safeway store, and I just didn't want to go to other stores in the days leading up to Christmas. This was a super tasty dip, and it's one I will definitely make again. Tasty and easy are two of my favorite combinations!!

Do you like my festive nail polish? It was one of my gifts from Boy #1. I heart that kid!

Saturday, November 24, 2012

Kung Pao Chicken Tacos


I absolutely LOVE Chinese food. If given a choice of cuisine, it's usually one of my top picks. Maybe from growing up in Seattle? I don't know. I haven't played around with cooking too much of it on my own (even though a few years ago I did invest in a pretty heavy duty Chinese cookbook). I was excited when I saw this recipe in October's Cooking Light because Kung Pao Chicken is one of our favorite Chinese take-out dishes. Since it has a little kick to it I decided to make it for a date night dinner for the husband and me since my kiddos don't like spicy.

Kung Pao Chicken Tacos
Source: Cooking Light magazine, October 2012

6 skinless, boneless chicken thighs, cut into bite-sized pieces
3 tablespoons lower-sodium soy sauce, divided
1/4 cup plus 1 1/2 teaspoons cornstarch, divided
1/4 teaspoon kosher salt
2 tablespoons canola oil, divided
1 1/2 tablespoons honey
1 tablespoon dark sesame oil
2 teaspoons rice vinegar
1 teaspoon sambal oelek (ground fresh chile paste)
1 large garlic clove, minced
3 tablespoons coarsely chopped dry-roasted peanuts
3/4 cup diagonally sliced celery (about 2 stalks)
8 (6-inch) corn tortillas
1/3 cup sliced green onions
1/2 medium red bell pepper, thinly sliced
4 lime wedges

1. Place chicken in a large zip-top plastic bag. Add 1 tablespoon soy sauce to bag; seal. Marinate at room temperature for 30 minutes. Remove chicken from bag; discard marinade. Place 1/4 cup cornstarch in a shallow dish. Sprinkle the chicken evenly with salt. Add chicken to cornstarch in dish, and toss chicken to thoroughly coat. Shake off excess cornstarch.

2. Heat a large skillet over medium-high heat. Add 1 tablespoon canola oil to pan; swirl to coat. Add half of coated chicken; sauté for 6 minutes or until done, turning to brown. Remove chicken from pan using a slotted spoon; drain on paper towels. Repeat the procedure with remaining 1 tablespoon canola oil and coated chicken.

3. Combine remaining 1 1/2 teaspoons cornstarch, remaining 2 tablespoons soy sauce, honey, and next 3 ingredients (through sambal oelek) in a microwave-safe bowl, stirring with a whisk until smooth. Microwave at HIGH for 1 1/2 minutes or until slightly thick, stirring twice. Stir in garlic. Combine soy sauce mixture, chicken, peanuts, and celery; toss to coat chicken.

4. Toast tortillas under broiler or on a griddle until lightly blistered, turning frequently. Place 2 tortillas on each of 4 plates; divide chicken mixture evenly among tortillas. Top each taco with green onions and bell pepper strips; serve with lime wedges.

*****

I used chicken breasts instead of thighs because it's what I had on hand. That was my only change, though. We LOVED the taste of the chicken, but we did not like it in the tortillas. I had even bought fresh corn tortillas from a nearby Hispanic market, and we just didn't like it in the tortillas. The actual Kung Pao Chicken was FANTASTIC. There were no leftovers--we devoured every single bite, it was that good. This is definitely something I'll be making again, but I'll skip the tortillas in the future!


Sunday, November 18, 2012

Coconut Chicken Satay


My baby boy turns four tomorrow. I just cannot believe it. I say it every year, but I really just can't believe it. I've been running around like a madwoman for the past few weeks getting stuff ready for his party that we had yesterday. I don't know how I always end up busy lately. My brother and his girlfriend are in town for the weekend, and they went on a hike this morning, the husband took Boy #1 out for some quality daddy time, so it's just Boy #2 and me hanging out while he plays with his loot of toys from his friends yesterday. So I thought it was a perfect time to work on my blog.

I know I'm so far behind (hey, but at least I won't go a whole month without posting!), so I will work my way backwards I guess. Mostly because the most recent new recipe I tried was awesome and worthy of sharing.

Boy #2's preschool teacher emailed me recently that she'd stumbled across my blog and wanted to let me know about a website she loves, 100 Days of Real Food. I had seen it before, but I had forgotten about it and certainly didn't have it in my food blog rotation that I usually check when I'm looking for new ideas. So I decided to see what all I could find on there. Turns out there was a ton, and I think after Thanksgiving we are going to start with the 10 day challenge and see how it goes. Shouldn't be too hard because we already don't eat many processed foods, but I'm excited for the challenge to see what more we can give up. This was one of the meals I chose from it for last week's meal plan.

Coconut Chicken Satay
Source: 100 Days of Real Food website

1 lb chicken breasts, preferably locally and/or organically raised
1/2 cup peanut butter
1/2 cup unsweetened whole coconut milk
1 tablespoon + 1 teaspoon fresh-squeezed lime juice
1 tablespoon rice wine vinegar
1 tablespoon honey
3 cloves garlic
1/2 fresh jalapeno, seeds & stem removed (use the other half to make some overnight refried beans…yum!)
1/8 teaspoon chili powder
1/3 cup unsweetened shredded coconut, lightly toasted (note: coconut can burn quickly and needs to be stirred/checked frequently while toasting…we do ours in the toaster oven for no more than 2 or 3 minutes)
Also need: skewers and foil lined baking sheet


Preheat the oven broiler on high. Soak skewers in water if you don’t want them to cook/burn in the oven.

Cut the chicken breasts into strips and thread them onto about a dozen skewers. Place the prepared skewers on a foil-lined baking sheet and set aside.

In a food processor or blender puree the peanut butter, coconut milk, lime juice, vinegar, honey, garlic, jalapeno, and chili powder together. Remove 1/4 cup of the peanut mixture and drizzle/brush it over the raw chicken skewers.

Place chicken under the broiler to cook. After 4 – 5 minutes take the baking sheet out, turn the skewers over, drizzle another 1/4 cup peanut sauce on top, and cook for 4 or 5 more minutes or until cooked all the way through.

Once the chicken is done take it out, drizzle on the remaining peanut sauce (or serve it as extra dipping sauce on the side), and sprinkle the toasted coconut on top. Serve warm and enjoy!

*****

We had this on a Wednesday night, which is when we lead a Bible study group for our church. I ended up getting a late start on it, so I didn't get to eat with my family because I had to go pick up our babysitter. The husband texted me that it was fantastic and they all loved it. I ate it when I got home, and it was super tasty! It was really easy to do and came together fast, which was great. I think my boys enjoyed the novelty of eating dinner off a stick. I skipped the jalapeno in the sauce because my kids don't like spicy, and I thought it still had good flavor without that. I did add a little extra chili powder to compensate for the missing jalapeno. I ended up having another skewer as a snack the next day. This is definitely going into my meal rotation since it was a hit with all of us!

Oh, I should note that I had an awful time finding unsweetened coconut. I finally found it at Fry's, which is a Kroger grocery store for those of you out of state, but it was tucked behind a display for something else. Sheesh. Hopefully you don't have such an awful time getting ahold of some!


Saturday, October 20, 2012

Jam Stuffed Biscuits


Normally I try to avoid buying processed foods and stick with foods that I can easily pronounce all of the ingredients, but I'm a sucker for a few things that I will buy on occasion. Like Grands biscuits. I can't help it, they're so flaky and delicious. My grocery store recently had them on sale for super cheap, so I bought quite a few. Well, I think I bought three. But that seemed like quite a few. I didn't really know what I was going to do with all of them, so I looked on the Pillsbury website for ideas. I saw this recipe and thought my kids would love it and it would be a quick breakfast. I love quick breakfasts...I'm not not a morning person, but I definitely prefer things to be easy in the morning so we can get out the door and take Boy #1 to school.

Jam Stuffed Biscuits
Source: Pillsbury.com


1 can (16.3 oz) can Pillsbury® Grands!® Flaky Layers refrigerated biscuits
1/2 cup jam or preserves of your choice
1/2 cup butter, melted
1/2 cup sugar

Heat oven to 400°F. Spray large cookie sheet with cooking spray.

Separate dough into 8 biscuits. Gently separate each biscuit halfway into 2 layers. Spoon 1 tablespoon jam into center of each biscuit. Pinch edges to seal.

Dip each biscuit into melted butter; dip each in sugar. Place on cookie sheet. Bake 14 to 16 minutes or until golden brown around edges.

*****

These were a huge hit at my house. My kids loved them and so did the husband. I used homemade peach jam inside this biscuits, and it was super tasty. I'd definitely make these again. They were even easy for a school morning!


Green Chile Pork Stew


There's quite a back story on this recipe. Well, maybe not. That makes it sound a lot more dramatic than it actually is. When Boy #1 was six months old I joined a local chapter of MOMS Club. I'm sure I've talked about it before. It was a huge lifesaver for me for many reasons. I was definitely a workaholic before he was born and then quit to be a stay at home mom when my maternity leave was done. We had moved to a different part of Phoenix when I was pregnant, so all of my friends with kids lived at least 30 minutes away, and everyone else I knew worked. It was a rough transition A friend on the east coast suggested I look into finding a MOMS Club chapter near me to meet other mamas. So I did. And I found one. There were several other women with babies around Boy #1's age, plus a lot of moms with older kids who gave great advice and knew exactly what I was going through. I had a lot of my identity in my career and what I had done, so it was a HUGE change to not have that define me anymore.

This is a lot more deep than I intended to get...sorry about that. The whole point was that one of the monthly activities was a cooking club, where the coordinator would pick a theme and everyone would bring a dish that fit the theme. There was a sandwich one, one to bring something with apples, cookies, and a soup one. I know there were more, but those are the ones that stick out. My friend Aimee brought a delicious green chile pork stew to the soup cooking club, and I've thought about it ever since then. Keep in mind the boy was maybe seven or eight months old at this point, and he'll be seven this coming February. I'm not lying when I say I've thought about it for years. I don't know why I never made it. Then recently I found pork stew meat on sale for super cheap...and of course I couldn't find the recipe. So I posted on her Facebook wall. Our mutual friend Mary saw it and found the recipe and sent it to me (God bless her!). I happened to have some roasted Hatch chilies in my freezer that I wanted to be using, so obviously all signs pointed towards me making this stew.

Wow, that was a really long explanation for a pretty simple soup recipe!

Green Chile Pork Stew
Source: Adapted from my friend Aimee

2 teaspoons olive oil
1/2 pound pork loin -- cut into 1/2-inch chunks and remove all visible fat
3 small garlic cloves -- finely minced
1 red onion -- finely chopped (optional)
2 tablespoons flour -- preferably masa flour
2 tablespoons cornstarch
4 tablespoons water
28 oz. New Mexican chiles -- roasted, peeled, seeded, and finely chopped
1-2 tablespoons chopped jalapeno pepper -- optional and preferably fresh
1 teaspoon cumin
1/8 teaspoon salt
1/8 teaspoon white pepper
2-3/4 cup chicken broth
2 large fresh tomatoes -- pureed (or peeled and chopped)

In dutch oven, heat olive oil over medium-high heat. Saute pork until all pink is gone (about 5 minutes). Move meat aside and add garlic and onion. As soon as garlic sizzles, stir together with pork.

In a small bowl, make thickener by adding water to flour and cornstarch. (Add another tablespoon of cornstarch and a tablespoon of water if you prefer a thicker sauce, but wait until later in the cooking to decide if the texture is what you want, or you may accidentally make it too thick.) Add mixture to dutch oven.

Add chiles, spices, chicken broth to pot. Bring to a low boil, then reduce heat and add tomatoes. (puree the tomatoes if you like a very smooth sauce; peel and chop 'em if you like more texture). Simmer on very low heat, covered, for at least 1 hour.

(Makes 4 good-sized servings) Freezes very well.

*****

The original recipe called for using the crockpot, but I think I ran out of time to do it...or figured if I was already dirtying pans, why dirty the crockpot too. The husband and I thought this was fantastic. I didn't bother having my kids try it because it was really spicy, and I knew they wouldn't like it. This was really easy to throw together, especially since I had pork stew meat, so I didn't even have to cut up the meat. I would definitely make this again for the husband and me to eat!