Thursday, March 22, 2012

Pesto Pasta with Chicken Sausage and Roasted Brussels Sprouts


You know what I love about Thursdays? My house is clean from having bible study here last night which means I can pretty much do whatever I want on Thursday! Woo hoo!! Granted I should unload the dishwasher and move the dirty breakfast and lunch dishes into it, but that doesn't sound fun and updating my blog does.

This, of course, came to me via Pinterest. Actually I had pinned it multiple times which I took to be a sign that I needed to make it. I happened to be at a natural grocery store a few weeks ago, and they happened to have chicken sausage AND fresh brussels sprouts on sale. Another sign, right?! I bought both of them and made this shortly thereafter.

Pesto Pasta with Chicken Sausage and Roasted Brussels Sprouts
Source: Adapted from Gimme Some Oven blog via Pinterest.com

1 lb fresh brussels sprouts, ends trimmed and any yellowed/browned outer leaves removed, then sliced in half
3 Tbsp. olive oil, divided
1/2 tsp. Kosher salt
1/2 tsp. freshly-ground black pepper
1 lb orecchiette pasta
4 chicken sausage links
5 cloves garlic, peeled and thinly sliced
1/3 cup pesto
Parmesan cheese, for serving

Preheat oven to 400 degrees. Spread brussels sprouts on a rimmed baking sheet. Drizzle with 2 Tbsp olive oil, salt, and pepper. Stir around until well combined. Roast for about 20-30 minutes, stirring once partway through, or until they are crispy on the outside and cooked on the inside. Remove from oven and set aside.

Meanwhile, heat the remaining olive oil in a skillet over medium-high heat. Add the sausage and cook, turning occasionally, until nearly-browned, about 6-8 minutes. Remove from pan, slice, and add back into skillet to brown sliced sides. Add the garlic, and continue cooking for another 1-2 minutes until the garlic is fragrant and the sausage is browned.

Cook the pasta according to the package directions. Once the pasta is cooked, drain the water (reserving 1/4 cup pasta water), and then toss together the pasta, pesto, cooked sausage and garlic, and brussels sprouts. Add in some of the reserved pasta water if needed for extra moisture.

Serve warm, and sprinkle with freshly-grated Parmesan cheese.

*****

I always, always, always forget to reserve pasta water. Even the times (like this one) when I tell myself constantly while cooking that I need to remember to reserve some of it, I never think of it. Well, I think of it but only once all the water has been poured down the drain. Ugh. I added in some chicken broth to make up for it, but I think the pasta water would have been better.

My family was mixed on this. The kids liked it well enough (brussels sprouts are one of their favorite veggies), the husband and I really liked it. Even the leftovers were good the next few days for lunches. I'd definitely make this again, and it would be fun to play around with different sausage flavors, too. I used a chicken apple sausage, which was tasty, but I bet you'd get good results with an Italian or even a spicy Italian sausage. Yum!


These brussels sprouts were ridiculously big. I think they were the size of Boy #1's fist!

Tuesday, March 20, 2012

Turkle Burgles


We were on a spring break trip in CA last week, and the husband pointed out that I hadn't updated my blog in awhile. I knew he was right, so today I decided to make blog updating a priority. and then I got distracted by Pinterest and going through my picture folders to see what exactly I wanted to blog about, so now I only have time to do one post instead of the two or three I had planned. Oh well! I was amazingly efficient today, so let's hope that carries over to tomorrow. Of course, it helps that Boy #2 is being entertained by an alphabet/phonics video.

This isn't anything we've had recently, but it's super yummy, and Boy #1 keeps talking about them, so I figured I should write a post about them. I have no idea where the name of this came from, but it's something my family has always eaten, especially with leftover Thanksgiving turkey. The sandwiches are so easy to put together, and really tasty! Hey, if my six year old asks for them repeatedly, you know it has to be something good! he even took them for his lunch, cold!

Turkle Burgles
Serves 4

4 hamburger buns or sandwich rolls (I use Oroweat Sandwich Thins)
8 slices cooked bacon
8 slices turkey (or enough for four sandwiches)
4 slices cheese
Thousand Island salad dressing (or homemade with mayo, ketchup, and relish)

Heat broiler. Toast hamburger buns. Place bottom half of buns on a cookie sheet. Top with 2 slices of turkey, 2 strips of bacon (I tore mine in half to get more bacon coverage), and slice of cheese. Place under broiler until cheese begins to melt. Spread dressing on top half of bun and top sandwich.

*****

Seriously, the hardest part of these was mixing up my own Thousand Island dressing. We had these a couple nights in a row when we had leftover turkey after the holidays because 1) they're so easy to put together, and 2) we all loved them. I'm sure they could be made using turkey lunchmeat, too, if you didn't have any leftover turkey meat, I've just always had them with leftover turkey.

Typing this out and looking at the pictures almost makes me want to find a turkey to cook...almost!


Tuesday, February 28, 2012

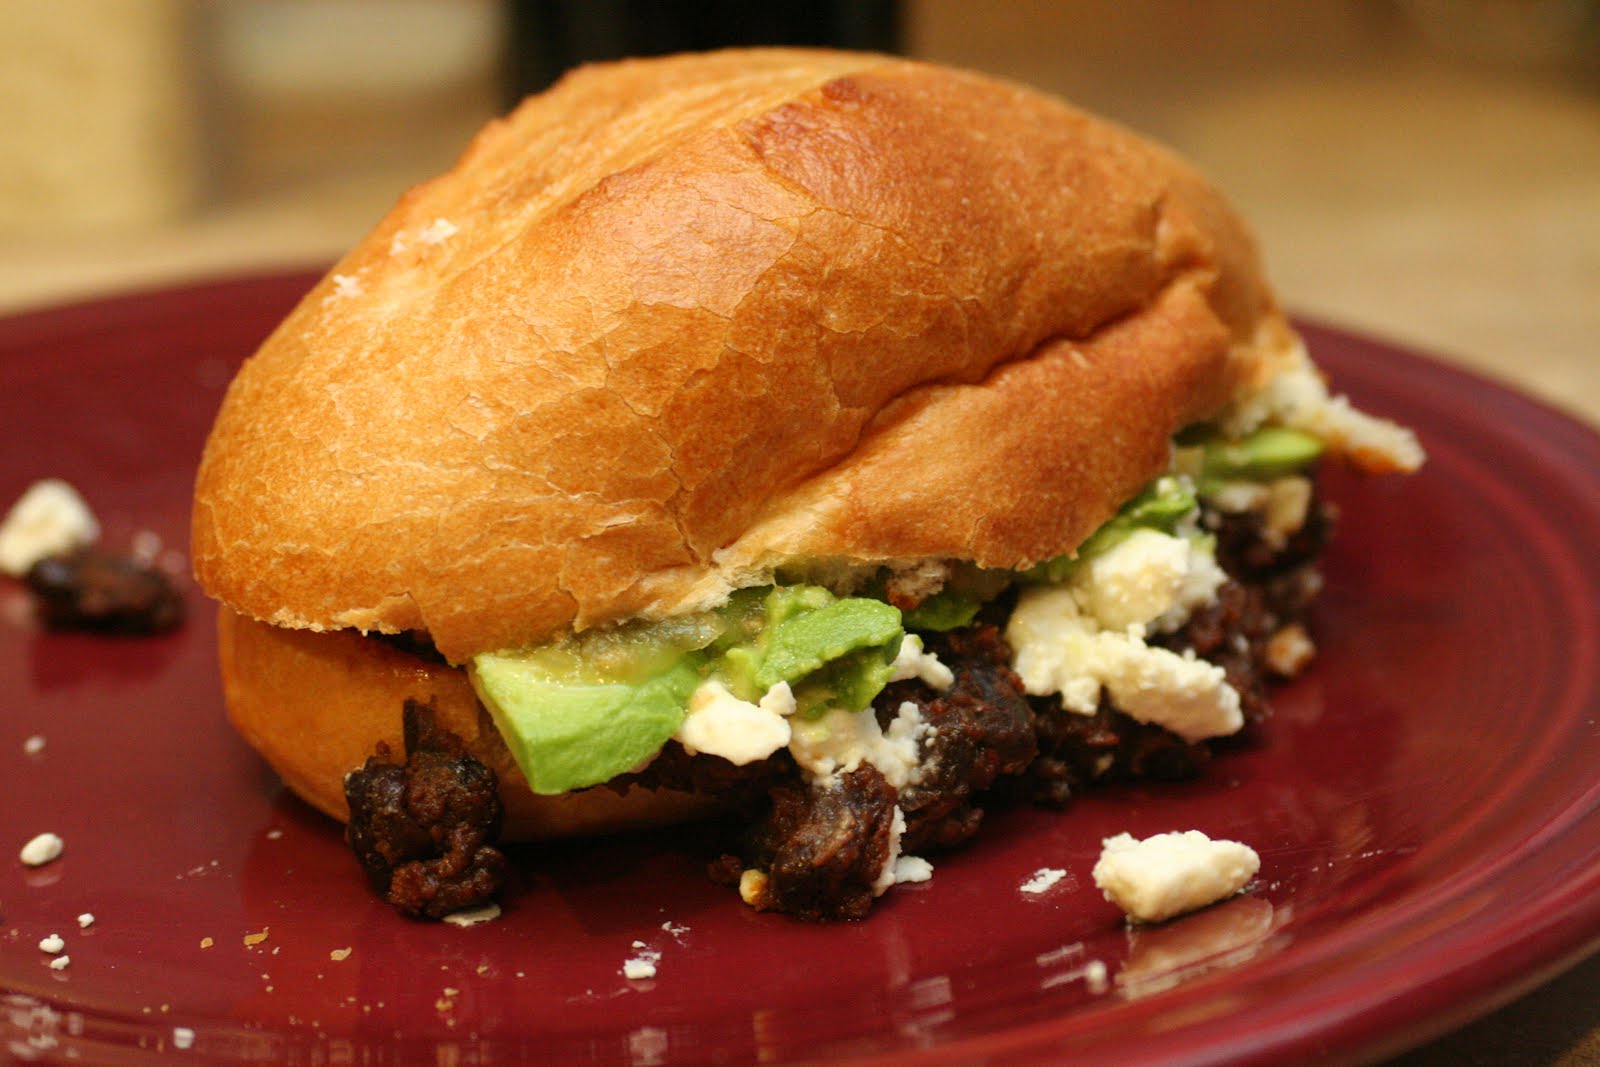
Rick Bayless Crusty Chorizo and Black Bean Subs


This isn't a new recipe, but my original post just had pictures taken with my cell phone. the husband and I had this for our date night dinner last week, so I seized the opportunity to get some new, better pictures of it. This is hands down one of my favorite sandwiches ever. The husband might not like me sharing this, but after we finished our sandwiches, he went into the kitchen and made a bite sized sandwich with some of the bread I tore out of the middle of the rolls. Yeah, it's that good. I normally make my own tomatillo salsa to go with these, but I knew I had some salsa verde in the fridge, so I just used that this time.

I know this is already on my blog, but I feel like it needs a new entry with the better pictures. So, here's the recipe again!

Crusty Black Bean Chorizo Subs
aka Tortas de Chorizo y Frijoles Negros
Copyright 2005, Rick Bayless' Mexican Everyday

8 ounces fresh Mexican chorizo sausage, casing removed (about 1 cup)
3-4 Tbsp vegetable or olive oil (divided use)
Two 15-ounce cans black (or other) beans
Salt
4 bolillo rolls, crusty French rolls or submarine sandwich rolls (6-7 inches long, 3 inches wide)
6 ounces queso fresco or other fresh cheese such as feta or goat cheese, sliced 1/4 inch thick
1 ripe avocado, pitted, flesh scooped from the skin and cut into 1/4-inch slices
3/4 cup Roasted Tomatillo Salsa (recipe to follow)

Set a large 12-inch skillet over medium heat and add the chorizo. Cook, breaking up the clumps, until browned and thoroughly cooked, about 8-9 minutes. Add 1-2 Tbsp of the oil (depending on how much fat the chorizo has rendered) and the beans. As the beans come to a simmer, mash them to a smooth paste with a Mexican bean masher, old-fashioned potato masher or the back of a large cooking spoon. Cook, stirring nearly constantly, until the consitency of very soft mashed potatoes--expect about 10 minutes after adding the beans. Taste and season with the salt if you think necessary. Keep warm over the lowest heat, covered to keep the beans soft and moist.

Heat a large griddle or skillet over medium. Slice the rolls open. use fingers or a spoon to scrape out some of the soft bread in the center of each half, making a small hollow. Brush the insides with the remainig 2 Tbsp oil, then lay them cut side down on the griddle or skillet to crisp to a rich golden brown, about 3 minutes.

Smear about 1/2 cup of the chorizo-bean mixture over the bottom half of each roll. Top with slices of the cheese and the avocado. Spoon on the salsa or dash on the hot sauce. Set the top of each roll i place, and you're ready to serve.

Roasted Tomatillo Salsa
Copyright 2005, Rick Bayless' Mexican Everyday

4 medium (8 ounces total) tomatillos, husked, rinsed, and halved
2 large garlic cloves, peeled
Hot green chiles to taste (2 serrano or 1 jalapeno), stemmed and roughly chopped
About 1/3 cup (loosely packed) roughly chopped cilantro
1/2 small white onion, finely chopped
Salt

Set a large nonstick skillet over medium-high heat. Lay in the garlic and tomatillos, cut side down. When the tomatillos are well browned, 3-4 minutes, turn everything over and brown the other side. The tomatillos should be completely soft.

Scrape the tomatillos and garlic into a blender or food processor and let cool to room temperature, about 3 minutes. Add the chiles, cilantro, and 1/4 cup water. Blend to a coarse puree. Pour into a salsa dish and thin with a little additional water if necessary to give the salsa an easily spoonable consistency.

Scoop the chopped onion into a strainer and rinse under cold water. Stir into the salsa. Taste and season with salt, usually about 1/2 tsp.

*****

I don't really need to say anything about these because I already have. So delicious!!!


Muffin Mix

I've been on a huge muffin kick lately. I found a recipe from an online friend for zucchini, carrot, raisin muffins (recipe coming at some point). I sent her a note saying I was making them, and she told me that she makes muffins every week for her kids to have for breakfast. I thought it was genius! Especially the next day when all I had to do was throw a muffin, some fruit, and some yogurt on a plate for each of my kids. Voila! breakfast was ready. I don't handle breakfast well. I'm not always caffeinated when my kiddos want to eat, and a lot of times there are fights about what they're going to have. But no one fought the muffins! I mentioned this at one of my bible study groups, and my friend Sarah said she had a recipe for an all-purpose muffin mix, that you just mix up a huge batch and keep it in the pantry or freezer and pull from it as needed and mix in all sorts of things to make different kinds of muffins. Genius!! I copied it down immediately and mixed it up the next day. I just used the last of my mix this morning (well, almost...there's maybe 1/2 a cup left in the container I was storing it in) and figured it was high time to type out the recipe so I didn't always have to look for my scrap of paper on which the recipe is written when I want to make these up. I'll have to mix up some more tomorrow--I don't want to be without my mix!

Sarah's Muffin Mix
Source: My friend Sarah (who runs full marathons!)
Yield: 4 batches of muffins

8 cups flour
3 cups sugar
3 T. baking powder
2 t. salt
2 t. cinnamon
2 t. nutmeg

Combine above ingredients. Store in pantry or freezer up to six months.

For each batch of muffins:

2-3/4 cups muffin mix
1 egg
1 cup milk
1/2 cup butter, melted

Place muffin mix in bowl. Whisk egg, milk, and butter together and stir into dry ingredients. Include whichever mix-ins below (mix any dry ingredients in with mix, wet ingredients or fruit into wet ingredients or at the end). Fill muffin cups 3/4 full. Bake at 400 degrees for 18-21 minutes.

Add-Ins:
Banana: 1 cup mashed bananas
Cranberry Pecan: 1 cup chopped cranberries, 1/2 cup chopped pecans, 3 T. sugar
Cappuccino: 1 cup mini chocolate chips, 2 t. instant coffee granules
Apple Cheese: 1/2 cup shredded apple, 1/2 cup colby jack cheese
Blueberry: 1 cup blueberries
Carrot Raisin: 3/4 cup shredded carrots, 1/3 cup golden raisins

*****

Sorry if the directions for when to mix in what are vague. I didn't copy that part down because it all seemed self-explanatory to me. For most of the varieties I think I'd mix everything in at the end, except the banana I'd mix in with the wet ingredients, the coffee granules I'd mix in with the dry ingredients. I think that's it.

So far I've made blueberry muffins, chocolate chip muffins, and this morning I made banana chocolate chip. I know, I'm fancy. I think the banana chocolate chip have been our favorite so far. I'm dying to try the apple cheese, but my kids ate all the apples I bought last time at the store. I'm also looking forward to the carrot raisin--I LOVE carrot raisin muffins!

I did make a few substitutions to the mix recipe. I used half whole wheat flour and half all-purpose flour. I also cut the sugar down to 2.5 cups. Three cups seemed like a lot (I think I figured it out to be about a tablespoon per muffin if your batch made 12 muffins...mine usually made 18-24 though), and plus the day I went to mix it up I only had 2.5 cups of sugar on hand. I figured I'd try it and see how it turned out. Now I think I'll keep it that way. I had meant to add in some ground flax seed to the mix but forgot when I mixed it up and then kept forgetting each time I make a batch.

This was super, super easy and it's so nice to have on hand! I've even made muffins first thing in the morning when I get up to have for breakfast if we were out, and it wasn't time consuming at all. My kids don't even mind waiting a little longer for breakfast knowing they're going to get a tasty warm muffin out of the deal!

If you make these and try any other variations that you love, leave me a comment and let me know what they were!

Hmnmm...apparently in all the batches of muffins I've made, I haven't taken a picture of any of them. Next time!

Baked Sweet and Sour Chicken


It's 7:30 in the morning right now which is by no means an optimal time at my house for me being on the computer, but this dinner last night was so good that I couldn't wait! Plus my kids are upstairs (supposedly getting dressed, but I think in actuality they're watching Pink Panther cartoons) and I'm waiting for my coffee to cool off a bit, so I figured I might as well jump on the computer. I'm sure I'll regret it when I'm scrambling an hour from now to get us out the door. Oh well.

This, of course, came from Pinterest. Boy #1 LOVES sweet and sour chicken when we get Chinese take-out, so I thought he'd be all over this. I was going to make it one night last week until I saw it had to bake for an hour and knew that just wasn't going to fit into the time frame I had to prepare dinner that night. Boy #1 was disappointed, but he was super excited to come home from school yesterday and find out we were having it last night.

Baked Sweet and Sour Chicken
Source: Life As A Lofthouse blog via Pinterest.com

The chicken coating:
3-4 boneless chicken breasts
salt + pepper
1 cup cornstarch
2 eggs, beaten
1/4 cup canola oil

The sweet and sour sauce:
3/4 cup sugar
4 tbs ketchup
1/2 cup vinegar
1 tbs soy sauce
1 tsp garlic salt

Start by preheating your oven to 325 degrees. Rinse your chicken breasts in water and then cut into cubes. Season with salt and pepper to taste. Dip chicken into the cornstarch to coat then dip into the eggs. Heat your 1/4 cup oil in a large skillet and cook your chicken until browned but not cooked through. Place the chicken in a 9x13 greased baking dish. Mix all of your sweet and sour sauce ingredients in a bowl with a whisk and then pour evenly over the chicken. Bake for one hour and during the baking process you will need to turn the chicken every 15 minutes.

*****

I have to say that this was pretty time consuming to make. It took me awhile to find a groove with the breading/egg wash/frying. Eventually I figured out to move a batch to the egg wash once I had put a batch in the skillet and start a new batch then in the cornstarch. When I flipped the chicken in the skillet, I flipped the chicken pieces in the egg wash, then they were ready to go once I took the skillet batch out. Did you follow that? I also had to adjust the cooking time and temperature. My chicken took longer to thaw than I anticipated, and we had to eat at a certain time last night. I ended up baking it for 30 minutes at 375, and it turned out great. I stirred it around once during baking and then again once it came out of the oven.

We all really liked this. REALLY liked it. Boy #1 is taking the leftovers in his lunch today. The husband and I were both standing over the baking dish taking bites last night once we were done eating. My only real concern with it was the 3/4 cup of sugar in the sauce. It seems like a lot. Next time I may try to scale that back a bit and see what happens. This is definitely something I'll make again, I'll just be sure to allow enough time for all the steps!

Wednesday, February 22, 2012

Pimento Cheese Stuffed Chicken Breasts


I was going back through the pictures for my blog to see what I hadn't posted about yet and couldn't believe I hadn't done this one! This came from our no carb week a few weeks ago. I found it on Pinterest.com and thought it looked awesome--and low carb! I'm pretty much a sucker for anything pimento cheese, so I knew we had to have it. Oh yeah, and it had bacon in it. Sign me up!

Pimento Cheese Stuffed Chicken Breasts
Source: Weight-Watchers-Recipes.net via Pinterest.com

1 slice applewood-smoked bacon
3/4 cup shredded cheddar cheese
2 tablespoons minced green onions
1 1/2 tablespoons diced pimientos
1 tablespoon canola mayonnaise
2 teaspoons fresh lemon juice
1/2 teaspoon hot sauce
1/2 teaspoon salt, divided
4 (6-ounce) skinless, boneless chicken breast halves
1/2 teaspoon black pepper
1 tablespoon canola oil

Directions:

1. Preheat oven to 350°.

2. Cook bacon in a large ovenproof skillet until crisp. Remove bacon, reserving drippings in pan; crumble bacon. Combine bacon, next 6 ingredients, and 1/4 teaspoon salt. Cut a 1-inch-wide slit into the thick end of each breast half; carefully cut down to the center of chicken to form a deep pocket. Divide cheese mixture evenly among pockets. Secure with wooden picks. Sprinkle chicken with 1/4 teaspoon salt and pepper.

3. Heat pan over medium-high heat. Add oil to drippings. Add chicken to pan; saute 4 minutes. Turn chicken over. Bake at 350° for 12 minutes; let stand for 5 minutes.

Makes 4 Servings

Nutritional Info Per Serving: Calories 204, Carbs 20 g, Fat 11 g, Fiber 3 g, Protein 7 g

*****

I changed this up just slightly, like by adding more bacon. Actually I was making another dish that used bacon, so I cooked up quite a bit to be included in both dishes. I love cooking things in bacon grease. I'm sure it's a fast track to a heart attack, but it's so delicious. This recipe worked out great with the dish I had planned to go with it because there were a lot of similar components. Don't you love when that happens?!

This was something we all really loved, and I will definitely make it again. Ooey, gooey cheese and bacon and bacon drippings?! Hells yeah!

Thursday, February 2, 2012

Chinese Five Spice Turkey Lettuce Wraps


I'm super multi-tasking this afternoon...sitting here with hair color in my hair (my roots were in a sorry state of affairs), updating my blog, and watching the most recent Glee episode. Oh, how I love me some old school Michael Jackson!! I also love Aggie's Kitchen (how's that for a transition?!) and was excited when she recently posted this recipe. When we did our low carb week last week, this was the first dinner I planned. I love lettuce wraps but hadn't ever made them myself. They fit the low/no carb diet perfectly, though.

Chinese Five Spice Turkey Lettuce Wraps
Source: Aggie's Kitchen website

1 lb ground lean turkey breast
1 medium red onion, chopped small
3 garlic cloves, minced
1 inch piece of ginger, peeled and minced
1 carrot, chopped small
2 tablespoons chopped water chestnuts
1 1/2 teaspoon 5 Spice Powder
2 teaspoons low sodium tamari (or soy sauce)
3 teaspoons rice vinegar
2 teaspoons black bean sauce
1 teaspoon agave or honey
chile garlic or chile sauce (like sriracha), for serving
Boston or iceberg lettuce leaves, washed and dried
shredded slaw mix (optional)
chopped green onions (optional)

Heat a nonstick skillet over medium heat. Coat pan with cooking spray and add onion and carrot. Cook for about 3-4 minutes, add ground turkey. Using a wooden spoon, break up ground turkey and sprinkle 5 spice powder over meat. Continue to cook until cooked through completely, about 7 minutes.

While turkey is cooking, combine tamari, rice vinegar, black bean sauce, agave, ginger and garlic in a small bowl. Add to ground turkey during the last few minutes of cooking and stir until all combined.

To serve scoop ground meat mixture into lettuce leaves, top with slaw mix, green onions and chili sauce.

*****

I couldn't find black bean sauce, so I substituted hoisin sauce. These were super tasty!! My kids got a little frustrated trying to keep the lettuce wrapped around the filling, so they resorted to just eating the filling and lettuce separately. I'm glad I finally made these...they are definitely something we'll eat on a regular basis!

Thursday, January 26, 2012

No Carb Pizza


Last week the husband suggested to me that we have a no carb week this week. He went to Mississippi to visit his best friend and knew he'd be over indulging. Last year we started the year off with a no carb week, but this year we were running a half marathon on January 15th, so going without carbs the first week of the year was going to be more detrimental than helpful. Since we both tend to get tired of the no carb thing quickly I chose all new dinner recipes to try and keep it exciting for us. Enter Pinterest.com. I did a search on low carb meals and came up with a bevy of ideas. Some have been good, some have been okay, nothing has been awful. I've had an easier time this week than in times past cutting out carbs, maybe because I'm more used to doing it now? I don't know. Or maybe I know we're just doing it through Monday, so the end is near already.

Anyway, the husband and my kiddos love pizza. I'm a fan, but I'm not a pizza monster like the three of them are. This sounded intriguing...pizza with no carbs in the crust? But I figured it was worth a try.

No Carb Pizza
Source: AccidentalMommies.com via Pinterest.com

For the crust:
1 (8 oz.) package of full fat cream cheese (room temp.)
2 eggs
Freshly ground black pepper
Garlic powder
1/4 cup grated parmesan cheese

For the pizza:
1/2 cup marinara sauce
1/2 teaspoon oregano
1 cup shredded mozzarella cheese
Sauteed pepperoni
Garlic powder

For the crust:
Preheat oven to 350.
Butter a 9×13 baking dish
Blend cream cheese and eggs and season with pepper & garlic powder
Add parmesan cheese and stir until combined
Pour into buttered baking dish
Bake for 17 minutes or until golden brown
Let crust cool for 10 minutes before adding toppings
After crust is cooked, raise oven to 400 degrees

For the pizza:
Mix together marinara sauce, garlic powder, & oregano
Top crust with marinara and spread evenly
Top with mozzarella cheese
Add toppings
Bake for 8 minutes or until cheese is bubbly

*****

I was pretty skeptical when I pulled the "crust" out of the oven, and I was a bit worried because my universal dinner back-up plan of Little Ceasar's pizza wouldn't work with no carbs. But I forged ahead praying and crossing my fingers it would at least be edible. And you know what? It was actually pretty awesome. Boy #2 wasn't sure about the crust at first and just ate the toppings, but once the husband told him it was cheese and eggs, he was completely on board with it. There was none of this left by the time dinner was done. The husband said he'd even eat it when we were doing no carbs! I used turkey pepperoni as the only topping. It didn't even occur to me to put anything else on it, but I think next time I'd add some veggies or a second meat to make it slightly more filling. this will definitely grace our table again!

Skillet Rosemary Chicken


I've been lazy about uploading pictures to my computer from my camera, and I finally decided today is the day while Boy #2 is engrossed in watching Cars 2 (or "Cars Soup" as he calls it for some reason). We had this one night last week, and it was amazing. I can't believe that didn't motivate me to get these pics uploaded earlier!

This was another Pinterest recipe, but I'd forgotten about it until my BFF made it recently. I thought it looked delicious, yet familiar, when she posted it on her blog. sure enough, I had it pinned as well. I already had chicken thighs on hand from making gumbo a couple weeks ago. I've wanted a cast iron skillet for awhile and finally put one on my Christmas list this year. My awesome little brother came through and got one for me. It was kind of funny because he also got me a cover for the handle, and they were each wrapped separately. I opened the handle cover first and was really confused, then it all made sense once I opened the skillet. I'd been looking for a way to break it in and decided this was the recipe!

Skillet Rosemary Chicken
Source: Minimally Invasive website via Jen's blog and Pinterest.com

3/4 pound small red-skinned potatoes, halved, or quartered if large
Kosher salt
2 sprigs fresh rosemary, plus 1 1/2 tablespoons leaves
2 cloves garlic, smashed
Pinch of red pepper flakes
Juice of 2 lemons (squeezed halves reserved)
2 tablespoons extra-virgin olive oil
4-6 skin-on, bone-in chicken thighs (6 to 8 ounces each)
10 ounces cremini mushrooms, halved

Preheat the oven to 450. Cover the potatoes with cold water in a saucepan and salt the water. Bring to a boil over medium-high heat and cook until tender, about 8 minutes; drain and set aside.

Pile the rosemary leaves, garlic, 2 teaspoons salt and the red pepper flakes on a cutting board, then mince and mash into a paste using a large knife. Transfer the paste to a bowl. Stir in the juice of 1 lemon and the olive oil. Add the chicken and turn to coat.

Heat a large cast-iron skillet over medium-high heat. Add the chicken, skin-side down, cover and cook until the skin browns, about 5 minutes. Remove chicken from pan; add the mushrooms and potatoes to the skillet, place chicken over mushrooms and potatoes and drizzle with any marinade remaining in the bowl and the juice of the remaining lemon.

Add the rosemary sprigs and the squeezed lemon halves to the skillet; transfer to the oven and roast, uncovered, until the chicken is cooked through and the skin is crisp, 20 to 25 minutes.

*****

I was a little nervous using my cast iron skillet for the first time, but I didn't need to have been. I loved how easy it was to go from the stove top into the oven. Granted I have other pans that can do that, too, but there was just something timeless about using cast iron for this. The chicken browned beautifully, and then the potatoes and mushrooms turned out amazing with the marinade and chicken fat dripping on them. YUM. The husband and I really loved this. Boy #1 freaked out about the chicken being on the bone, but once we took care of that for him he ate all of his dinner. Well, not the potatoes or mushrooms because he doesn't like either of those, but I happily ate them for him. This is definitely something I'll make again! Easy, relatively fast, and super tasty!!

Wednesday, January 18, 2012

The Best Ever Chocolate Chip Cookies


I've been making these chocolate chip cookies since I was in college, and I could not believe that I have never put the recipe here on my blog. These are without a doubt the BEST chocolate chip cookies ever. Well, my friend Kelly makes some tasty chocolate chip cookies, too, but aside from hers these are hands down my favorite. I don't even mind making them, and I generally hate making cookies. The recipe came to me from my college boyfriend's mom. Honestly when he and I broke up I was most disappointed that I would never have his mom's chocolate chip cookies again. Yeah...things had really gone downhill at that point since that was what disappointed me the most. His family also made the most delicious frozen margaritas, but I'd already learned how to make those. Anyway, I eventually put on my big girl panties and emailed his mom asking for the recipe. She was thrilled to hear from me and sent me the recipe. Haha..score! And I've been making them ever since. I used to make them really, really often and had the recipe memorized, but now since I don't make them all the time I have to pull out the recipe each time I want them. And I was reminded yesterday why I don't make them very often...I ate four of them almost immediately. I'm not proud of it, but damn they're tasty.

The Best Ever Chocolate Chip Cookies
Source: Susan, my ex-boyfriend's mom

1 cup white sugar
1 cup brown sugar
3 sticks butter minus about 2 tablespoons
2 eggs
2 teaspoons vanilla

Put ingredients in a bowl and cream really well. It will look yucky and then look like a thick whipping cream. I always start with everything right out of the refrigerator.

Add
3 cups flour
1 teaspoon salt
1 teaspoon baking soda

I don’t mix this too much, just enough to combine.

Then add chocolate chips (1-2 12 oz bags depending on taste) and pecans or walnuts.

Bake at 375 until done, about 10-12 minutes.

*****

I have found that 11 minutes is the optimal baking time for these cookies. They will look a little underdone at that point, but trust me when I say that's the best time to pull them out. Otherwise they're too crunchy. Not that they're bad then, but they're much better when they're soft in the middle. I don't ever add nuts to mine either, mostly because I don't have those nuts on hand, and I'm not really a fan of nuts in my cookies. I always mix these up in my Kitchenaid mixer because it's super easy to let it do all of the work. I think that's another reason I like this recipe--I don't end up dirtying a ton of dishes, and that's one of the big beefs I have with baking. Why does it seem to always produce more dirty dishes than just cooking?

Oh, and I really like milk chocolate chips in these, although the batch I made yesterday I used a bag of milk chocolate and half a bag of semi sweet chips that I had in my pantry.

Anyway, try these cookies. Now. You won't be disappointed. And if you make them and think your chocolate chip cookie recipe is better, send it to me! I'm down for a taste test!

This is also the only cookie dough I like to eat.

What's a plate of chocolate chip cookies without a glass of milk?!

Monday, January 16, 2012

Chicken and Spinach Pasta Bake


Ah, a quiet Monday afternoon. The husband and Boy #1 are off at a hockey game, Boy #2 is upstairs watching Dumbo, I took a power nap on the couch, rolled out some king cake dough, and decided to update my blog. I wanted to get laundry put away and clean up our toy room a bit, but since the boy is upstairs watching a movie I've decided to put all that off and deal with it later to enjoy some peace and quiet downstairs. Ahhh. I have to revel in it now because I know it won't last long!!

This was another new recipe we had for dinner this past week. I had limited grocery money to use, but I had a lot of the items for this on hand already. It came from (surprise, surprise) Pinterest. I love a good casserole and this one sounded really tasty. Pasta, chicken, spinach, and cheese? Sounds scrumptious! Oh, Pinterest, where would my life be if I hadn't discovered you. If my husband were answering that question I'm sure he'd come up with some witty comment about how our house would be clean, laundry would be done, and we'd eat dinner on time every night. But, he's not, so I'll go on with my Pinterest obsession fascination.

Chicken and Spinach Pasta Bake
Source: Adapted from Saving Money Living Life blog (found via Pinterest)

8 oz uncooked whole wheat rotini pasta
1 T olive oil
1 c chopped onion
1 (10 oz) pack frozen spinach, thawed
3 c cubed, cooked chicken breasts
1 (14 oz) can Italian-style diced tomatoes, drained
1 (8 oz) container Philadelphia chive & onion cream cheese
1 cup ricotta cheese
½ t salt
½ t pepper
1½ c shredded mozzarella cheese

Prepare pasta according to package directions. Spread oil on bottom of 9x13 baking dish; add onion in a single layer. Bake at 375 for 15 minutes or just until tender. Transfer onion to large bowl, set aside.

Drain chopped spinach well. Stir pasta, spinach, chicken, & next 5 ingredients into onion in bowl. Spoon mixture into dish & sprinkle evenly with shredded mozzarella cheese. Bake uncovered at 375 for 30 minutes.

*****

I only changed up the original recipe slightly. It called for rigatoni, but I like whole wheat pasta, but my grocery stores don't carry whole wheat rigatoni, so I used rotini instead. I also added in the ricotta because 1) I was worried it wasn't going to be creamy enough, and 2) I had some in the fridge that needed to be used up. Plus we're all about extra cheeses here at my house. The original recipe also called for baking it covered for 30 minutes and then uncovered for 15. I didn't want to wait that long to eat, and I really didn't see the point in it since all the parts were cooked already and it just had to combine and heat up. It worked out fine that way. if I had more time I might try it the original way to see how it compared.

This was a total hit with everyone in my family. The husband and I especially dug it, and Boy #2 had more than one serving. Boy #1 I guess was more lukewarm about it now that I think back to dinner that night, but he still ate most of his and didn't complain. No complaining about a dinner, I take that as a win. This is definitely something I would make again. The husband and I really enjoyed the leftovers for lunch the next couple days, too.


By the way, I calculated this to be 279 calories per serving, assuming seven servings (based on the portions I served myself and the husband).


Thursday, January 12, 2012

Mexican Lasagna


Happy New Year, everyone!! Are you excited about what 2012 has in store for you? I'm hoping it has more blogging in it for me. I've kind of decided to just go forward with my blog here and potentially not go back and fill in the missing posts I had wanted to do. I don't know...I can't decide. I figure I'll start current and then when I have some time I'll add in old ones here and there. Otherwise I just get too overwhelmed and don't do anything.

My childhood best friend posted on Facebook recently about calories for a Mexican lasagna she makes. I asked her for the recipe because it sounded tasty just from the title. She sent it to me, and I had most everything on hand already, so I put it into my meal plan for the week. Worked out great because I was low on grocery money this week. I was excited to try it--and that it was low cal! 2011 was the year I got fit, so now I'm really focusing on staying that way, so tasty and low-cal recipes that come highly recommended are fantastic!

Mexican Lasagna
Source: Adapted from my friend Sarah (who has a really funny blog about Jason Segel)

1.25 pounds ground turkey
1/2 onion, chopped
Salt
Pepper
Taco seasoning
28 oz can enchilada sauce
1 medium zucchini, shredded
1 red bell pepper, diced
1 package frozen spinach, thawed and drained
1 can refried beans
4 whole wheat tortillas
2 cups shredded Mexican blend cheese

Preheat oven to 400 degrees.

Brown ground turkey and onion in skillet with salt, pepper, and taco seasoning (no more than one packet...use however much you like to taste...or throw in random taco seasoning spices like chili powder, cumin, garlic powder, oregano, and paprika if you don't have actual taco seasoning). Pour enchilada sauce into skillet and add in vegetables (you can use others, too, whatever floats your boat or what you have on hand). Simmer.

In separate pan, heat can of refried beans.

Coat a 9x13 dish with cooking spray. Spread half of the turkey and vegetable mixture in the bottom of the pan. Top with half of the refried beans, spreading to cover as best you can. Top with two whole wheat tortillas, then half of cheese. Repeat layers.

Bake at 400 for 15 minutes. Cut into eight servings.

*****

I didn't change this a whole lot from how Sarah sent it to me, just added in more veggies and used flour tortillas instead of corn. I had intended on using corn originally, but I ran out of time to make them like I'd planned and didn't have any on hand, so whole wheat flour tortillas is what I ended up using. It worked out fine...I probably could have used a couple more so the tortilla layers were thicker, but no one complained.

This was super easy to put together and SO GOOD. Well, the husband and I both thought so. My kids weren't really fans. Boy #2 ate his up once I mixed some Greek yogurt (in lieu of sour cream, which we didn't have on hand) in it to cut the spice a bit. Boy #1 picked at his even with the yogurt mixed in, but he did end up eating a decent amount of his serving. I will definitely make it again.

Oh, and I calculated it to only be 310 calories per serving! Not bad at all--and it was so filling!


Monday, December 5, 2011

Slow Roasted Pork Shoulder


I am finally, FINALLY done with P90X!! There has been much rejoicing from me today, let me tell you. I need to have the husband take after pics of me so I can compare with the before pics to see how I improved. I'll post them on my fitness/weight loss blog once I have them. So now my afternoons are free to do things around the house (I'm fairly certain I've accomplished more in the hour Boy #2 has been napping than I have on most days total while doing P90X) and update my blog. Again, much rejoicing!

In one of my many recent catch-up posts, I once again professed my love for the Meal Planning 101 blog. As I was scouring it for recipes at one point I saw this one for a pork shoulder. Conveniently soon there after I found a pork shoulder on sale, so I figured I'd buy it and try this out. I had never been steered wrong from there before...don't you love finding blogs like that?!

Slow Roasted Pork Shoulder
Source: Meal Planner 101 blog

4 to 5 pound pork shoulder, bone-in
1 tbsp brown sugar
2 tsp cumin
1 1/2 tsp smoked paprika
1/2 tbsp salt
1 tsp pepper
1 tbsp olive oil
1 medium yellow onions, peeled and cut into wedges
4 cloves of garlic, peeled
1 28 oz. can of diced tomatoes
1 12 oz beer (use chicken stock or water here if you prefer, but we used a brown ale and it was perfect)

Preheat oven to 325 degrees

If the pork shoulder has any thick layers of fat you want to trim that off. Mix together the cumin, paprika, brown sugar, salt and pepper and rub it all over the pork shoulder. Let it rest with the spice mixture on for about 30 minutes.

Once the pork has rested, heat up a dutch oven with the olive oil over medium high heat. Place the pork inside and brown on all sides. Once it has a nice brown crust all over, remove from the pot and add the onions, garlic, tomatoes and beer. This is the part where you scrape up all the delicious bits off the bottom. Place the pork back in the dutch oven, cover and slow roast for 3 1/2 to 4 hours until the pork is extremely tender and pulls apart with a fork.

Remove the pork roast from the dutch oven to a cutting board. Using two forks, shred the meat and place on a platter. Remove any bits of fat. Serve the pork with mashed potatoes and steamed carrots and spoon the delicious sauce over the top. You can also puree the beer/tomato/onion mixture to get rid of any big chunks...it becomes a beautiful thick gravy that is just delicious. Enjoy every bite of this incredible roast.

*****

I had never cooked a pork shoulder before, so I was a little excited to try something new. This was super easy to put together, too. Mix rub, rub on meat, walk away and do something else. Heat oil, throw in roast, put away some dishes, turn roast in pot, put away some more dishes, turn roast in pot, put dirty dishes in dishwasher, turn roast in pot, finish loading dishwasher, finish roast steps. I'm all about multitasking.

This smelled AMAZING while it was cooking, I could not wait for dinner. And, folks, let me tell you, this did not disappoint. Oh man...it was so good! We all really loved it. It yielded quite a lot of meat, too, so we had pulled pork sandwiches with it later in the week. The meat was so tender from the slow roasting, it literally just fell apart once I started shredding it.

One of my local grocery stores had these on sale recently so I picked up another and can't wait to have this again, although the husband just got a smoker and wants to smoke it, which I would probably be okay with too. He can have part of it, and I'll slow roast the other.

Monday, November 28, 2011

Mary's Tortilla Soup


Last year when my dad passed away, my BFF Jen Clementine set up meal support for my family, which was a huge lifesaver. Honestly it's the only way my kids were going to get fed because I was not functioning at all. My friend Mary brought us this soup one night, and it was so good. My vegetarian brother was tempted to give up his non-meat eating ways to have some, he thought it looked and smelled so good. I was really excited to make it again, but given my family's soup aversion I never had. Plus it always seems weird to me to make soup in the summer in Phoenix. Who wants to eat soup when it's over 110 degrees outside?! But, after the Ham and Beans was decently received, I figured it was worth making. Our Wednesday and Thursday nights for the past month and half have been crazy busy with my bible study group meeting at our house on Wednesday nights and Boy #1 having soccer practice on Thursday nights, so I have been on the lookout for crockpot meals to make my life easier.

Mary's Tortilla Soup


Chicken Tortilla Soup

3-4 chicken breasts (frozen ok)
2 cans corn
2 cans chicken broth (14oz)
1 pkg taco seasoning
1 can stewed tomatoes
1 can cream of potato soup
1 can green chilies
1 cup cheddar cheese, grated
1 can tomato sauce (8oz)
16 oz sour cream (I use the light)
1 handful of cilantro

Put it all (except sour cream and cilantro) in the crock pot on low for 6 hours or high for 3 hours. Take out the chicken and shred it, then add back in. Add the tub of sour cream (you need to temper it so it doesn't curdle). Garnish with cheese, avocados and chips.

*****

I'm not sure if the husband had any of this last year when Mary brought it over since he wasn't that hip on soup, but he LOVED it this time. He requested this be the only tortilla soup I ever make again. Boy #1 thought it was okay, Boy #2 devoured it and asked for seconds. Woo hoo! It was really so easy to make, especially being able to just throw frozen chicken breasts in with everything else. I also added in a can of black beans because I had them on hand and thought they'd be a nice addition. I used regular tomato sauce, but I bet using El Pato sauce instead would be tasty as well. Hmmm...I'll have to try that next time.

I picked up some ciabatta rolls the same day we were having this, sliced them in half and put them under the broiler to brown them a bit, then spread with butter and sprinkled on some shredded cheddar cheese and put back under the broiler to melt the cheese. I figured Boy #1 wouldn't be that excited about the soup, so I wanted there to be something with the soup that he'd like. He thought the cheese rolls were the best thing ever. He kept saying, "Mom this cheese bread is just too good!" Ah, bless him.

This soup will probably be in high rotation in our house this winter. Thanks, Mary, for such a great recipe!

Oh, and the amazing cheese bread:

Fancy Baked Sweet Potatoes


I was reading through a recent issue of Martha Stewart Living (I told you I love Martha!) and saw these amazing looking sweet potatoes. There wasn't really a recipe, just a one page thing about how fantastic sweet potatoes are. The picture was gorgeous! I decided I must try them, and the opportunity presents itself shortly thereafter when I received a bunch of sweet potatoes from my produce co-op one week. I knew there was no way my kids would eat these, so I slated them for a date night dinner for the husband and me.

Fancy Baked Sweet Potatoes

Per serving:
1 baked sweet potato
1 cup roasted Brussels sprouts
2 Tbsp blue cheese
2 Tbsp dried cranberries
1/4 cup toasted pecans

Split baked potato lengthwise and top with Brussels sprouts, blue cheese, dried cranberries, and pecans. Serve.

*****

Doesn't get a whole lot easier than that. The sweet potatoes I had were pretty little, so I baked two for each of us. All other ingredients are estimated because I'm really not sure how much of each I used. These looked GORGEOUS--the orange potatoes, green Brussels sprouts, crimson cranberries, flecks of white and little bits of blue from the cheese. I was so excited to eat these...then I took a bite and was so disappointed. It was not at all what I expected and honestly I thought it was kind of gross. So did the husband. But we didn't really have anything else we could make for dinner at that point because it was late on a Friday. So we muscled through it, and surprisingly we discovered that the more bites we took, the more we liked it. The trick was to have a little of each component on each bite. We ended up both really liking it and cleaning our plates. I'm so glad it worked out because I was really apprehensive after that first bite and debated running out to get us a pizza. I'm glad we stuck with it and finished them off. It ended up being so tasty!

Fresh Apple Cake With Brown Sugar Glaze


I love my neighborhood. We've lived here a year and a half now, and I've never once regretted our decision to move here. There are so many young families, a ton of families from our church live near us, our neighbors are all super friendly. It's such a complete opposite of our last neighborhood where we couldn't leave toys out in our backyard or the kids across the street would climb over our wall and steal them. Seriously. Anyway, we recently had a neighborhood picnic put on by the HOA. They provided lunch and residents were asked to bring desserts. There were pony rides, a bounce house...it was super fun. Since I'd been going crazy with Pinterest.com (see, I'm not exaggerating when I say I'm obsessed with it...I'm probably a few pins away from an intervention) I figured I'd make one of the desserts I'd pinned. This one seemed especially tasty and I had all the ingredients for it.

Fresh Apple Cake With Brown Sugar Glaze
Source: Lick The Bowl Good blog via Pinterest.com

Apple Cake:
1 1/2 cups all purpose flour
1 cup sugar
1/2 teaspoon baking soda
1/2 teaspoon salt
1/2 teaspoon cinnamon
2 eggs
1/2 cup canola oil
1 teaspoon vanilla
1 1/2 cups finely chopped apples
1/2 cup pecans or walnuts, chopped (optional)

Brown Sugar Glaze:
1/2 cup packed light brown sugar
3 Tablespoons butter
1/2 teaspoon vanilla
1 Tablespoon heavy cream

For the cake: Heat the oven to 350 degrees F. Grease an 8-inch pan (round or square) and set aside.

In a medium bowl, combine the flour, sugar, baking soda, salt and cinnamon. Stir with a whisk to mix everything together.

In a large bowl, mix the eggs with a hand mixer til light in color and foamy. Add the oil and vanilla and beat well.

Stir in the flour mixture with a spoon and continue stirring the batter til the flour disappears. Add the apples and nuts (if using) and stir to mix them into the batter.

Scrape batter into prepared pan and bake for 40-45 minutes, or until a toothpick inserted in the center comes out clean.

Place the hot cake on a wire cake. While it's still hot, prepare the glaze.

For the glaze: Combine all the ingredients into a saucepan. Cook over medium heat, stirring often, until the mixture comes to a gentle boil. Cook for 3-5 minutes.

Spoon the hot glaze over the still hot-from-the-oven cake. Let the glazed cake cool completely before serving straight from the pan.

*****

I had to improvise a bit for the glaze because I didn't have cream, but I used some half and half instead. It probably wasn't quite the same, but it seemed to do the trick. I was a little disappointed when the boys and I went to pick out dessert that no one had cut into my cake yet. So I figured I'd be the first. I was really pleased with how it came out--dense and sweet and awesome, basically. This is a great fall cake. And I loved that the glaze went on the cake while they were both still hot. One of the things I hate about cake making is having to wait for it to cool before you can frost it, so this solved that problem.


Don't mind the other dessert remnants on the plate there.

Crockpot Cornbread Stuffing


I guess I should have worked a little harder to get this particular recipe posted before Thanksgiving in case anyone was short on oven space and needed a crockpot side dish. Oops. This is another recipe I found via my friend Heather. She shared a link from recipes inspired by the book and movie, "The Help." I've read the book (fantastic!) but haven't seen the movie. I love southern food and culture, so I was all over the link and went crazy pinning (as in, pinning to Pinterest.com) most of the recipes featured. Normally I prefer regular stuffing, like with normal bread, not cornbread. But I'm game for anything when it comes to stuffing/dressing, so I figured it was worth a try.

Crockpot Cornbread Stuffing
Source: MyRecipes.com


5 cups crumbled cornbread
1 (14-oz.) package herb stuffing
2 (10 3/4-oz.) cans cream of chicken soup
2 (14-oz.) cans chicken broth
1 large sweet onion, diced
1 cup diced celery
4 large eggs, lightly beaten
1 tablespoon rubbed sage
1/2 teaspoon pepper
2 tablespoons butter, cut up
Preparation

1. Combine first 9 ingredients in a large bowl.
2. Pour cornbread mixture into a lightly greased 6-qt. slow cooker. Dot with butter. Cover and cook on LOW 4 to 6 hours or until set and thoroughly cooked.

*****

I'll be honest, I was a little nervous this was just going to be a soggy, disgusting clump when I opened the crockpot to serve this up with our dinner. I'm happy to report that I was proved wrong and it was quite tasty! I love stuffing, so it was great to just let this cook all day and then serve it up with a pork roast for dinner. I made up two boxes of Jiffy cornbread and used a box of Stove Top for the bread components. I forgot to dot the top with butter, but I don't think it made a huge difference. This would also be tasty with some Craisins and toasted pecans mixed in at the end, maybe even some cooked, crumbled sausage. I'll definitely make this as a side dish again. But be warned--it makes A LOT!

Benah's Pumpkin Crumb Cake


I feel kind of like I'm cheating posting this because I've posted it before, but it was a long time ago (I was pregnant with Boy #2 who recently turned three) and there aren't any pictures on the post. This cake is amazing and definitely worth of being posted again with pictures, so here it is. I have yet to meet someone that doesn't like this cake. I was never a pumpkin fan, but this cake made me see the light. Hallelujah!! My dear friend Benah shared the recipe with me years ago, like before the thought of Boy #1 ever crossed my mind. I recently needed something to take a a birthday brunch for my MOMS Club and thought of this cake. then it turned out I needed something the next night for a snack for my bible study group, so I made it again. Yes, I made it two days in a row. It's that good. My kids were disappointed on the third day when I didn't make another one. Sorry, kiddos, we can't have cake every day. I know, I'm such a mean mom.

Benah's Pumpkin Crumb Cake

Crust:
1 pkg (18 oz) yellow cake mix (take out one cup for topping)
1 egg
1 stick butter, melted

Filling:
1 lb can pumpkin
3 eggs
½ c granulated sugar
¼ c brown sugar
1 ½ tsp cinnamon (or 1/2 tsp each of cinnamon, nutmeg, ginger)

Topping
1 cup cake mix
½ c granulated sugar
½ c chopped nuts (optional)
3 tbsp butter

Preheat oven to 350. Mix crust ingredients; pat into greased 9x13 pan.

Beat filling ingredients; pour over crust.

Combine topping and crumble over filling.

Bake for 45-55 min. Watch it be devoured.

*****

I love this cake. I have pumpkin in my pantry right now but alas no cake mix. It's probably for the best since I'm the only one home for most of the day, I'd just end up eating the whole pan of it. Not that I'd mind, but I probably would regret it tomorrow when none of my pants fit.

Ham and Beans


When I was growing up, my grandpa would love it when he'd have a ham bone because he could make ham and beans. Honestly I was never really a fan growing up because of my bean aversion, but now that I'm learning to embrace and love the bean I figured it was worth a shot, mostly because I came across a ham bone in my freezer that I needed to use and we were low on grocery money this particular week. Grocery prices lately are driving me nuts, by the way.

I asked my mom about my grandpa's recipe but she didn't know specifics, so I did some searching on Food.com. This sounded good and like what I remembered my grandpa making. Good enough for me!

Ham and Beans
Source: Adapted from Food.com

1 lb great northern bean
1/2 onion, chopped
2 stalks celery, chopped
8 garlic cloves
1 bay leaf
7 cups water
4 teaspoons chicken bouillon
1 ham bone

Rinse and sort thru beans (has anyone ever really found a rock in these?). Cover with water and let sit overnight.

In the morning, drain water, rinse again and place beans in the crockpot. Dump in all of the other ingredients (except ham bone) and give it a few good stirs.

Put the ham bone in the crockpot, cover and cook on high for 6-8 hours.

Remove the bay leaf, ham bone and fish out any bones that may have fallen off during cooking. Stir the beans a few times. Remove 1 cup of the beans and place in a bowl, mash them with a potato masher or back of a spoon, then return to the beans and stir; this helps thicken it up a bit.

Take off any meat left on the ham bone, chop and return it to the crockpot.

Stir again and serve!

Nutritional info:
Calories 106.2
Calories from Fat 3
Total Fat 0.4 g
Saturated Fat 0.1 g
Cholesterol 0.0 mg
Sodium 51.8 mg
Total Carbohydrate 19.9 g
Dietary Fiber 6.0 g
Sugars 1.5 g
Protein 6.7 g

*****

I really didn't know how my family would react to this as none of them are big soup fans. Turns out the husband and Boy #2 love soup! Boy #1 not so much, but as Meatloaf says, "Two out of three ain't bad." this will be my go-to recipe when I have a ham bone that needs to be used up. Not that it happens very often, but now at least I can hold on to them and use them instead of passing them on to my mom. Sorry, Mama!

Pesto Chicken Stuffed Shells


My love for Pinterest.com has not waned while I've been slacking on updating my blog. Food, crafts, decorating ideas, projects for my kids...what's not to love about it?! Although probably I could have gotten a few blog posts done in the time I spend on it, but I'll try to not think about it. In fact I'm trying really hard to resist the urge to go look at it now. I try not to think about all I could get done around my house if I didn't have a computer the internet.

Anyway, I love stuffed shells, but I don't make them very often because they're messy. And I generally try to only use whole wheat pasta, and either they don't make whole wheat pasta shells or I just can't find them in my limited selection of grocery stores. But these sounded so tasty and I had some pesto I needed to use up, so I figured it was worth having regular pasta shells.

Pesto Chicken Stuffed Shells
Source: What’s Cookin’ Chicago, via Pinterest

12-16 jumbo pasta shells
water for boiling pasta
4oz cream cheese, softened
1 cup freshly grated Parmesan or Asiago cheese + 1/4 cup for topping
3 tablespoons prepared pesto (homemade or store bought)
2 cups shredded cooked chicken
2 cloves garlic, minced
salt and pepper to taste

In a large pot over high heat, boil water and prepare pasta shells as directed on package. Cook pasta shells only until al dente. The pasta will finish cooking when the dish is baked. Drain the pasta shells and set aside.

In a large bowl, combine the rest of the ingredients, except the 1/4 cup of cheese for the topping. Fill the pasta shells with the filling and place in a baking dish. Sprinkle the remaining 1/4 cup of cheese over filled shells.

Preheat oven to 350 degrees and bake shells uncovered for 30 minutes or until shells are bubbling hot and cheese melts.

To make ahead/freezer meals - Prepare as directed but place filled shells in an oven- and freezer-proof baking dish. Top with remaining 1/4 cup of cheese over filled shells, cover and freeze. When ready to prepare, defrost. Preheat oven to 350 degrees and bake shells uncovered for 35-40 minutes or until shells are bubbling hot and cheese melts.

*****

My only complaint was that there could have been more cheese. You know how we love cheese at my house. This would be a great use for leftover chicken. I loved the creamy, pesto filling of the shells. I loved this take on stuffed shells, instead of my usual recipe I use that has the shells stuffed with cheese and then topped with a red sauce. My whole family really liked these, so it's definitely something I'll make again...especially if I can find whole wheat shells somewhere!